Tuesday, May 31, 2011

Brownie Waffles

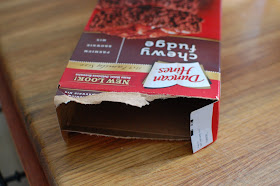
A few weeks ago, I was watching Rachael Ray and she mentioned something about making brownies on a waffle iron. My first thought was that they wouldn't cook all the way through...but I figured I would give it a try anyway. My helper was just a little excited about the idea of Brownie Waffles...can you tell?!?
I got a little more help cracking the eggs.
Then we gave the batter a stir. I added a little bit more water than the recipe called for so that it would spread on the waffle iron better.
Fill up the waffle iron and spread the batter around.....
....just don't forget to spray your waffle iron with cooking spray or you will end up with a crumbly mess of brownies!
These would be so fun served up with some whipped cream or a big scoop of vanilla ice cream:)
Can you tell I'm on a waffle kick lately?!? I actually have a few more ideas in my head {and pantry} so be on the look out for some fun waffle ideas in the next few weeks!

Friday, May 27, 2011

How to have Decent Furniture with a House Full of Boys

This is our breakfast table. From a distance it looks pretty good.
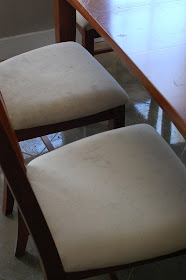
 But the closer you get, the easier it is to tell that a house full of boys use this table and it's {unfortunately} cream colored chairs on a daily basis.
 Now don't get me wrong, these chair started out a beautiful cream color and they stayed that way for a few years in my {rarely used except for crafting} dining room. When we finally outgrew our 4 seater table, the logical thing to do was to move this bigger table into the breakfast nook for everyday use....the only problem was those beautiful cream colored chairs. We tried being careful, we tried cleaners, we tried scrubbing...nothing was going to keep those chairs clean! The only solution was to recover....using something a little more durable than cream colored fabric!

I considered using a vinyl type fabric so that spills would clean up easy, but who wants to eat dinner on a chair that squeaks like Marie Barone's couch:) That is where this bolt of fabric comes in. I picked it up at Hancock Fabric on clearance for $6 a yard...and it is outdoor material! I figured outdoor material would repel stains and clean up easier than normal fabric, plus it was so cheap that I got a few extra yards so I can recover them again if we have any major oops!
To recover your chairs, simply remove the seat from your chair. Cut out a piece of fabric big enough to cover the front of the seat and wrap around the sides.
Use a staple gun to attach the fabric to the underside of the seat and then cut away any extra fabric.
Covering up those stained cream cushions made our chairs seem like they were brand new...now we are just waiting for our first spill to test out our newly recovered chairs!


And just for fun here is a before and after....though I almost considered labelling them the opposite because the first one is "after kids have been here" and the second one is "before kids have been here":)

So how can you have decent furniture with a house full of boys....cover up their stains and have an extra stash of fabric just in case they when they inevitable make more!
Weekend Bloggy Reading

Thursday, May 26, 2011

Watermelon Waffles

With summer here, I am already scrambling around for fun ideas to keep my boys busy and to avoid hearing the dreaded "We're bored!" from them! So for lunch yesterday, I got out my trusty waffle iron and made a fun summer treat: Watermelon Waffles:) These are SUPER easy to make {even easier then Rainbow Waffles} plus they are extra sweet because of the added watermelon seeds {chocolate chips}!
Start by mixing up some waffle batter using your favorite recipe or box mix. Let your little helpers get in on the action by stirring:)
Pour about 1/3 of the batter into another bowl and add some green food coloring. Add red or pink food coloring to the remaining 2/3 of the batter. You could also make these even more fun by adding in some watermelon flavoring {by adding some dried jello powder or some kool-aid mix}.
Star by pour the red colored batter in the middle, then go around the outside edge with the green batter. Spread the red around if you need to get the colors to meet, then sprinkle some chocolate chips {aka watermelon seeds} onto the red batter.
Once the waffles are done, cut them in half and you have a fun slice of watermelon waffle...just don't sprinkle salt on it:)
These would be adorable served up as dessert at a picnic and because they can be loaded up with chocolate chips, there really isn't any need for syrup!

What kind of fun treats are you making for your kiddos this summer?
Visit thecsiproject.com

Wednesday, May 25, 2011

Wordless Wednesday: Two Wheeler


*Ok so technically there are four wheels if you count the training wheels, but Mr. Big Stuff here has officially graduated from his cute little green tricycle.*

Tuesday, May 24, 2011

Rustic Frame Makeover

Summer is officially here. We've had an interesting few days to say the least!
*all three boys went to my parents' for a visit*
*a business trip cancelled after we were already headed out of town*
*shopping instead of tripping*
*first movie of the summer*
*last tennis lesson until fall*
*running 2 miles*
Needless to say I am more than tired which I'm using as an excuse to avoid my blog for a few days:) Instead of posting something new for you today, I am reposting a guest post that I did last week for Yanet over at 3 Sunkissed Boys.
**********************
Today I am sharing a simple spray paint project that is part of my bigger Master Bedroom Redo.
I started with these really cute frames that I bought a few years ago. I loved them because the colors were perfect for our room and they had that rustic yet tropical feel that I was going for at the time.
Since I decided to add red into the decor, the two tones of blue just weren't working in the room anymore. The easiest solution for that problem is a little bit of red spray paint, some newspaper, and some painters tape.
I used the painters tape to mask off just the darker color blue and then I used the newspaper to protect the rest of the frame that I didn't want the red spray paint to get on.
After the paint dried overnight, I used a piece of sandpaper to rough up the red a little bit just to make it match the rustic-ness of the rest of the frame.
I added in some new black and white pictures, and now my frames are ready to go into my {still in progress} master bedroom.

Friday, May 20, 2011

Thanks, Smiles, & Fabric

Today is the last day of school. Somehow this school year has flown by....and it has been a great one! We were blessed with amazing teachers for both Henry and Grant this year, and I just couldn't finish out the year without showing them our appreciation one more time.
I sent these really cute canvas bags for each of their teachers filled with a few happies and a gift card to Target:) The bags are monogrammed with an iron on initial that I cut out with my Cricut. Then I added a little tie to the handle for a little extra flair!
 Yesterday Eli and I went to eat lunch with our Kindergartner and 1st grader for the last time this year. It was kind of sad, but the boys are already saying they will be a 1st grader and a 2nd grader after today:) I think Eli is most excited because he will finally have someone to play with during the day!
 I've been working hard to finish up a few projects around the house before summer break starts. This bolt of fabric has been measured and cut and my re-upholstery project is about halfway finished...now I have less than 2 hours to get done before the madness begins:) Hopefully I can share the finished product with you one day next week...that is if we aren't already spending our days at the pool by then!
We have a birthday party on Saturday and a little trip planned for Sunday, but inbetween I hope to work on some new summer door decorations! Have a great one....and spend a little time working on a fun craft this weekend:)

Thursday, May 19, 2011

Sidewalk Chalk Paint!

This SUPER fun project {Sidewalk Chalk Paint}was orginally posted over at Postively Splendid as part of Amy's Summer Survival Guide. I am reposting just in case you missed it, but please go over and check out all the other awesome summer ideas that have been {and will be} posted throughout the month of May!
Positively Splendid


We love regular chalk at our house. It's relatively cheap, not too messy, and it is the perfect outdoor activity! Basically the kids love chalk because it's fun and I love chalk because they are making a mess outside and not inside:) What I don't love about chalk are all the little broken pieces that pile up after a few weeks of use. I hate to throw them away, but they are just too small to use without scraping your fingers on the concrete!
Instead of throwing them out, we are going to turn those broken piece of chalk into paint! Start by sorting your chalk by color. This is a great teaching activity for any kiddo who is working on learning their colors.
Put each individual color into a zippered bag.
Seal up the bag and then break up the chalk using a small hammer. This should be done by an adult or a {very} well supervised child. Try and break the chalk into a fine powder to make you paint as smooth as possible.
One you have your powdered chalk, pour each color into small plastic cups.
Add a little water.
And stir around with a paint brush to dissolve the chalk powder. We used some inexpensive art brushes that are now our chalk paint brushes:) All of the chalk powder may not dissolve, but your paint should still work fine. Use a different brush for each color and then let the kiddos get busy making art on your sidewalk. The colors may be hard to see at first, but as soon as they start to dry the individual colors will show up well!

The best part about chalk paint is that if someones spills it, it isn't a big deal because all you need is a water hose to clean up the mess!
And that is how you turn broken chalk pieces into a ton of summer fun!
Visit thecsiproject.com

Wednesday, May 18, 2011

Wordless Wednesday: A Swinging Good Time


*Can you tell I was making them smile for the camera:)?*