Home AboutMe Crafts Food

Wednesday, November 30, 2011

Guest Posting at Serenity Now

Today I am SUPER excited to be over at Amanda's place {Serenity Now} sharing my tutorial for a Metal Tin Advent Calendar! This is the first day of Amanda's great new holiday series called A Season of Serenity (Now) at Home....and perfect timing for me to be sharing an Advent Calendar since tomorrow is December 1st! Click over, check out my tutorial, and leave some comment love please. And don't forget to check back with Amanda over the next few weeks to see some great giveaways and awesome guest posts as part of A Season of Serenity (Now) at Home!
Pin It!

Tuesday, November 29, 2011

Mini Muffins Make Me Smile

And hopefully they will make you and the person you share these with smile too...because this SUPER cute decorated egg carton is filled with Pumpkin Chocolate Chip Muffins!
 I pinned this cute egg carton idea from fiskar.com a few months ago. I was waiting for just the right time to make them, and staff appreciation at church turned out to be perfect time for me to whip up some mini muffins and try them out!
To make these, simply cut scrapbook paper to cover the top and front of your egg carton. The inspiration one only covered the top and left the egg carton writing visible on the front...but I wanted to cover most of the writing up for a cleaner look. The inspiration one also added some cute scrapbook paper and little note inside, but I figured the muffins were a good enough surprise inside without the little note:) I used spray adhesive to attach the paper, but a glue stick would work fine too.
Honestly, I was a little skeptical about the mini muffins fitting into the egg carton when I first got started, but as soon as they were cool I started sitting them in the egg carton and they fit perfectly!
Fill up your egg carton with yummy mini muffins, tie them up with some pretty ribbon or raffia, add a little note, and you have a perfectly cute and edible gift to show your thanks to someone!

Here's the recipe for the Pumpkin Chocolate Chip Muffins {from allrecipes.com} just in case any is interested:


Ingredients
  • 3/4 cup white sugar
  • 1/4 cup vegetable oil
  • 2 eggs
  • 3/4 cup canned pumpkin
  • 1/4 cup water
  • 1 1/2 cups all-purpose flour
  • 3/4 teaspoon baking powder
  • 1/2 teaspoon baking soda
  • 1/4 teaspoon ground cloves
  • 1/2 teaspoon ground cinnamon
  • 1/4 teaspoon salt
  • 1/4 teaspoon ground nutmeg
  • 1/2 cup semisweet chocolate chips

Directions

  1. Preheat the oven to 400 degrees F (200 degrees C). Grease and flour muffin pan or use paper liners.
  2. Mix sugar, oil, eggs. Add pumpkin and water. In separate bowl mix together the baking flour, baking soda, baking powder, spices and salt.. Add wet mixture and stir in chocolate chips.
  3. Fill muffin cups 2/3 full with batter. Bake in preheated oven for 20 to 25 minutes.
Pin It!

Monday, November 28, 2011

Miscellany Monday

I have a ton of pictures in my November folder that I haven't shared, so I decided to join in with Carissa this week to share them....even though they probably aren't really blog-worthy!
Miscellany Monday @
lowercase letters
A.
Maybe it's kind of mean, but I think this picture of Eli is kind of hilarious! He was playing under our breakfast room table and somehow got himself stuck under one of the chairs. It's hard to tell from this picture, but his tiny little hiney is stuck under the cross bar of the chair:)

B.
I tried to get crafty earlier this month with the leaves that Eli and I gathered on our walk. It was a major craft fail! I didn't lay the leaves flat to dry out so they were kind of wrinkly and wouldn't stick to the candle well....even though I sprayed them with a generous coat of spray adhesive. My Mod Podge was almost empty and I had to scrap the bottom of the jar, and I really didn't get a full coat on them. They are currently sitting in my china cabinet and I have a feeling they are probably going in the trash can soon!
C.
I only took two pictures of the boys at their Thanksgiving lunch and they are pretty bad.
           Henry the Indian                      &                   Grant the Pilgrim

D. 
We had an end of the season football party for Grant's pee wee team a few Saturdays ago. I made some fun football jersey sugar cookies for the boys with their jerseys numbers on them. They were gobbled up before I could get a decent picture of them, here's a shot of Grant holding his...with a bite or two taken out of the bottom.
E.
I was craving a banana split last week when Jason was working late and I was home alone with three sleeping kiddos, but we didn't have any ice cream or chocolate syrup. So I made the next best thing: a Faux Banana Split with Nutella Drizzle:) I cut up a banana, added a big scoop of Lite Cool Whip, tossed on some peanuts, and drizzled a little bit of warmed Nutella over the top...YUM!
What kind of randomness have you been up to lately?
Pin It!

Thursday, November 24, 2011

Happy Thanksgiving...

...from my three little turkeys:)
I hope you all had a {family} {food} & {fun} FILLED day!
I ate so much at lunch that I am skipping dinner, and I think I may not be hunger for breakfast in the morning either....unless I burn off all of my lunch shopping till I drop tonight with all the other crazy Black Friday {even thought it technically starts on Thursday now} shoppers!
HAPPY THANKSGIVING
Pin It!

Tuesday, November 22, 2011

Scrapbooking Made Easy! My Memories Suite Giveaway!

This giveaway is closed. Congrats to Kim at Today is My Someday!
I've shared a ton of different crafts on my blog over the last few years....mostly because I love being crafty. One craft that you've never seen on my blog though is scrapbooking. I've done a few paper crafts here and there, but the only scrapbooking I've ever done was for my kiddos' teacher {and they didn't turn out all that great}. I'm not sure why I never fell in love with scrapbooking. Part of me thinks it's because I don't have the patience for the precise cuts and small embellishments that are needed to make a scrapbook page really great. My days of  avoiding scrapbooking were over the day I downloaded My Memories Suite!
My Memories is the number one selling digital scrapbook software on Amazon, and from just a few minutes of opening the program I could totally tell why. It is so easy to use, plus there are no sticky glue fingers, unevenly cut paper, or small embellishments rolling all over your floor! Everything is digital...just click, drag, and drop! Besides making SUPER cute scrapbook pages, you can also make a ton of other things too. I am seeing birthday invitations, Christmas cards, and even photo book pages made with this awesome software!

Here is a screenshot of the software just so you can see all amazing features it has...and so you can see the really cute scrapbook page that I made of Eli! One of my favorite features of My Memories Suite is that your fonts aren't limited like some of those other online companies. You can use any font that you have downloaded on your computer! See the SUPER cute font I used with my page....by the way, it's called Elise and it's from kevinandamanda.com:)

The generous people at My Memories Suite have agree to let me give away the My Memories Suite software to one of my lucky readers! Just in time for holiday too!

To enter: 
Mandatory Entry: Visit the My Memories website and choose your favorite digital paper pack or layout.

Check out the My Memories blog. Leave a comment and/ or follow them. 

Like My Memories on Facebook.  

Follow My Memories on Twitter @MyMemoriesSuite

Be a public follower of Random Thoughts of a SUPERMOM on GFC.

Follow me on Twitter @SUPERMOM_Kellli
Tweet this giveaway with a link to this post and include @SUPERMOM_Kelli and @MyMemoriesSuite in the tweet. Can be done daily.
Sample tweet: Check out this SUPER scrapbooking software giveaway from @MyMemoriesSuite and @SUPERMOM_Kelli http://tinyurl.com/7weh9sl #giveaway

Make sure to leave a separate comment for each entry and include your email address if it's not visible in your profile. This giveaway will end Wednesday, November 30th at 12:00 noon CST. I will use random.org to select a winner and the winner will be notified by email. 
I was not paid for this review/giveaway. I did received a free download of My Memories Suite to facilitate me in this giveaway.
Pin It!

Friday, November 18, 2011

Gobble, Gobble: Turkey Waffles

Yesterday I admitted my obsession with crafty kids shirts, so now it's time for me to admit that I am just a little bit obsessed with fun waffles too! The first waffle I made was a rainbow waffle to celebrate St. Patty's Day. It's fun to have a colorful breakfast to help celebrate a holiday...but once I started I couldn't stop. I've shared some just because waffles {cupcake waffles} and a whole lot of holiday ones too {candy corn and jack o lantern}.

I have been brainstorming Thanksgiving ideas for a while now. It's amazing how hard it is to come up with a good waffle idea for a holiday based around food:) I tried to make Cornucopia Waffles with an abundance of M&M's, but all that did was make a huge mess of the waffle iron. So I decided to give Turkey Waffles a try instead. Now I know the name makes them sound kind of gross because seriously who wants savory turkey hiding in their waffles! Don't let the name scare you off...there is not a trace of real turkey in these fun and colorful Thanksgiving waffles:)
I started with the usual suspects...and my usual helper:) 
**waffle mix, food coloring, and Eli**
 Mix up your waffles according to the directions. You will need four waffles total to make two turkeys. By the way, these are sharing waffles...two people per turkey:)
*Start by making one plain waffle.*
*While that waffle is cooking divide your remaining batter into three bowls.*
*Add green, yellow, and orange food coloring each into one of the bowls and stir to combine.* 
*Cook the three colored waffles and then get ready to assemble.*

Start by cutting the plain waffle in half and the colored waffles into quarters.
Lay out the colored waffles in a turkey tail pattern starting with the outside ones{green here} and working your way in. Lay the half plain waffle on top of the turkey tail and adjust as needed. Use one of the leftover yellow quarter waffles to make a beak for your waffle. I simply cut off the pointed edge and added it on top of the plain waffle. 
What kind of fun foods are you making to celebrate Thanksgiving this year?
Pin It!

Thursday, November 17, 2011

Pilgrim and Indian Initial Tees

I have shared countless times about my slight obsession love of crafty kids' holiday shirts. I'm actually starting to think that maybe I should start a support group, but I might be the only crazy member! Anyway, with Thanksgiving only a week away, I decided to take advantage of our little sick day yesterday and get some sewing done on the boys' shirts for this year. I knew I wanted to attempt a cute turkey face shirt for Eli {I'll share his shirt later after I figure out how to add the eyes without making the turkey look crazy}, but I wasn't quite sure about what to do for Henry and Grant. I stumbled across a Pilgrim initial tee on Etsy earlier this week and as soon as I saw it I knew my boys were getting Pilgrim and Indian shirts this year:)
I won't bore you with all the details{and a million pictures} of how I made these shirts...you can go back and check out one of my other step by step tutorials if you like. But just so this isn't a single picture with a ton of rambling, I will share a quick rundown of how I made these.

**Print out each kiddos initial {mirrored} and attach it to orange and white gingham.**
**Cut out the letters and attach them to some orange felt.**
**Sew the letters to the felt with a zig-zag stitch and then cut around each letter leaving an orange border.**
**Use spray adhesive to hold the letter to the shirt, then stitch around the letter to attach it.**
**Make the pilgrim hat and indian headband out of scraps of felt. **
**Use spray adhesive to hold them in place and then sew them onto the shirts.** 

Really the hardest parts of this project are deciding which font to use for the letters and getting the proportions of the hat right so that it looks like a Pilgrim's hat and not a crazy top hat:) For those of you that don't sew, you could also make this no sew with some ultra hold iron on adhesive! Except for the new white long sleeve shirts, I used all materials that were in my craft stash making these shirts cost around $5 each. Not too bad for two SUPER cute Thanksgiving shirts!
Weekend Bloggy Reading
Pin It!

Monday, November 14, 2011

Using Actions for Photoshop Elements to Edit Your Photos

I've had a DSLR camera for a few years now, and having a nicer camera {even though mine is the the bottom of the line Nikon D40} really has improved my photos. Besides the fact that the quality of the photo is better, having a DSLR makes me think out the composition and lighting of my photos a lot more than when I simply used a point and shoot digital camera. But having a good camera is only the first step in taking great photos...you also have to know how to edit pictures to get the most out of each shot!

There are more than a few editing programs out there, some are outrageously expensive and some {like the one I have} are more affordable. I use Photoshop Elements for all my editing. I bought it when we got our new laptop a few years ago, and I think it cost somewhere between $80 and $100. The only problem with photo editing programs is you really need to know how to use a them to get the most out of them...and it can be quite complicated to figure out!

My biggest help in using PSE to edit my photos was when I discovered Actions! And even better I found some really awesome FREE Actions! I've downloaded free Actions from two websites {and I'm sure there are lots more out there too} : The CoffeeShop Blog and The Pioneer Woman. Having these actions has really helped me improve my pictures! I love all the different options that both of these websites provide, and I love the different feel you can get just by clicking a few buttons!

Just to show you what Actions can do for your photos, here are a few straight out the camera shots along with some shot that I edited with the free PSE Actions that I downloaded. I am not an expert with these by any means, and I honestly can't remember the names of the Actions that I used for each picture. I usually just click an Action and see how I like it with the photo. If I don't like it, I just click undo and start over. These next three photos were all edited with The Pioneer Woman Actions, but you can see some photos that I edited with The CoffeeShop Blog Actions HERE.

                             SOOC                                                                              Edited with PSE Actions


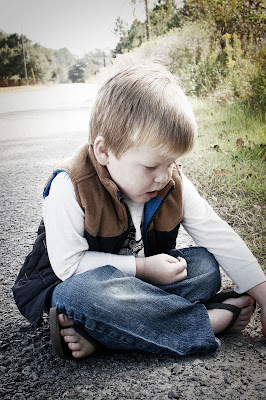
{{Can you tell I like taking pictures in this spot!}}
I'm sure there are a few professional photographers cringing at my overeditednotverygood photos, but I think they look pretty great for a self taught phtotographer with SUPER squirmy kids! IF you are looking for a way to edit your photos without blowing the bank {or blowing your mind}, check out PSE. The abundance of free downloadable Actions totally make Photoshop Elements worth the initial cost.

{FYI I wasn't paid to share any of this with you even thought I know it sounds kind of like a sales pitch:) I really have been having a ton of fun editing my picture {including the photos that I used with my Thankful Photo Decor} with these free Actions lately and I thought you might want to know about them too!}

Pin It!

Friday, November 11, 2011

Friday Flashback: Craft Edition

**This is a re-post from last year. I have been looking for some great Thanksgiving shirt inspiration for this year, so I figured I would share one of my Thanksgiving shirts for last year in case anyone wants to attempt it for their kiddo!**

I have seen a ton of cute turkey shirts for Thanksgiving floating around the internet lately. I had intentions of making my boys a cute turkey shirt, but was really wishing I could make something a little different and a little more fun instead.

The Shirt of Plenty is what I ended up with after a TON of inspiration {and a template} from Family Fun magazine.
This is the original craft shared in the November issue of Family Fun...SUPER cute Thanksgiving themed felt food. I simply decided to turn my felt food into a shirt instead of making a toy:)
The first step in making this SUPER cute shirt is to print the templates and cut them out. Sometimes the template calls for two of each shape, but you usually only need one.
Use spray adhesive and stick the cut out shapes to different colors of felt. You can mix and match however you want, or follow the suggestions on the templates.
Then add iron-on adhesive to the backside of the felt following the directions on the package.
Cut out the shapes following the template, then remove the paper and the iron-on adhesive backing.
Lay out your design on the shirt and decide where you want each piece to be. Iron the pieces onto the shirt following the directions on your package of iron on adhesive.
The finally step to making The Shirt of Plenty is the most tedious and time consuming....but it also makes a big difference in the appearance of the shirt. Using coordinating colors of embroidery thread, go around the edges of each piece of felt with a running stitch. Make sure to tie off each end of the embroidery thread well, so that the felt pieces stay securely attached.
And that is how you make a SUPER cute Thanksgiving shirt!
Now if I can only find the time {and energy} to make two more:)
Pin It!

Thursday, November 10, 2011

Organizing the Laundry

I know I'm not the only mom who despises laundry. I think between the monotony of folding and the fact that it's a never ending cycle of clean & dirty, most moms would love to have someone else take care of the laundry for their family! But like me, just because you hate to do it doesn't mean you can get way with not doing it! Sure if you're J. Lo or someotheroverpaidfamouspersonwhoneverhastodotheirownlaundry the laundry probably seems like a joy...drop it off and it comes back clean and folded and you didn't have to do any of the work! But in my house laundry is work, and the best way to make work easier is to be organized.

We've had the dirty clothes part organized for a while thanks to this lovely creation that I bought at Walmart a few years ago.
 My organizational issues with laundry start after the clean clothes come out of the dryer. We have spent the last few years with just two laundry baskets. You can do the math and probably figure out that two laundry baskets for five people just doesn't work very well. And most of the time the clean clothes end up piled on the couch {and the chair} kind of like this...except this is a much smaller pile than normal:)
 So I decided it was time to get my clean clothes organized by simply buying a few new laundry baskets. My original intentions were to find some fun colored baskets {ideally in blue, green, and orange to continue our tradition of color coding}, but Walmart and Target didn't seem to get the memo and only had either black or white baskets. I decided on black mostly because they seemed a little more sturdy, but also because they seemed a little more formal too...you know just in case I wanted to leave them sitting around full of laundry when we have guests over!
 Now I had three identical black baskets, and I knew that would be an issue. It is is a lot harder for my kiddos to find their clean {wrinkled} clothes if they don't know which basket is theirs. My simple solution was to cut a few pieces of ribbon {blue, green, and orange} and tie them to the handles of the laundry baskets. Now everyone knows which basket is theirs without digging through a basket for 10 minutes while looking for clean underwear!
Do you have any simple solutions for making the dreaded task of laundry easier? Please share them with me....I need all the help I can get when it comes to the laundry!
Weekend Bloggy Reading
Pin It!
Related Posts Plugin for WordPress, Blogger...