Home AboutMe Crafts Food
Showing posts with label Crafts. Show all posts

Thursday, February 17, 2011

How to Recover a Lampshade

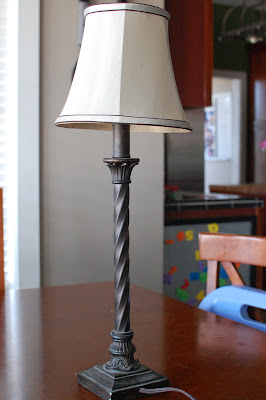
I had this lamp.
It wasn't terrible, but it wasn't really great either.
It's just the right size for the table in my foyer, but the shade was a really weird green color that looked even worse once I painted the table it sits on red!
 Instead of just buying a new one, I decided to salvage the lamp by recovering the lampshade...a quick, easy no sew project. Start by tracing a pattern of your lampshade on some paper. Do this by rolling the lampshade while using a pencil to follow along the top and bottom edges of the lampshade. Then use a ruler to connect the two lines at both ends.
 Cut out your pattern and test fit it on your shade.
 Make any adjustments in size, then pin your pattern to your fabric and cut.
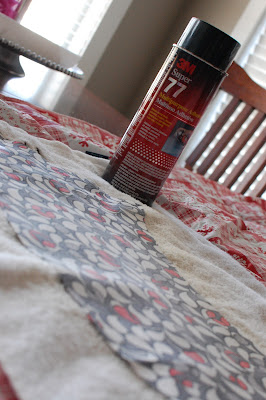
 Apply heavy duty spray adhesive to the wrong side of the fabric. Then carefully wrap the fabric onto your lampshade.
 The piping on my original shade matched the new fabric, so there was no need to do anything to the edges of the lampshade. If you want to cover the edges, make the fabric a little larger and fold over the edges. You can also hot glue on some matching ribbon to cover the rough edges of the fabric.
Now my lamp is much more fun and it matches my new red table perfectly!
Pin It!

Friday, February 11, 2011

Valentine Kissing Ball

This craft was on my original "Valentine To Do List" that I made back in January. It is such an easy craft that someone who thinks they have zero craftiness can do this with no problems! The fun part about this craft is that there are no special tools {not even a hot glue gun} required!
 Supplies:
Styrofoam ball
ribbon
tissue paper
paper clips
Start by adding a hanger to the top of the Styrofoam ball with a piece of ribbon and a paper clip.
 Cut your tissue paper into strips {mine were approximately 4 inches long by 1 inch wide} and then crumple the tissue paper up a little.
 Feed about three pieces of the crumpled tissue paper halfway through a paper clip and then fold the ends up...you will probably have to fluff the tissue paper a little after squeezing it through the paper clip:)
 Stick the paper clip into the Styrofoam ball until the tissue paper is flush with the outside of the ball.
 Continue filling in with your tissue paper. Put them close together for a fuller kissing ball and further apart for a not so fluffy look.
 Hang on a door knob to add a little Valentine fun to your house.
These are even more fun hung up high so you can actually use them as Kissing Balls, but everyone in our house has had the crud so I figured a door knob was a safer bet:)

**Tip Junkie has a whole post on different kinds of Kissing Balls...go check them out here!**
Pin It!

Thursday, February 3, 2011

Buckets of Love

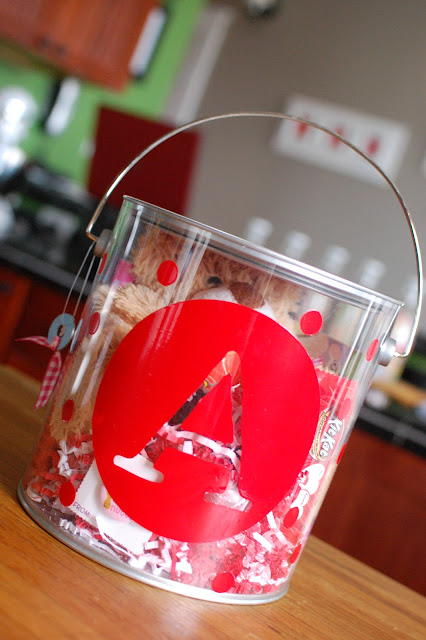
I mentioned a few weeks back that both Henry and Grant are escorting little girls in their elementary school pageant. Well apparently getting fun gifts at the pageant is half the fun...so I set out to find something fun for my two boys and their girls:) I've seen these cute clear paint buckets before in gift shops {and in our local gift shop that is sending gifts to the pageant}....but being the crafter that I am, I always think "I can make that for so much less than they are charging!"
So my quest for craftiness began {and ended} at Micheal's were I found these large buckets for $4.99 each. They also had a cute smaller size for around $3.
 I used my Cricut to cut a few initials and some small dots out of vinyl. {You could totally do this with scrapbook stickers if you don't have a cutting machine.} Then I filled the buckets with pretty shredded paper and some goodies: a teddy bear, an activity book, decorative pins, and just little bit of chocolate:)
 I decorated the top of the lid and tied a small ribbon on the washer attached to the handle. It took me a while to figure out that you use the washer to pop off the top of the bucket:)
 Here's another one using white vinyl. I think it kind of looks like a white M&M!
 And here is the boys' version...less colorful and no polka dots:) I think my boys will approve, especially since there will be a DS game tucked inside their buckets!
These would be SUPER cute for Valentine's Day full of fun heart shaped candy and toys with a pretty red or pink bow tied to the handle!
Visit thecsiproject.com
Pin It!

Friday, January 28, 2011

Valentine Dish Towels and a Giveaway!

This giveaway is now closed! Congrats to Kelly!
I spent most of the morning yesterday avoiding laundry working on these SUPER cute Valentine Dish Towels!
 I love having an excuse to make something pink and girly and ruffley! Plus this was the perfect first project for me to finally put my ruffler to work:)
 One of the best things about these dish towels is how easy they are to make....and it doesn't hurt that they are pretty inexpensive too. I picked up a couple different kinds of white dish towel/sack clothes at Walmart and Target a few weeks ago, and I found some really cute pink/red/Valentine fabrics and ribbons at Hobby Lobby. A few ruffles, a few snips with my pinking shears, a few straight stitches and I had some SUPER cute Valentine dish towels:)
 But the very best thing about these SUPER cute Valentine dish towels is that I am giving TWO of them to one of you!


To enter:
Mandatory entry: Leave a comment telling me what kind of Valentine's Day decorations you have or plan to have at your house this year.

For another entry, follow my blog and leave me a comment telling me that you do.

For another entry, follow me on twitter, and leave a comment telling me that you do.

For another entry, tweet about this giveaway and include @SUPERMOM_Kelli and a link  http://tinyurl.com/4vrhmrg to this giveaway in the tweet.

For FIVE extra entries, subscribe to my blog via feedburner...click on the icon in the right sidebar by the facebook and twitter icons. Make sure to leave 5 separate comments.

Make sure to leave a comment for each thing that you do. This giveaway will end next Friday, February 4th at 10:00 pm. I will use random.org to pick a winner! Good Luck and thanks for entering!

Join  us Saturdays at tatertotsandjello.com for the weekend wrap 
 up           party!
Pin It!

Tuesday, January 25, 2011

A Ruffle is a Ruffle is a Ruffle

This crazy contraption attached to my sewing machine is called a ruffler.
 Just in case you weren't sure from the name, it makes ruffles...and it does it's job really well I might add! After multiple failed attempts at making ruffles following some online tutorials, I asked for this little beauty crazy looking contraption for Christmas. It has taken me almost a whole month to figure it out, but I finally got a few SUPER cute ruffles made.
 As the {really loud} ruffler was working, my head was swirling with all the possibilities. The first project on my list was some pretty Valentine dish towels, then I thought I might move on to a ruffled camera strap or one of the cute ruffled clutches that I have seen on other blogs. But thanks to my ruffler and this broken needle:
...all those ideas will have to stay in my head until I find my replacement needles!
I think my sewing machine hates me!
Pin It!

Friday, January 21, 2011

Sweet and Simple Valentine

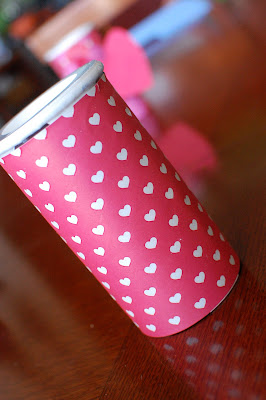
I'm pretty sure the cashier at Walmart thought I was a little crazy when I loaded more than 50 Tootsie Roll banks onto the conveyor belt the day after Christmas. The thing is, I knew from the moment that I saw these 50% off beauties that they would make awesome Valentine's Day treats for my boys to take to school:)
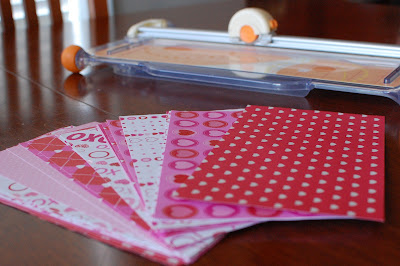
 All I needed to add was some really cute Valentine themed scrapbook paper from the Dollar Spot at Target and little bit of tulle {left over from Christmas wrapping}. I measured my Tootsie Roll bank {fyi mine was about 3 3/4 inches tall and 8 1/4 in circumference} and then used my paper cutter to cut the paper to the right size.
 I used a little bit of spray adhesive to stick the paper to the Tootsie Roll bank. You could also simply wrap the paper around the bank and tape it in place. Here's another little tip: When I  use spray adhesive, I almost always put down an old sales magazine to catch the overspray. When you spray one page, simple turn the page and you have a fresh surface for the next time. I have literally been using the same sales magazine for almost a year!
 Wrap the Tootsie Roll bank with your paper making sure to cover as much of the original packaging as possible.
 Add some cute ribbon or coordinating tulle and a heart shaped name tag, and your kiddos will be ready to pass out their sweet and simple Valentine's at school!
Pin It!

Thursday, January 13, 2011

Valentine Hula Hoop Wreath

The supplies for this project are pretty simple...a hula hoop, some pretty fabric, yarn, and a little bit of cardboard. I picked up my hula hoops at The Dollar Tree for $1 each. They come in a few different sizes, and the smallest one that they have is the perfect size for a wreath....and a lot cheaper than most large sized wreath forms out there. I also picked up some fun Valentine fabrics at Hobby Lobby...30% off! You can use scrap fabric for this project too, but for some reason I have very few pink and red fabrics in my collection:)
You start by wrapping the hula hoop with yarn. I tied a knot in the end of my yarn to get it started and then held the end in place while I wrapped a few times. You could also hot glue the end down to make it a little more stable. Wrap the entire hula hoop with your yarn...it probably took me a little over an hour to do while I was watching tv.
The next step is to cut a heart shape out of cardboard. You can use anything you have around your house...cereal boxes or some heavy cardstock should work fine. I used a baby wipe box which is a pretty heavy duty cardboard. Punch a hole in the heart shape where you want to add your hanger. I decided to hang my heart a little crooked, but you could do it right in the center also.
Cut you fabric into strips. I did mine about a 1/2 inches wide and as long as my piece of fabric.
Fold the strips of fabric in half with the wrong sides together and then twist. Once you get them twisted put a small bead of hot glue around the outside edge of the cardboard heart and carefully put your strip of fabric on the heart.


Continue to add your twisted strips of fabrics around the heart shape. Be sure to leave the hole you punched earlier open so that you can thread a piece of fabric or ribbon through as a hanger. I also added a little tulle ruffle to the back of my heart. I simply added a little hot glue to the back and folded and glued the tulle in place.

To finish your wreath, take your completed fabric covered heart and tie it to your yarn covered hula hoop using a strip of fabric or some coordinating ribbon.
This is what two wreaths look like on my front door:
FYI...It is really difficult to get two wreaths perfectly level when the hook is a good 3 feet over your head:)
Visit thecsiproject.com
Pin It!

Friday, January 7, 2011

See-Through Valentines

I love the idea of homemade Valentines! They just seem like so much more fun than the store bought kind...though I will admit to using store bought Valentines a ton of times more than once in my life:) For the most part, I have managed to make homemade Valentines with the boys for their school parties though.
When I saw these SUPER cute See-Through Valentines on Martha Stewart.com, I knew I had to give them a try...even if they aren't what I end up sending to school with the boys on Valentine's Day!
***
I had a ton of M&M's left over from THIS Christmas craft...perfect for filling my See-Through Valentines! I just sorted out the red M&M's from the green ones:)
 I used my Cricut to cut two hearts {make sure they are the same size} out of wax paper. You could easily do this by hand if you don't have a Cricut, I just knew I couldn't cut out a perfectly shaped heart by hand:)
*can you see where some little mischievous hands got Sharpie on my Cricut mat*
 I used my sewing machine to sew the two hearts together. Again, this could totally be done by hand if you have the patience to hand sew things!
Make sure to leave about a two inch space open so that you can fill your Valentine with candy. I used my leftover M&M's but redhots or conversation hearts would also be really cute in these! Fill the hearts with candy and the sew up the opening with your sewing machine.
Trim off any excess threads and you have a really cute homemade See-Through Valentine that anyone would love to recieve! You could also attach a small gift tag to them or write a special message on the wax paper with a permanent marker.
To enjoy the yummy candy inside the See-Through Valentine, simply tear the wax paper!
I have another idea in mind for Valentines for the boys' to hand out at school, so I think I may make a batch of these See-Through Valentines for my Sunday School class! Kindergarteners would love these:)

linked up at:
Jen's Weekend Wrap Up Party:)
Pin It!
Related Posts Plugin for WordPress, Blogger...