Home AboutMe Crafts Food
Showing posts with label Food. Show all posts

Monday, October 15, 2012

Kid-Friendly Fruit and Yogurt Smoothie

What kid doesn't need to add more fruits and veggies into their diet?!? I try to serve up fruits and veggies with almost every meal {and yes I count pasta sauce as a veggie sometimes}, but sometimes it can be fun to mix things up a little! I've found one of the easiest way to get my boys to eat their fruits {and veggies can be mixed in to} is to turn them into a smoothie. Now, this isn't really a recipe, more like a list of ingredients that you can mix, match, and combine to make any kind of fruit and yogurt smoothie that your kiddos will love! 
 Start with yogurt in a food processor or blender.
Any kind of yogurt will do.
We use vanilla flavored yogurt, but plain, greek, and even homemade yogurt will work.
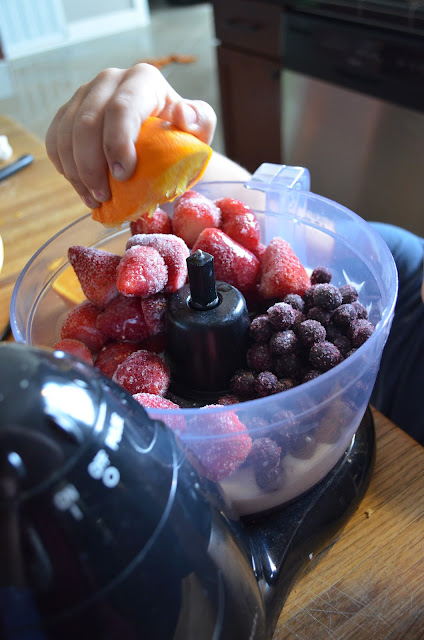
 Toss in a handful of frozen blueberries.
 Add some frozen strawberries.

{We like a lot of strawberries!}
The more frozen berries you use, the thicker your smoothie will be.

Cut up a fresh orange...
 ...and let your little helper squeeze in the juice.
You can also just a little bit of orange juice from a bottle if that is what you have on hand...or just leave it out!
At this point, you an add in any other kind of fruit {bananas are yummy in this smoothie}you like, and you can toss in some spinach to get a serving of veggies in the mix too! 
Then you put the lid on your food processor....
 ...and let your helper turn it on.
 Blend the ingredients for a few minutes to make sure all the frozen fruit is mixed in well, then serve your smoothie in a mason jar with a cute striped straw.
 Yummy.
Easy.
Kid-Friendly.
And full of good stuff!


Linking up here..
Pin It!

Monday, October 8, 2012

Crock Pot Chicken and Dumplings

Fall is finally making it's way to Mississippi. And fall weather mixed with late night football practice pretty much screams for a crock pot meal! I have to be honest and tell you that up until a few weeks ago, I really only ever used my crock pot to make an annual pot roast and to heat up cheese dip for parties. I don't know why, but for some reason the crock pot just never really appealed to me. But with our afternoons being so busy lately, I decided using my crock pot was the only way I was going to be able to feed my family a meal that didn't include frozen chicken nuggets or pizza! I've actually tried quite a few different recipes, and this delicious recipe for Crock Pot Chicken and Dumplings has been my favorite by far! 
I searched around for an easy crock pot recipe, and I found this one at BubbleCrumb.comThe thing I liked most about this recipe is that it is very similar to the recipe that my mom uses for her chicken and dumplings, except it uses a few more canned ingredients and a crock pot. I modified the original recipe to make it a little easier and to suit my family. I started with a couple of frozen chicken breast. Actually I threw in two smaller sized chicken breast and about four frozen chicken tenderloins because that is what I had in my freezer.
I added in two cans of cream of chicken soup and then I added enough chicken stock to cover the frozen chicken pieces. 
I gave the cream of chicken soup/stock mixture a little bit of a stir in the crock pot and then added a couple pats of butter and a little sprinkle of some dried parsley, salt, and pepper. 
Then I put the lid on my crock pot and let it go on high for 4-5 hours. The one thing I love about cooking with my crock pot is that it is almost impossible to overcook something. So if you accidentally leave your chicken in the crock pot a little longer it will be fine and still moist and delicious!
After the 4-5 hours is up, I pulled the cooked chicken out of the crock pot and shredded it up with two forks. Then I added the shredded chicken back to the crock pot.
I got my tube of refrigerated biscuits out. I used butter flavored biscuits because that is the kind that my mom always used in her Chicken and Dumplings, but the original recipe calls for Grand's biscuits. Use whatever kind your family prefers, just know that the butter flavored biscuits add a really yummy, buttery flavor that regular biscuits won't. I rolled out my biscuits a little with a cup and then cut each biscuit into four pieces. Next time I'm going to cut them a little smaller to make the cooking time a little shorter and to ensure that the dumplings aren't still gooey when it's time to eat. 
I then dropped my biscuit pieces in a few a time and carefully stirred them into the liquid. At this point, you can also add a little more stock or even a splash of milk if you think you need more liquid. After I added all the dumplings, I let it cook for about another hour on low. The cook time will really depend on how big you cut your dumplings, so keep that in mind. 
Serve up these delicious and easy Chicken and Dumplings with a side of butter beans and maybe even some warm cornbread on a really cold day! These Chicken and Dumplings were a big hit at our house. Henry even said he liked mine better than my mom's, thought Grant said he still prefers Grammie's:) 
Pin It!

Monday, September 17, 2012

Eli's Barnyard Brunch Birthday Party

My baby turned four a few weeks ago. Thinking about it almost makes me cry...because really four is not a baby anymore...it's also not a toddler either. Four is officially a preschooler which means I will soon have a 'schooler' and I will be left all alone with no kiddos at home!
Despite the tears {that I almost shed}, we had a SUPER fun Barnyard Brunch birthday party for Eli.
******
Here's a quick look at the party:
I bought a little over a yard of black and white gingham to use as a table cloth. I wanted to have a more elegant, less kiddie look to the table for this party and black and white with pops of color seemed like the way to go. Jason brought home an old pallet for work for me to use as the backdrop of the table. I slapped on a little bit of white paint and added a cute bunting to it. I think it gave the table the perfect barnyard feel! 
 I found some cute cow print napkins and I bought red plastic-ware for a little more color. The cute chalkboard came from Hobby Lobby and I added some colorful washi tape to the frame.
We had a fun and yummy cereal bar set up with five different kinds of cereal and milk in a big drink dispenser. It was fun {plus SUPER easy} and what kiddo doesn't like cereal!
 I also fixed small mason jars filled with chocolate milk for the kiddos. I added a white cupcake wrapper to the top as a lid to hold the cute orange and white paper straws in place.
 We had Chicken Feed aka Chex Mix...
 ...Pigs in a Blanket {that I bought premade because I knew I wouldn't have time to make them the morning of the party}...
 ...and fun licorice Wagon Wheels:)
 I also set up a table with a couple of sodas and some yummy orange juice, along with the birthday boy's cake and some cute cow print plates.
 This is the same cake design that Henry had for his 3rd birthday. Eli saw it a couple of weeks ago and decided that he wanted one just like it:)
 Farmer Eli in his overalls and his straw hat had a SUPER fun time at his Barnyard Brunch Birthday Party!

”TipLinking up here..
Pin It!

Monday, August 27, 2012

How to Plan a Surf Party

Birthday parties are big deal around here! I love to put together a fun themed party with all the bells and whistles...but I usually don't have a lot of time or want to spend a lot of money. This year we decided on a Surf Party for Grant complete with a fun inflatable water slide and fish tacos {aka surfer food}.
 The first thing I nailed down for Grant's Surf Party was this inflatable water slide! We got a great price from some people that go to my parent's church...and even though it cost a little more than what I would normally spend on a birthday party, it was worth it to have this fun slide at our house ALL weekend long. {And yes, Jason and I tested it out with the boys a few times Saturday morning before the party!} If you didn't want to spend as much on a rental, you could always do a couple of slip n slides, sprinklers, and kiddies pools!
 To decorate, I picked up a couple grass table skirts and some cute wave scrapbook paper. The table skirt came from Hobby Lobby and with my 40% off coupon it only cost $6! I spend about $5 and a little over an hour with my Silhouette to make the cute Surf's Up banner that I hung on the boys' skimboards.
 We has some yummy surf themed food:
delicious fish tacos {I just baked up a couple of boxes of frozen fish sticks and served them with flour tortillas, lettuce, tomato, cheese, and couple different sauces},
starfish sandwiches {PB&J cut out with a star shaped cutter}, 
pretzel goldfish {served in cute blue and white party cups},
 fruit kabobs,
wavy chips,
and gummy sharks!
 We also had a snow cone station under the Airstream awning complete with a grass skirt and a couple of surfboards! 
Plus a yummy cake with a surfboard and palm tree:)
 All the kiddos wore their swimsuits and I picked up this cute swimshirt for Grant to wear mostly because it said "Hawaiian Surf Legend"...and because I got it on clearance at Target for less than $5!
{Silly boy was tired of saying cheese I think:)}
 We sang Happy Birthday and he blew out the candles...
 ...then opened a bunch of presents:)
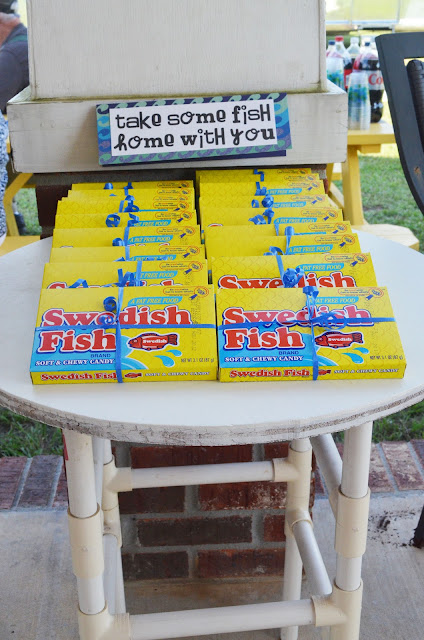
 The party went on for a couple of hours...it was hard to drag the kiddos away from that fun inflatable water slide. But when they did finally head home, they all took a cute box of Swedish fish with them as a party favor!
And that is how you plan a surf party!
Pin It!

Wednesday, August 22, 2012

7

Today this kiddo turns seven years old!
It seems like he should still be a toddler running around the house following his big brother. We were looking back through some old pictures yesterday, and it is so hard to believe how fast they grow up...it seems like yesterday he was this cute, chubby faced baby: 
 But he's not...he's growing up {way too fast}! 
We are celebrating with a Surf party this weekend. So to go along with the surf theme, I made some shark cupcakes for him to share with his class today. They were SUPER easy to make except that I learned the hard way why the package of almond bark says not to add food coloring:) Let's just say these shark fins spent a little time in the freezer before they could go on the cupcakes.
 I also made a fun surfboard cake for us to eat tonight after dinner...because every birthday boy should be able to blow out candles on their actual birthday:)

Pin It!

Thursday, August 16, 2012

Shark Week Waffles

Apparently this is the week of waffles around here:) On Monday I shared our fun Back to School Apple Waffles and today it's fun shark waffles in honor of Shark Week! My boys have been SUPER excited about watching all the educational {and scary} shark shows on the Discovery Channel this week, and I thought it would be fun to make some waffles to celebrate:) The great thing about these Shark Week Waffles is that you don't even need a waffle iron to make them....you can make them with plain old frozen waffles!
 Start with one waffle per person plus an extra waffle {you'll need 1/4 for each person} to make the shark fins. I made some crispy Belgium waffles, but again the frozen kind would work just fine here too!
 Cut your extra waffle into quarters. Your waffles need to cool off a little before you assemble them, so set them to the side to cool while you work on the next step.
 Take a container of Cool Whip {I used about 8 oz. and it was plenty for four waffles} and add in some blue food coloring. Give your Cool Whip a good stir until you get it to a blue color that resembles water.


Slather a couple tablespoons of the blue Cool Whip onto your cooled waffles.
 Trim down a little bit of the quarter waffles that you cut earlier so that it will sit on you waffles without falling over, then place it in the center of of all the blue Cool Whip water.
 These were SUPER simple to make and so much fun for the boys to eat...they didn't even need syrup with all the "water" on top of their waffles:)
 {WARNING: Your kiddos will end up with a lovely blue smile for a while after eating these...but that just makes them more fun!}
Have you and your kiddos been watching Shark Week?
Linking up here..
Pin It!
Related Posts Plugin for WordPress, Blogger...