Home AboutMe Crafts Food
Showing posts with label Waffles. Show all posts

Wednesday, April 18, 2012

Earth Day Waffles

Earth Day is this Sunday, and I thought it would be fun to whip up some waffles to celebrate. I have to admit though that other than the fact that these waffles look {a little bit} like the earth, there isn't anything really "earthy" about them. As I was mixing in the food coloring to make the blue and green batter, I realized that it would have been much more "earthy" for me to use fruits and veggies to dye the batter. So if you really want to celebrate Earth Day the right way with these waffles break out the blueberries and spinach...or you can be like me and just add in a little dye and enjoy the pretty colors:)
 I started by mixing up some store bought waffle mix according to the package directions. Again if you want to be extra "earthy" make your own homemade waffle mix...and I guess you could even grind your own flour too if you REALLY want to be "earthy"!
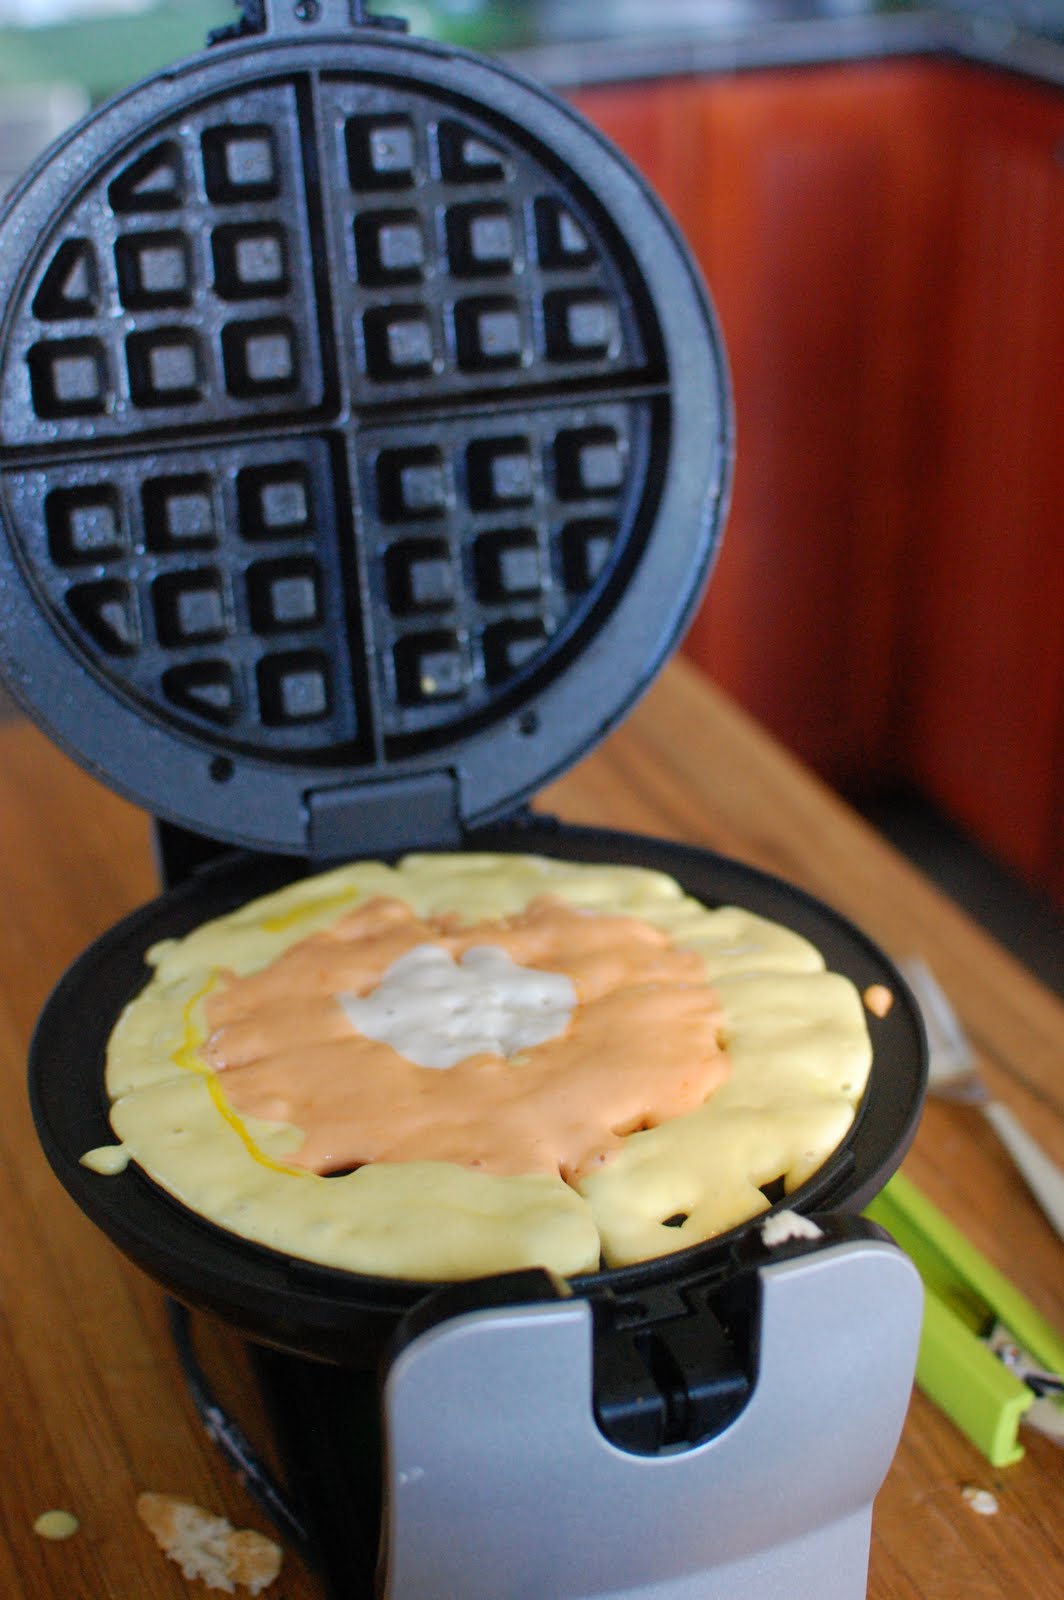
 Divide the batter into two bowls pretty evenly...even though there is way more water than land on our planet it is a lot easier just to put equal amounts of both colors onto the waffle iron:) Then add a little bit of green {either food coloring or pureed spinach} to one bowl and a little bit of blue {either food coloring or pureed blueberries} to the other bowl. Let your little assistant give each bowl a good stir with a whisk until you get the color that you want.


Spray your preheated waffle iron with non-stick spray and add the batter onto the waffle iron. You can just pour it on and spread it around or you can really try to make it look like a view of the Earth. I tried to make mine look like the Earth...can you see North & South American on the left, a little bit of Europe on the top right, and Australia on the bottom right?!? After you've added your batter cook your waffles on a pretty low setting to prevent it from browning too much. 
Our waffles ended up getting a little more brown than I wanted, but I just called it dirt and took a few pictures to share with you:) They tasted the same even if we had to pretend that the brown parts were dirt!
I think these is going to be my boys' after school snack today and then maybe we will work on a recycling project to really get us in the Earth Day mood!

Do you do anything to celebrate Earth Day?
Linking up here..
Pin It!

Friday, January 27, 2012

Chocolate-Covered Strawberry Waffles

A few weeks ago, I starting thinking about making some yummy Valentine-ish waffles...fun waffles have kind of become an obsession of mine and I knew I couldn't leave Valentine's out of the mix! The only problem was that I just couldn't figure out a clever way to use my round waffle maker to make anything heart shaped. So I figured instead of making something fun shaped, I would do a combo of ingredients that are classic Valentine flavors. 
Nothing says romantic Valentine's like a yummy chocolate covered strawberry! But lets be honest here, strawberries really aren't in season right now so you will probably either end up with small not so sweet strawberries or you will have to pay a ton of money to order fancy chocolate covered ones that end up not being nearly worth the $40 you spent to have them shipped all the way from California {I don't know this from experience or anything}!
Enter the Chocolate-Covered Strawberry Waffle:
This yummy waffle concoction is made with a strawberry cake mix, so you are guaranteed that yummy strawberry flavor without having to get it shipped from California. You could also make a homemade strawberry cake mix, but then you still run into the problem of strawberries not being in season...so I would just stick to the boxed cake! The only other thing you need is a bag of milk chocolate chips.
Start by mixing up your cake mix according to the directions on the box. Then add in half of your chocolate chips and give them a good stir.
Put the other half of your chocolate chips in a microwave safe bowl and heat them until melted.
Warm up your waffle iron, spray it down with non stick cooking spray, then add your batter to the waffle iron. I use a large cookie scoop {the same one I use to portion out cupcakes}, and it takes a little more than three scoops to fill my waffle iron. Just play around with it until you get the right amount.
Once the waffles are finished cooking, carefully remove them from the waffle iron. They will be a lot softer than a regular waffle because they don't really crisp up...which you don't want anyway because you want a soft fluffy cupcake feel. Let them cool slightly, then drizzle them generously with the chocolate that you melted earlier. You can do that simple with a spoon, or you can put the melted chocolate in a little baggie, cut off the corner and drizzle away. 
I don't really recommend having these waffles for breakfast...they're a little too sweet for breakfast. But they are the perfect dessert to end your romantic Valentine's meal, or maybe a sweet treat to surprise you kids with when they get home from school on February 14th!

Linking up here..
Tatertots and Jello
Serenity Now
Decor Chic
Someday Crafts
Skip to my Lou


Pin It!

Saturday, December 31, 2011

Top 10 Posts of 2011

Apparently food was a big deal on my blog in 2011:)
Nine out of the top 10 posts from this year are some form of food including 4 posts about waffles! So here they are, starting with #1 and going all the way to #10...the Top 10 Posts on Random Thoughts of a SUPERMOM! in 2011:
#1 Rainbow Waffles


#10 Brownie Waffles


Thank you all so much for being such awesome blog friends, followers, and commentors! I am looking forward to another fun year...and apparently I need to start working on some more fun waffle ideas!
Have a wonderful New Year's! See ya in 2012!
Pin It!

Friday, November 18, 2011

Gobble, Gobble: Turkey Waffles

Yesterday I admitted my obsession with crafty kids shirts, so now it's time for me to admit that I am just a little bit obsessed with fun waffles too! The first waffle I made was a rainbow waffle to celebrate St. Patty's Day. It's fun to have a colorful breakfast to help celebrate a holiday...but once I started I couldn't stop. I've shared some just because waffles {cupcake waffles} and a whole lot of holiday ones too {candy corn and jack o lantern}.

I have been brainstorming Thanksgiving ideas for a while now. It's amazing how hard it is to come up with a good waffle idea for a holiday based around food:) I tried to make Cornucopia Waffles with an abundance of M&M's, but all that did was make a huge mess of the waffle iron. So I decided to give Turkey Waffles a try instead. Now I know the name makes them sound kind of gross because seriously who wants savory turkey hiding in their waffles! Don't let the name scare you off...there is not a trace of real turkey in these fun and colorful Thanksgiving waffles:)
I started with the usual suspects...and my usual helper:) 
**waffle mix, food coloring, and Eli**
 Mix up your waffles according to the directions. You will need four waffles total to make two turkeys. By the way, these are sharing waffles...two people per turkey:)
*Start by making one plain waffle.*
*While that waffle is cooking divide your remaining batter into three bowls.*
*Add green, yellow, and orange food coloring each into one of the bowls and stir to combine.* 
*Cook the three colored waffles and then get ready to assemble.*

Start by cutting the plain waffle in half and the colored waffles into quarters.
Lay out the colored waffles in a turkey tail pattern starting with the outside ones{green here} and working your way in. Lay the half plain waffle on top of the turkey tail and adjust as needed. Use one of the leftover yellow quarter waffles to make a beak for your waffle. I simply cut off the pointed edge and added it on top of the plain waffle. 
What kind of fun foods are you making to celebrate Thanksgiving this year?
Pin It!

Tuesday, October 18, 2011

Jack O Lantern Waffles

What's more fun than colorful waffles? Colorful waffles that smile back at you of course! If you've been around my blog long you know that I have quite an obsession with FUN waffles, and today I'm sharing my newest fall waffle creation: 
To make these smiling waffles, all you need is a waffle mix of you choice, orange food coloring, and mini chocolate chips.
After you mix the batter according to the package directions, add a pretty good amount of orange food coloring {I always use Wilton gels because they make the color a lot more vibrant than liquid food coloring}.
Stir in the food coloring and add more as needed.... You want to make sure your jack o' lantern is a vibrant orange, not a pastel color.
After your batter is mixed up and you've got the perfect shade of orange, get your mini chocolate chips ready. I found it was easiest to pour them in a small bowl. That way I could scoop them up with a spoon and add them to my waffle batter quickly.
Pour the orange waffle batter onto your greased and heated waffle iron. Using a spoon {it gives you a little more control of the those crazy mini chips}, add the mini chocolate chips onto your waffle in the pattern of a jack o' lantern....eyes, nose, and big smiling mouth.
When your jack o' lantern waffle comes out of the waffle iron, it will be smiling back at you!
I had three hungry boys waiting for waffles so I didn't have a ton of time to decorate these after they came off the waffle iron, but you could add some green gummies to the top of the waffle as a stem and leaves to make them even more fun!

Pin It!

Friday, September 16, 2011

Candy Corn Waffles

After making fun kid friendly waffles this spring {rainbow waffles} and this summer {watermelon waffles}, I figured it was time to start working on some fun fall waffles! I had a couple of ideas in my head, but candy corn waffles won out as my first attempt...and I'm so glad they did! Aren't they adorable! My boys were so excited about them, except they were a little sad that they didn't actually have candy corn in them! I may have to work on that for next time:)
Start with your usual cast of {fun} waffle making characters: waffle mix and food coloring.
Mix up your batter according to the package directions and then divided the batter into three bowls. Leave one bowl uncolored and then add yellow coloring to one bowl and orange coloring to the other. I made a little more yellow batter since it is the largest area of the candy corn.
I closely inspected some real candy corn to make sure I added the colors in the right order:) Just in case you weren't sure it goes white, orange, yellow from top to bottom!
Spray your waffle iron with non-stick cooking spray....you don't want your candy corn creations to stick:) Start in the middle of your waffle iron with a small circle of the uncolored batter. Add a ring of orange batter and then a ring of yellow batter around the outside.
This is what a whole waffle will look like:
To finish up your Candy Corn Waffles, cut the whole waffle into fouths.
Next on my waffle to do list is going to be Jack-o-Lantern Waffles...and I'm thinking fall is the perfect time to try out some savory waffles too!
Visit thecsiproject.com
Pin It!

Tuesday, July 19, 2011

Cupcake Waffles

I've had a cake mix in my pantry calling my name for weeks now! I had planned to make this fun creation weeks ago...you know when I was on my waffle kick...but I got distracted by kids, crafts, trips, and the 4th of July. The last few times I've opened my pantry all I could think about was that darn box of cake mix! So I finally got around to making my fun treat yesterday, and let me tell you it was totally worth the wait! So instead of keeping you in suspense any longer, I will tell you how you can make this yummy treat I call Cupcake Waffles:)
 Drool worthy right?!? The beauty is that they are really {no I mean REALLY} easy to make!
**************
Start with your favorite box of cake mix. I chose Funfetti cake mix simply because I thought the kiddos would like that best...what kid doesn't love sprinkles in their cake:) Make your cake mix according to the directions on the package.
 Warm up your waffle iron, spray it with non stick cooking spray, and them put your cake batter on the waffle iron. I used my trusty Pampered Chef scoop {the large size} that I normally use for cupcakes and I put three {plus just a little more} scoops.
 Cook your cupcake waffles on medium heat. You want them to cook through without getting too crispy on the outside. We are going for the texture of a cupcake but in the shape of a waffle:)
 Remove the waffle from your waffle iron and separate it into sections. Let it cool slightly.
 Put two sections of waffle on a plate and put a {smallish} scoop of ice cream on one of the sections...
 ...sandwich the two waffle pieces together...
 ...then top your cupcake waffle creation off with the icing of your choice. Again I chose Funfetti icing just because sprinkles makes everything more fun:)
And that is how you can have yummy {ice cream filled} cupcake waffles without ever turning on your oven!
Pin It!
Related Posts Plugin for WordPress, Blogger...