Home AboutMe Crafts Food

Wednesday, August 24, 2011

Guest Post: Photography Tips

Hi there! I'm so excited to be guest-posting for Kelli while she's away!  My name is Liz, and I blog over at Sugarplum Creations.  I'm a stay-at-home mama to four little girls.  Yep, FOUR.  Our newest little sugarplum was born in June, and she is keeping us quite busy.  We spend our days homeschooling, crafting, and playing dress up and beauty salon.  And I insist on documenting every single second.

Photography has always been fascinating to me.  I would spend hours poring over photo albums when I was little.  I love the way you can come across an old photo, and be completely transported back to that time.  I love to journal, don't get me wrong, but there is nothing like a photo to tell the whole story.  And if a picture is worth a thousand words, then a good picture . . . well, that's priceless.

So, let's talk about some simple ways to improve your everyday photos.

Have your camera ready.

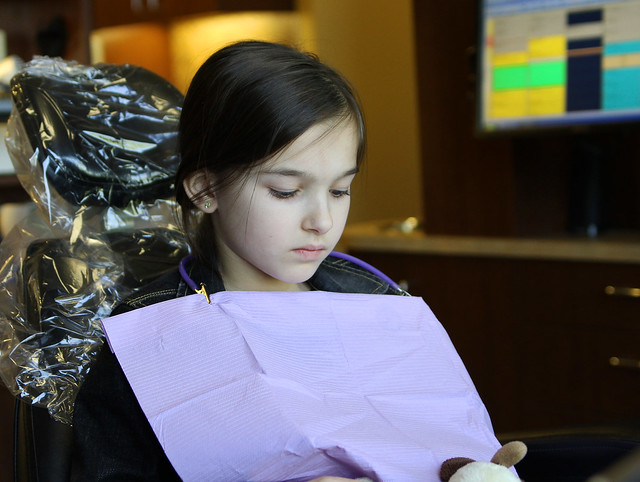
Okay, this seems like a no-brainer, but if your camera is hiding away in its bag in a closet somewhere, guess what, it's not easily accessible.  And it's going to be more than a little difficult to capture those fleeting moments.  Get your camera out.  Use it daily.  I take my camera to the library, grocery store, and dentist.  Cameras are not just for birthdays, holidays, and vacations.  Capture the little moments.  You'll be so glad you did.
Dentist2

Now that you have your camera ready . . .

Say no to "the cheese"

While posed photos definitely have their place, if you really want to document every day life, you're going to have to be sneaky.  Catch your littles playing Barbies, brushing teeth, climbing trees, even pitching fits {hey, someday you'll miss the feisty moments too!}

CampingPart3B

Remember and implement the Rule of Thirds

Subjects don't always need to be centered in the frame.  In fact, eyes are not naturally drawn to the center of a photo.  Try to compose your shots by envisioning a grid of sorts on top of your photo, dividing it into nine equal parts.   Then place the most important subjects on or near the "lines", especially where those lines intersect.  A simple way to make your photos even more interesting!

Photography Tutorial, Rule of Thirds copy

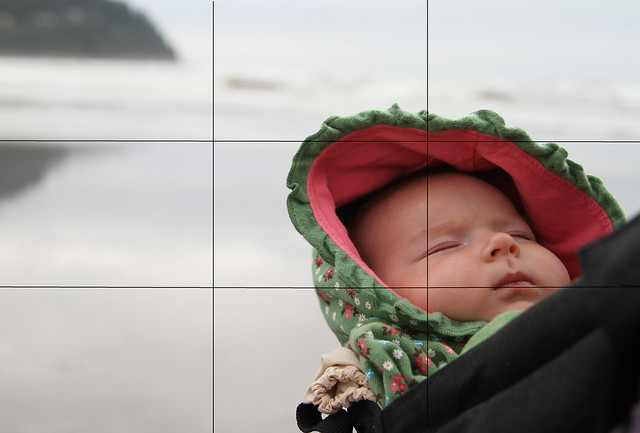
Look how little Miss' eye and mouth fall right on the lines.

Find the Right Light

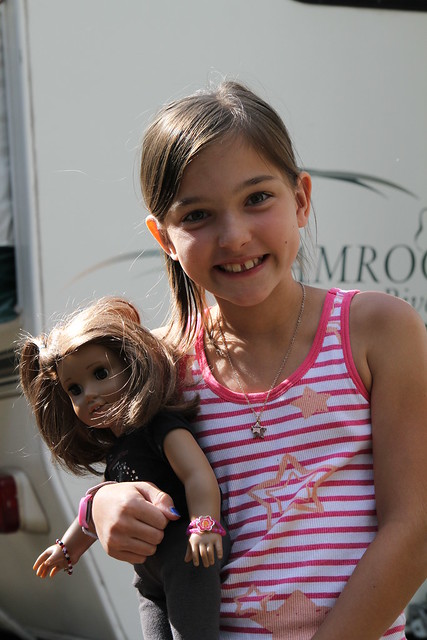
Lighting is probably the single most important factor in photography.  I won't go into a long explanation of how ISO, Shutter Speed, and Aperture work together to give you a properly exposed photo.  That would take way too long, and probably bore you to death.  What I will say is that, whenever possible, find natural light to work with.  I stay away from flash completely because it is difficult for me to use without creating harsh shadows and giving an overall unrealistic feel.  Sometimes you have to experiment with lighting to see what works best.  For example, on our camping trip, my daughter had crafted a bracelet for her American Girl doll.  She wanted me to get a picture of her with Meghan {her doll}.  It was sunny, but we were among many trees.  The lighting was very uneven.  I snapped a picture:

086

Hmmmm.  Dark shadows.  Not real flattering.

I simply moved my subject a couple of feet over . . .

CampingPart3E

And voila!
Okay, so the photo is not phenomenal, but I think you can see that moving a little made a big difference.

~~~~~~~~~~~~~~~

There you have it, a few simple tips to make your photos spectacular.  Now, go find your camera's manual, and read up.  And remember, practice makes perfect!
Pin It!

Tuesday, August 23, 2011

Guest Post: Chocolate Chunk Cookie Recipe

I am not a baker but do love to cook. However, I decided I needed to come up with a chocolate chunk cookie that suits my needs; lots of chocolate, and thick. Many people like cookies that flatten as they bake, but not me. I like them thick, the thicker the better:) My kids get all excited when I bake a treat during the week, because it is not something I do often. I am not cool so have to do everything by hand, no KitchenAid Mixer here, like my dear friend Kelli. This is really the ultimate chocolate chunk cookie recipe giving me everything, huge chocolate chunks and a nice sized cookie. I highly recommend doubling the recipe as the basic recipe only makes about 36 cookies, which will not last long. When making this cookie the dough may seem crumbly so get your hands in the mixture to make a large ball:) We like messy cooking in our home, so why not do it with baking as well! I hope you all enjoy this recipe. Fall is coming so baking season is coming up quickly!

Chocolate Chunk Cookie Recipe

Ingredients:

1/2 cup butter-unsalted, room temperature
1 cup firmly packed brown sugar
1 large egg
1/2 teaspoon vanilla
1 1/2 cups all-purpose flour
1/2 teaspoon baking soda
1/4 teaspoon salt
8 oz Semi-sweet baking squares-chopped

Directions:

Preheat oven to 375°F. Beat butter and brown sugar until creamy. Beat in the egg and vanilla. In a separate bowl, stir together flour, baking soda and salt. Add flour mixture to the creamed mixture, beat well. Chop the baking squares by hand(1/4 inch chunks or so). Stir the chocolate in by hand. Drop by rounded tablespoonfuls onto lightly greased baking sheets(I do 12 to a sheet). Bake in preheated oven for 8 minutes(set your timer) Immediately move from pan to wire racks to cool. Enjoy with a glass of ice cold milk!

Nichol is a mom of two, and blogs over at KiddiesCorner Deals, where she posts about online kids deals, recipes, reviews and giveaways. She knows kids are expensive, but shopping for them doesn't have to be! She is thrilled to be guest posting on Kelli's blog while her family is away on vacation.
Pin It!

Monday, August 22, 2011

Guest Post: Felt Napkin Rings

Hello, Random Thoughts of a Supermom readers.  I’m Paula from Sweet Pea and I’m delighted to be guest posting today for Kelli.

When I was a child, I remember my mom and grandmother making felt napkin rings as party favors.  I never forgot them and always wondered how they were made.  This spring in Southern Lady Magazine, there was a feature on these cute napkin rings that I so fondly remembered, but no instructions.  Following the picture in the magazine, I figured out how to make them.
SL


I played around with felt and came up with these three samples.
Example1

Example3
Example2


Aren’t they fun?  Would you like to make some?  I thought you would! 

Supplies Needed:
Felt in colors of your choice
Scissors and/or rotary cutter
Ruler
Sewing pins


Make the Napkin Ring:

Make the napkin ring which also becomes the center of the felt flower by cutting 7” x 2” strips.  (My pictures show three strips.  Cut as many strips as you need to make your desired number of completed napkin rings.)
Ring1


Fold each strip in half and secure with pins.  This will make cutting the felt much easier.
Ring2


Cut a heart shape on each end of the strip, stopping a little less than half-way through the width of the strip.  Then cut from heart to heart.  This is difficult to explain, so I roughly sketched in red how you should cut but be aware that the heart on the right doesn’t look so much like a heart.
Painted VERSION


They should look like this once cut.
Ring3


And should look like this when you open each strip.  (Kind of like a bone!)
Ring4


Make the Flower:

Cut a 4” square for each flower.
Flower1


Fold the square into fourths and pin.  (Sorry for the color switch.)
Pink1


Cut a half circle starting from the halfway point of one side and ending at the halfway point next to it.  (Cut from black dot to black dot.)
Pink2


Do not make a half circle on the side that contains all of the folds.
Pink3


Now make a small clip across the folded end.
Pink4


It should look like a flower when you open it up.
Pink5


Make the Sepals:

Cut a 4 1/2” square for each sepal.  In nature these are green but feel free to choose any color you wish.
Sepal 1


Fold the square into fourths and pin.  Cut a sailboat shape out as shown below. (Another felt color change..I made quite a few versions.)
Sepal 2


Cut off the folded tip to make a hole in the center and it should look like this.
Sepal 3


To assemble the flower, place a flower on top of the sepal, lining up the holes in the center.  Wrap the napkin ring part around a napkin and then bring the ends through the lined-up holes and you’re done.
FinishedFinished2


Felt is inexpensive and this idea could be used to coordinate with the season.   Here I’ve used two for a fall place setting and one for a summer one.
Stage1Stage2Stage3

This project makes a great table favor.  Pink or blue could work for a baby shower or all white could be used for a bridal shower.

I hope you enjoyed this project and that you might consider trying it.

Many thanks to Kelli for having me today.  I’d love it if you’d stop by Sweet Pea sometimes for a visit.
Pin It!
Related Posts Plugin for WordPress, Blogger...