Home AboutMe Crafts Food
Showing posts with label Food. Show all posts

Sunday, December 23, 2012

Milk Meets Santa Video

A few weeks ago, my boys and I got a fun opportunity to be part of a Christmas video all about cookies, milk, and Santa for the Milk Mustache campaign. You can check the video out HERE or you can watch by clicking on the Youtube video below. 

 **So what REALLY goes down with Santa on Christmas Eve? Only these kids know the truth. Watch to find out!**


Disclosure: I was compensated by the National Milk Mustache "Got Milk?" Campaign for participating in this video.
Pin It!

Thursday, December 20, 2012

Easy Teacher Gifts in Jars

*mason jars*
*fabric*
*string*
*gift tags*
*& some kind of sweet treat*
 *quick, easy, inexpensive, and SUPER cute*

Pin It!

Tuesday, December 18, 2012

Snowman Waffles

I pulled out my waffle maker this weekend and whipped up some fun and easy waffles to help get us in the Christmas spirit! I've made waffles for almost every other holiday there is, so I figured it was time to make some for Christmas too! These waffles would be so fun for Christmas morning or even for dinner on Christmas Eve if you don't have big family plans! And the wonderful thing about these cute Snowman Waffles is that you can even use a little help from the store and use frozen waffles instead of making them homemade!
 I started with a stack of three warm and yummy waffles.
 I got out my sifter and my {huge seven pound} bag of confectioners sugar.
 I simply laid the waffles out to look like a snowman and then dusting them liberally with the confectioners sugar.
 After your snowman is all covered with snow, all that's left is to decorate him!
 a couple of chocolate pieces for buttons
Twizzlers for his mouth and scarf
an orange Tootsie Roll for his nose
Banana slices with Sixlets for his eyes
I just used the candy that we had on hand...mostly stuff from the Christmas parade that we went to a few weeks ago! The fun thing about this snowman is that you can pull out all your leftover gingerbread house decorations {or parade candy} and let your kiddos use their imagination to make Mr. {or Mrs.} Snowman anyway they want!


Linking up here..
Pin It!

Tuesday, December 11, 2012

Popcorn Snowballs

A couple of days ago, I was honored to share a fun and easy recipe as part of the awesome blog series "A Season of Serenity at Home" over at my friend Amanda's blog Serenity Now. And just in case you missed it over there, I'm re-sharing it here so you can all make these fun popcorn snowballs with your kiddos!

Snow is a rare thing where I live. I've seen snow at my home three times in my 30 plus years living in South Mississippi. And it can sometimes be difficult to get into the holiday spirit when it's 70 degrees outside and everyone is wearing flip flops:) So I decided that since my boys rarely get to play with real snowballs, it might be fun to make some edible Popcorn Snowballs instead!
I started by gathering my ingredients: two bags of microwave popcorn, a 16 oz bag of mini marshmallows, half a stick of butter, some flake coconut, and some white sugar sprinkles.
First pop your two bags of popcorn and put them in the biggest bowl you have. I ended up using the top to my cake keeper because it was bigger than any of my bowls:) After the popcorn cools a little dig through and pick out any of the popcorn kernels that didn't pop. I learned the hard way that unpopped kernels in your popcorn snowballs is no fun!
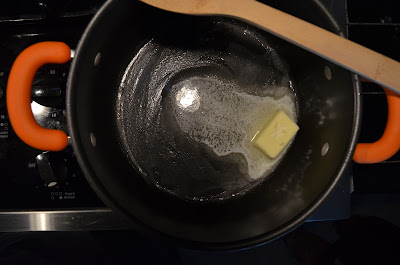
Melt your butter over medium heat...
...add your bag of mini marshmallows and stir until they are completely melted.
Poor the melted butter/marshmallow mixture on top of the popcorn.
Then stir, stir, stir! Mix it until all the popcorn has been coated in the marshmallow. Then let it cool for about 5 minutes.
While the mixture is cooling give each of your kiddos a piece of parchment paper and spray their hands with a little bit of cooking spray.
Carefully scoop up some of the mixture and give it to your kiddo. Let them use their hands to form the popcorn mixture into a snowball. At this point you can have plain popcorn snowballs....
...or you can make them fancy by rolling them in flake coconut...
...or white sugar sprinkles!
These were really fun to make, and {other than the messy bowl and a few messy fingers} they were really easy to make too! Now my boys can enjoy snowballs in the winter anytime they want....even if it's 70 degrees outside and we're wearing flip flops!
Linking up here..
Pin It!

Thursday, November 29, 2012

Guest Post Over at Serenity Now!

Today I am over at Amanda's place as part of her holiday blog series "A Season of Serenity at Home".

I'm sharing a fun, easy, and yummy recipe for these SUPER cute edible Popcorn Snowballs:
Click on over and check out the step by step so you can make these yummy snowballs for your kiddos this winter!
Pin It!

Friday, November 16, 2012

Sugar Cone Cornucopia

I saw these SUPER cute Thanksgiving treats floating around the blog world last year. And I have to admit that when I first saw them, I was pretty skeptical that they would work....that's probably why I didn't attempt them last year. But earlier this week when our preschool choir director asked if I could come up with a snack for the kiddos, this was the first thing I thought of. I searched Pinterest and found a couple different versions all with different directions {I never did find what looked like the original inspiration. If you know where it is let me know and I'll credit them!}, so I grabbed a couple of sugar cones and tried out a few techniques. After a failed attempts, I came up with the perfect way to make and fill these cute Sugar Cone Cornucopias!
Start by gathering your supplies:
sugar cones
chocolate 
fall sprinkles
Cool Whip
Reese's Pieces or M&M's
Take a couple of paper towels, fold them up into a square, wet them, and then ring out most of the water. You want them to be damp, but not dripping. Place your wet paper towels on a microwave safe plate, then place the bottom half of the ice cream cones on the paper towels and cover them up. I found that two at a time worked the best because you only have a little bit of time to work with them after they come out of the microwave.


Microwave the cones for around 30 seconds depending on the strength of your microwave. You want the ends of the cones to be soft enough to mold without burning the part that isn't in the paper towel. You also need to re-wet the paper towel after two 30 seconds runs in the microwave.
Remove the plate from the microwave and pull back the paper towel carefully. They will be hot! Pick up your cones, and working quickly bend the end of the cone using your hands, the counter top, or even a clean pencil. You will have to hold the ends in place for a few seconds until they cool enough to keep their shape. 
This is a great projects for kiddos to help with, but they don't need to help with the cone making step because it can be really hot! So let them start helping after all the cones are made:) I actually made all the cones at home and then took them with all the other supplies to church and the kiddos all got to decorate and fill their own cornucopias! 
After you finishing forming all your cones, melt a little bit of chocolate in a coffee cup or small bowl. I used almond bark and I just put one square in my cup and microwaved it until it was melted. 
Then dip just the very end of the cone in the chocolate...
...and place your dipped cone in a small plate of fall colored sprinkles.
Set the cones aside so the chocolate can harden. While you wait on the cones, put your Cool Whip in a small plastic bag and clip off one of the corners.
Use the plastic bag to fill the cone up with Cool Whip...
...then place a couple of Reece's Pieces or M&M's in the Cool Whip. 
Now you have a SUPER cute Sugar Cone Cornucopia that kids and adults will love!

Linking up here..
Pin It!

Monday, November 12, 2012

Gobble, Gobble: Turkey Waffles (Again)

I truly can't believe that Thanksgiving is only a little more than a week away! It feels like we just got through Halloween, and I really haven't had much time to think about Thanksgiving...so I'm re-posting these fun Thanksgiving waffles that I made for my boys last year!
*******************
I have been brainstorming Thanksgiving ideas for a while now. It's amazing how hard it is to come up with a good waffle idea for a holiday based around food:) I tried to make Cornucopia Waffles with an abundance of M&M's, but all that did was make a huge mess of the waffle iron. So I decided to give Turkey Waffles a try instead. Now I know the name makes them sound kind of gross because seriously who wants savory turkey hiding in their waffles! Don't let the name scare you off...there is not a trace of real turkey in these fun and colorful Thanksgiving waffles:)
I started with the usual suspects...and my usual helper:) 
**waffle mix, food coloring, and Eli**
 Mix up your waffles according to the directions. You will need four waffles total to make two turkeys. By the way, these are sharing waffles...two people per turkey:)
*Start by making one plain waffle.*
*While that waffle is cooking divide your remaining batter into three bowls.*
*Add green, yellow, and orange food coloring each into one of the bowls and stir to combine.* 
*Cook the three colored waffles and then get ready to assemble.*

Start by cutting the plain waffle in half and the colored waffles into quarters.
Lay out the colored waffles in a turkey tail pattern starting with the outside ones{green here} and working your way in. Lay the half plain waffle on top of the turkey tail and adjust as needed. Use one of the leftover yellow quarter waffles to make a beak for your waffle. I simply cut off the pointed edge and added it on top of the plain waffle. 
What kind of fun foods are you making to celebrate Thanksgiving this year?
Pin It!

Tuesday, November 6, 2012

Charlotte's Web Spider Web Snack

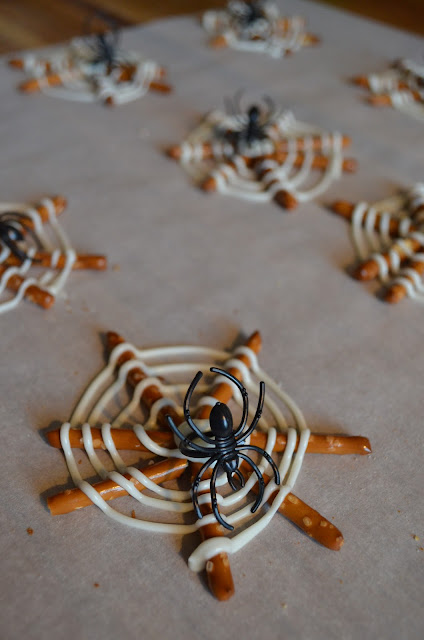
I saw these really cute spider web snacks {from Sara at Mom Endeavors} around Halloween last year when they were making the rounds on Pinterest. I thought they were absolutely adorable, but with all the stuff that we had going on for Halloween {last year and this year} I never got around to making them. So when I got a note saying Henry's class was having a County Fair to celebrate reading the book Charlotte's Web, I knew this would be the perfect snack to make! They fit in perfectly with their celebration, and they were a big hit with the teachers and the kids!
One of the best things about my version of this snack is that it only takes two ingredients:
pretzels sticks and white chocolate/vanilla almond bark.
Start by melting your almond bark according to the directions on the package. Then add the melted mixture into a plastic squeeze bottle. I get mine at Walmart. They are Wilton brand and they usually run around $3 for 2 bottles.
Lay out a big sheet of parchment paper and put your pretzels down in a sort of snowflake design. My pretzel sticks were abnormally long so I broke mine in half to make the spider webs a more manageable size. I tried to have 7 to 8 pretzel pieces per spider web so there was plenty of pretzel for the almond bark to attach to.
Gather up some of those fun plastic spider rings.
Use your squeeze bottle to make the spider web onto of the pretzel sticks. Start in the middle and add a pretty big blob of the almond bark to make sure that all the pieces stay together, then work you way to the outside edge of the pretzel sticks in a circular motion.When I first got started I thought it was going to take forever, but it actually went pretty fast once I got the hang of it!
Before your almond bark sets too much, stick a spider ring in the middle making sure to get the ring part down in the almond bark so it attaches well. Then let them set up. Mine took about 30 minutes to be completely  set up and ready to be removed from the parchment paper. I found that the easiest way to lift them was to use an offset spatula and slowly slide it under the spider webs and lift.
When I finished making about 40 spider webs {I made some extras just in case they broke because they are kind of fragile and I didn't want any of the kiddos to have to get a broken spider web.} I used the almond bark that was left in my squeeze bottle to spell out a few of the words that Charlotte had written in her web in the story! It added a little bit more fun to the snack:)

Pin It!

Thursday, October 25, 2012

Biscuits with Chocolate Gravy

Earlier this month, I set out on a mission to make homemade biscuits. I've tried my hand at homemade biscuits before, but for some reason they always turned out hard as rocks or not very tasty I never was able to get the perfect biscuits! So after stumbling upon a pin about different flours used to make biscuits, I decided I needed to heed the advise of the blog post and try again at making some delicious homemade biscuits! I'm going to be honest here and tell you that I tried three different times over four days, and I only ended up with okay biscuits...which means I need to keep trying. But along with my okay biscuits, I also made a REALLY delicious chocolate gravy! 
Now I know when most people hear the words chocolate and gravy together they think it sounds disgusting...when I first heard about chocolate gravy when I was in college I thought it sounded pretty gross too! BUT it's not! It is actually really yummy and I'm so glad that I tried out this recipe, because it almost made up for my just okay biscuits:)

I found quite a few different variations on chocolate gravy, but this easy recipe from VarmintBites looked like a good recipe to try! And it did not disappoint! 


Chocolate Gravy
5 Tbsp unsalted butter
3 Tbsp flour
3 Tbsp cocoa powder
4 Tbsp sugar
1 cup milk
1-1/2 tsp vanilla

Melt butter in skillet.  Add flour, cocoa powder, and sugar. Cook over low heat for 2-3 minutes.  Slowly add the milk, making sure to incorporate it fully.  Cook for another 2 minutes, until thick. Remove from the heat and add the vanilla.  Serve on warm buttered biscuits.


Linking up here..
Pin It!
Related Posts Plugin for WordPress, Blogger...