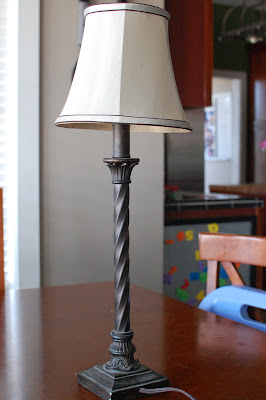
I had this lamp.
It wasn't terrible, but it wasn't really great either.
It's just the right size for the table in my foyer, but the shade was a really weird green color that looked even worse once I painted the table it sits on red!
Instead of just buying a new one, I decided to salvage the lamp by recovering the lampshade...a quick, easy no sew project. Start by tracing a pattern of your lampshade on some paper. Do this by rolling the lampshade while using a pencil to follow along the top and bottom edges of the lampshade. Then use a ruler to connect the two lines at both ends.
Cut out your pattern and test fit it on your shade.
Make any adjustments in size, then pin your pattern to your fabric and cut.
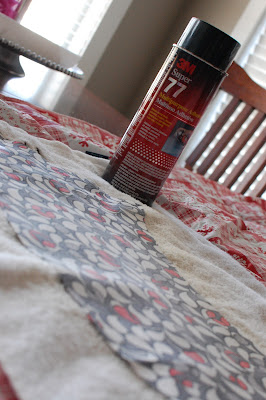
Apply heavy duty spray adhesive to the wrong side of the fabric. Then carefully wrap the fabric onto your lampshade.
The piping on my original shade matched the new fabric, so there was no need to do anything to the edges of the lampshade. If you want to cover the edges, make the fabric a little larger and fold over the edges. You can also hot glue on some matching ribbon to cover the rough edges of the fabric.
Now my lamp is much more fun and it matches my new red table perfectly!


thanks for sharing this! I have a shade I love that I really want to revamp and was trying to remember how to make a pattern. Yeah, I'm smacking myself right now cuz its so easy.....lol, Love your lamps new look...red and black are my fave!!
ReplyDeleteCute! Thanks for posting this. I was just thinking the other night I need to cover lamp shades for my living room redo! :)
ReplyDeleteWhat fun fabric! You did good!
ReplyDeleteLove the fabric! It looks so much nicer. Thanks for sharing.
ReplyDeleteI have 2 lamp shades I need to recover and I can actually do this lol. Thank you! Love that fabric.
ReplyDeleteSo cute! That's a great fabric pattern...fun and modern!
ReplyDeleteWow...what an amazing difference! I love this idea. There you go again out doing yourself. haha!!
ReplyDeleteThat's really cool! And the way you explained it made it seem simple enough even for me. Well done!
ReplyDeletelooks great....love the new fabric :)
ReplyDeleteSo cute! How would you cover a lamp shade that is more of a weird rectangle shape?? I want to do something for my girls room, but I would have no idea how to make the pattern. Thanks for any suggestions.
ReplyDeleteTiffani
I LOVE, love, love the fabric! Seriously so pretty and you did a marvelous job on it.
ReplyDeleteOh, wow! MUCH better, Kelli!!! Love that pretty fabric you chose. I've never recovered a lampshade before. Now I know how! ;) Thank you so much for the sweet comment you left today on my blog's birthday post. :)
ReplyDeleteI'm in love with this fabric. It does go perfectly with the table. Thanks for sharing! You are one creative lady.
ReplyDeleteLOVE this fabric!!
ReplyDeleteAnd the fact that there's no sewing?!?! I LOVE it even more!!!
So cute...I love the fabric! I was thinking of buying fabric to make new pillows for the living room...but I decided to buy some at Target, ha! I'm not even sure how to buy fabric! I really need to go shopping with you, you are so crafty! Love the new look, so pretty...it looks great on the table!
ReplyDeleteLove it! I have covered a few lamps before but they have not alway come out so great. I think I need to try it with the spray adheisive. Thanks for the tutorial!
ReplyDeleteOh my gosh..that looks so good!! I would never have figured out how to do that on my own!! The fabric is so pretty, too!
ReplyDeleteGreat fabric!
ReplyDeleteI have an award awaiting your presence sweetie. Love your blog. By the way, I love that refashioned lamp! Great job!
ReplyDeleteHappy ALoha Friday.
stopping by to say hi. It's been awhile since I've had time to do that. I see you are still as busy as ever!!
ReplyDeleteBeautiful. Thank you for the tutorial
ReplyDeleteThanks for posting such a great tutorial, love how the lamp turned out!
ReplyDeleteLooks great, and you make it sound really easy! I saw your link on Tatertots and Jello.
ReplyDeleteI am your newest follower for SURE! I clicked over from Tatertots & Jello! I was just looking at 2 of my lamps today and thinking about how I REALLY need to recover the lampshades...but not sure how to do it. Thank you so much for this post!
ReplyDeletethanks so much for the tutorial! the lamp looks great!
ReplyDeleteThanks for the nice comments on my Blog... I have a confession, I am scared of lamps, I don't have one in my house.. Your lamp looks awesome.. I need to break out of my shell, and get one. I know it would add to my house.
ReplyDeleteladybirdln.blogspot.com
awesome! That is the perfect step by step that I've always wanted to know! Found you from Mary's Meanderings blog party list. I'd join your party, but I haven't made anything lately! Thanks, Nan
ReplyDeleteI love it! I have a white shade that I need to recover, thanks for telling me how to do it. :)
ReplyDeleteAnna
www.askannamoseley.com
I've put together a round up of some creative lamp makeovers on Craft Gossip today and included your project. :) You can see it here
ReplyDeletehttp://homeandgarden.craftgossip.com/9-great-lamp-ideas/
If you would like to share the Craft Gossip love and show your visitors you've been featured, you can grab a button here!
http://homeandgarden.craftgossip.com/grab-a-craft-gossip-button/
I'm so glad you posted this on the Sunday Showcase. I have a little lamp for my kitchen and was going to redo the shade today and couldn't figure out how to cover it! I'm a new follower of your blog too!
ReplyDeleteWow, I totally need to do this to my living room lamp. Thanks for the inspiration!! I would love it if you'd link this up to my Marvelous Mess party. I will be choosing one project to be featured on my sidebar for a week!! Here is the link: http://marvelouslymessy.blogspot.com/2011/02/marvelous-mess_20.html
ReplyDeleteVery chic and so easy! Just how I like it. ;)
ReplyDeleteI really like this. I have a couple really ugly lamps that could use a face lift like this. Thanks for sharing such a creative idea, and in a very understandable, easy to do way.
ReplyDeleteTracy http://allthumbscrafts.blogspot.com
Love this! Need to do this on a few lamps soon! And love the red I see a glimpse of!
ReplyDeleteWhat a brilliant idea!! thanks for sharing it.
ReplyDeletegood thing about it is you can replace what
design you really want.