Tuesday, January 31, 2012

January Recap Via Instagram

Date Night
 1st Picture with Phoebe
 Frying a turkey
 No trailing wheels!
 Rainbow:)
 Pizza for the big {college} game:) We LOVE Papa John's!
 Being sick is no fun!
 Making some progress on the Airstream!
 Making a mess in the kitchen!
 100th day of school
 Jumping
 Oops!
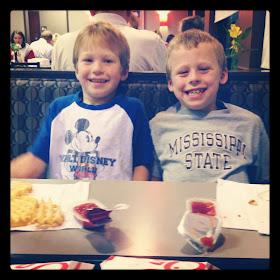
 Friday night at Chick-fil-a
 Jolie's birthday party at the park.
 Haircut time!
 1st soccer practice
 Grant thinks he's funny!
 Crazy Hair Night at Awanas!

Friday, January 27, 2012

Chocolate-Covered Strawberry Waffles

A few weeks ago, I starting thinking about making some yummy Valentine-ish waffles...fun waffles have kind of become an obsession of mine and I knew I couldn't leave Valentine's out of the mix! The only problem was that I just couldn't figure out a clever way to use my round waffle maker to make anything heart shaped. So I figured instead of making something fun shaped, I would do a combo of ingredients that are classic Valentine flavors. 
Nothing says romantic Valentine's like a yummy chocolate covered strawberry! But lets be honest here, strawberries really aren't in season right now so you will probably either end up with small not so sweet strawberries or you will have to pay a ton of money to order fancy chocolate covered ones that end up not being nearly worth the $40 you spent to have them shipped all the way from California {I don't know this from experience or anything}!
Enter the Chocolate-Covered Strawberry Waffle:
This yummy waffle concoction is made with a strawberry cake mix, so you are guaranteed that yummy strawberry flavor without having to get it shipped from California. You could also make a homemade strawberry cake mix, but then you still run into the problem of strawberries not being in season...so I would just stick to the boxed cake! The only other thing you need is a bag of milk chocolate chips.
Start by mixing up your cake mix according to the directions on the box. Then add in half of your chocolate chips and give them a good stir.
Put the other half of your chocolate chips in a microwave safe bowl and heat them until melted.
Warm up your waffle iron, spray it down with non stick cooking spray, then add your batter to the waffle iron. I use a large cookie scoop {the same one I use to portion out cupcakes}, and it takes a little more than three scoops to fill my waffle iron. Just play around with it until you get the right amount.
Once the waffles are finished cooking, carefully remove them from the waffle iron. They will be a lot softer than a regular waffle because they don't really crisp up...which you don't want anyway because you want a soft fluffy cupcake feel. Let them cool slightly, then drizzle them generously with the chocolate that you melted earlier. You can do that simple with a spoon, or you can put the melted chocolate in a little baggie, cut off the corner and drizzle away. 
I don't really recommend having these waffles for breakfast...they're a little too sweet for breakfast. But they are the perfect dessert to end your romantic Valentine's meal, or maybe a sweet treat to surprise you kids with when they get home from school on February 14th!

Linking up here..
Tatertots and Jello
Serenity Now
Decor Chic
Someday Crafts
Skip to my Lou


Thursday, January 26, 2012

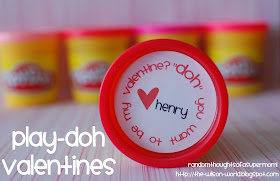
Play-Doh Valentines with Printable Labels

I love Valentine's Day.
Not the cheesy cards or the really expensive roses...but the fact that we have a whole day just to celebrate love! I remember Valentine's Day as a kid being so much fun, especially all the great goodies that we got during our class Valentine's Day party. The first few years that my boys were little, I would pick up a box of generic Valentines and let them give them to a few of their friends. But I soon realized that you could do so much more for Valentine's Day if you think outside the box! Last year I turned some clearance Tootsie Roll banks into a Sweet and Simple Valentine Favor. They turned out really cute, so this year the bar was set kind of high! I started thinking of  Valentine's ideas as soon as the Christmas decorations came down. I toyed with a few different ideas and ended up going with this cute Play-Doh Valentine after I found the 24 pack on sale last week:)
 I picked up two boxes {one for Henry's class and one for Grant's class} of regular sized Play-Doh at Target on sale for $12.99 each. When you do the math the cans of Play-Doh end up only costing a little over 50 cents each. You could also try this with the smaller party sized cans of Play-Doh, but they weren't really much cheaper than the regular sized ones. I created a fun circle label {just the right size for the regular sized Play-Doh lid} that said "Doh" you want to be my Valentine? using a tutorial I found on pinterest. 

{Disclaimer: This is my first attempt at sharing a printable and I'm not really sure what I am doing.}
Just right click on the image below and save it to your computer. Open it up in any editing software and add your kiddos name beside each of the hearts. You could also let them write their name in if you didn't want to edit it. Test print one on a sheet of regular paper first to make sure the circle are the right size for your paper cutter and the Play-Doh lids, then you simple print out as many copies as you need onto sticker paper. The page is formatted to print out on a regular 8.5 X 11 piece of paper. On my computer I have to select fit to printable area to make sure the circles are just the right size.
{A couple of readers have emailed me saying they can't get the printable to work just right when they right click and save. If you are having trouble with it send me an email  & I can send you a copy, contact me at kellibwilson (at) gmail (dot) com.}


Once you get your labels printed, use a 2 inch circle cutter to cut them out.
 Peel off the back of the stickers and place them on the lids of your Play-Doh.
 Then stack them up a take a ton of pictures because they turned out so cute! 
You could also dress them up a little more by adding some pretty ribbon or tulle...but I figured my boys would be happier without the added decoration! 
This really is a fun Valentine to give, and it worked out  perfect that there are 24 cans of Play-Doh in a box and both of my boys have 24 kids in their class. The fun part of the big box of Play-Doh is that their are ton of different colors so the boys can go home with a can of blue or green and the girls can have all the pink ones:)


Linking up here..
Tatertots and Jello
Serenity Now
Decor Chic
Someday Crafts
Skip to my Lou

Tuesday, January 24, 2012

Valentine Chalkboard Candy Boxes

I love a good holiday tradition, and if it involves candy then it's even better:) For Christmas one of my greatest candy memories is getting those cute Lifesaver Books in my stocking, and for Valentine's day nothing says tradition like a little heart shaped box full of chocolates. I remember every year my dad would come home from work with three of those little heart shaped boxes in tow...and even though my sisters and I had been eating candy all day at school, those candy boxes just seemed special. 

But let's be honest here....those store bought heart shaped candy boxes really aren't the cutest thing ever. I mean I took my time and picked out a few of the better looking ones at Target, and they still just really aren't my style. The great thing is, it's easy to make these candy boxes SUPER cute and all it took was a little chalkboard paint to get these:
from these:
 I started with three candy boxes that I picked up at Target for $1 each, chalkboard paint, and a foam brush...easy, peasy!
 Take the plastic off your candy box then start painting. I painted a few thin layers of the chalkboard paint with my foam brush. The paint won't adhere great the first couple of coats because more than likely your box will be made of shiny cardboard. Be patient and let each coat dry and then add another. I ended up doing four coats. Here's a picture after the first coat:
 You may have a little bit of warping because of the moisture of the paint, but it's not a big deal just lay the heart flat upside down after it dries to straighten it out. After your paint is completely dry, prime the surface by rubbing chalk all over it and then wiping it off.
 Then grab some chalk and have fun. You can decorate your Valentine Chalkboard Candy Box anyway you like. Add that special someone's name, put a fun Valentine's Day saying, or just draw a bunch of hearts. If you don't like your first design, just erase it and start over:)
I am planning on adding the boys names to a few candy boxes to give them for Valentine's Day. This would also be an adorable teacher's gift with a special message or picture added by your kiddo!


Linking up here..
Tatertots and Jello
Serenity Now
Decor Chic
Someday Crafts
Skip to my Lou

Monday, January 23, 2012

Meet Phoebe the Puppy

I don't know if I've mentioned this before or not, but I am really not a dog person. I don't know why exactly. I do remember that I was terrified of dogs as a child...maybe that has something to do with it. But I just am not a dog {or really any kind of animal} person. We had a few puppies growing up and I'm sure I played with them at some point, but I don't really remember ever being super attached to any of them. Now just because I'm not a huge fan of dogs doesn't mean that I don't want my boys to enjoy having a pet. We actually had a dog a few years ago {Corndog} who had an unfortunate accident with a car...but it's been a few years since the boys had a pet. 
*****
Over Christmas break, my parents got a cute little part beagle part dachshund puppy. 
And my boys {especially Henry} fell in love. 
After seeing how much they loved playing with Eddie, I knew it was time to get them a puppy...and luckily Eddie had a sister that needed a home too.
And so we got Phoebe:
 She is actually a really good puppy.
She plays well with the boys, hasn't tore up much in the yard, knows to stay away from our cars, doesn't bark loudly, only eats a little bit of food, and she poops in out of way places:)
We bought her a cute little wooden dog house and she has a pillow and blanket. For the most part she is content to nap in the sun during the day and sleep in her doghouse at night. We have let her in the house on the few cold nights we've had...and she is great about coming in and going straight to her little kennel by the back door. 
 Phoebe is getting pretty good at playing fetch. She loves the little squeaky balls the boys picked out for her a few weeks ago, and she also like to play with stray socks that the boys leave outside by the trampoline. Eli usually goes out and plays with her for a little bit in the mornings while Henry and Grant are at school...and she really gets some fun play time in the afternoons with all three boys:) So far the boys have been pretty good about taking care of her...Henry is in charge of food and Grant is in charge of water. And Henry is now officially on pooper scooper duty too!
 So for now, I am trying my best to a dog person...and I have to say, it's actually nice to have another girl around the house!

Thursday, January 19, 2012

Let's Go Fishing


 Give a man a fish
 and you feed him for a day.
 Teach a man to fish
 and you feed him for a lifetime.
 Chinese Proverb


Wednesday, January 18, 2012

100 Days

Today is Henry and Grant's 100th day of school. Their school always has a fun 100th Day Party with all kinds of fun 100 activities. Earlier this week both boys took baggies with 100 items in them {Henry took toothpicks and Grant took Conversation Hearts} to share with their class. And yesterday the boys and I helped Grant's teachers hang 100 balloons from the ceiling of their classroom.
Yesterday I was also up to my eyeballs in cake and homemade buttercream icing:) Grant's teacher asked last week if I would make a 100 cake for their class, and I was more than happy to help out!

 Honestly making a 100 cake really isn't that hard. It doesn't take a rocket scientist to figure out that all you need is a rectangular piece of cake and two round cakes. I mixed up two store bought box mixes. One I place in a 13X9 pan and the other I divided into two round 9" pans. After the cakes baked and cooled, I stuck them in the freezer to harder up. I've learned the hard way that boxed cakes don't keep their shape well when you cut them unless they are pretty close to frozen. After about an hour in the freezer I pulled out the two round cakes and used a 3" round cookie cutter to cut a hole in the center. To make the one, I lined the almost frozen 13X9 cake up next to the zero and cut it as proportionally as I could {sorry I forgot to measure how big the one was}.
 After I had the cakes cut and ready, I did a crumb coat of buttercream icing. I used the Vanilla Buttercream recipe from Cookies & Cups and it work really well. After I did the crumb coat I stuck them back in the freezer to chill for about 10 minutes. Then I added the final coat of icing. It's not perfect by any means...one of the reasons I don't make cakes often is because I can never get the icing as perfect as I want it. But the pretty M&M's distract you from the imperfections:)

Weekend Bloggy Reading

Tuesday, January 17, 2012

Just Some Rambling

I'm making a cake for Grant's class today. A "100" cake for their 100th day of school tomorrow. I'm thinking about trying homemade buttercream frosting. I've only ever made homemade chocolate and caramel frosting before and I'm kind of worried....but I didn't buy any cans of store bought frosting for back up so I hope it works. I've seen a few recipes here and there that look pretty good, but somehow all these yummy baking blogs make their cakes look amazing and I know mine will never look like theirs!

Eli and I are home today waiting on the Dish Network guy to come out and work on our dish. We've been having trouble with it for a few weeks....the one channel that we can't get to work {that we really need} is Nick Jr! Kind of crazy that the channel watched most in my house is the one that is messed up! So we are waiting from 8-12.

I was sick last week.  Like really sick. Apparently my low immune system means that when I get something like strep throat it really hits me hard. I seriously didn't get off the couch for almost three days straight. I only left the house one time between last Monday night and yesterday and that was to pick up my antibiotic at the pharmacy.I don't think I would have survived if my mom hadn't watched the boys for me last week though. She picked them up at school on Tuesday and kept them until Friday so I didn't have to deal with drop off and pick up each morning and afternoon. I'm feeling much better today, though I'm still a little tired. I guess that's what a fever, sore throat, and lymph nodes swollen to the size of house will do for you:)

We got a new puppy the week after Christmas. I tweeted a picture of the boys with her a few weeks ago, but I still haven't gotten around to taking pictures to share here with you. Our new pup's name is Phoebe and she is actually a pretty good puppy {and this is coming from me the not really a dog person}. She is a tiny little thing that is part dachshund part beagle, and she plays really well with the boys. Even Eli who is technically scared of dogs love to play with her and pet her. When we got home from dropping Henry and Grant off at school this morning, Eli reached down to pet Phoebe and said "I missed you Phoebe". Isn't that the sweetest thing ever?!?

Jason took the boys to sign up for soccer last week. Henry and Grant {who are just a little over 16 months apart} never seem to be able to be on the same team! It seriously blows my mind that they can be that close together and still fall into different age groups. It mostly has to do with their birthdays though. For spring sports Henry's birthday is three weeks ahead of the age cut off, and for fall sports Grant missed the age cut off by 22 days. That means in most cases, Henry has to move up but Grant is too young to move up so they end up on different teams. So we are back to the same thing we had to deal with during football....Jason is coaching Grant's team and Henry is hopefully going to be on the team that our friend is coaching.

There are still a few traces of Christmas hanging around my house. I still have out some cute green polka dot {with red accents} napkins out, and I still have a Christmas printable in my kitchen frame. I have been brainstorming some ideas for a cute picture printable similar to the "I am Thankful for..." printable that I made for Thanksgiving. I have also been trying to think of a cute {original} Valentine for the boys to take to school, but so far I've got nothing!

The boys got their report cards last week. They both did really well and made all A's. I made a copy of their report cards before I returned them so we can get some yummy free donuts at Krispy Kreme one day this week. Krispy Kreme is so not on my diet, but a yummy chocolate iced donut sure does sound good right now:) I need to get back on my diet after being off for a week while I was sick...though I actually lost about three pounds while I was sick because I all I did was drink Diet Sprite and each chocolate pudding!

Now that I've talked about donuts and pudding, I'm hungry...so I'm off to find some breakfast. Have a great day! I hope to be around soon to check up on all the bloggy goodness that I missed last week!

Tuesday, January 10, 2012

January Un-decorating & Redecorating

We took down all of our Christmas decorations last week. The tree had been down for a few days, but all the garland, wreaths, and pretty sparkly stuff was still hanging...and since it was almost two weeks after Christmas, it was time for it to come down. But for some reason the house seems so bare once all the pretty Christmas stuff comes down. Our front door is empty...no pretty wintery wreaths here {when the temps have been in the 70's it hard to put something that says "Let it Snow" up!}.

So since we aren't really into celebrating winter when we don't get to experience one...I decided to just jump right into Valentine's Day decorating! The first thing I did was dump out all the peppermints from my Candy Jars and add in the Conversation Hearts that I saved from last year:) No sense in buying new candy every year when all it is used for is decorations! After Valentine's Day last year I poured all five jars of Conversation Hearts into a Ziploc bag and stored them in the back of the pantry. And now they are SUPER cute back in my jars again this year for Valentine's Day!

Since I'm in the mood to get ready for Valentine's Day I figured I would share a few of my favorite past project just in case anyone out there is looking for some V-Day inspiration! 


Now I'm off to find my Hula Hoop Wreaths from last year so my front doors don't look so bare. Then I may start working on a yummy Valentine's Day snack to share with you {after I work on getting the three mountains of laundry put away first}!