Home AboutMe Crafts Food
Showing posts with label Roadtrip Ready. Show all posts

Friday, June 15, 2012

Roadtrip Ready Round-Up

First I want to say THANK YOU to all my amazing blog friends who helped out with this series! You all shared some amazing ideas! I hope that everyone enjoyed all of the posts in my Roadtrip Ready series. I can honestly say that we used a ton of these ideas on our roadtrip and they really did make the trip better! My boys LOVED the Travel Snack Boxes and the Roadtrip Countdown:) I got a ton of complements on their cute Roadtrip T-shirts, and my camera managed to make it home safely thanks to my Padded Camera Bag! Anyway, I thought it would be fun to do a little round up with all the posts from the series so that the next time you are planning a roadtrip, it will be easy to find all these great ideas in one place!


Linking up here..
Pin It!

Wednesday, May 30, 2012

Roadtrip Ready: Keep Them Busy Baskets


Hey guys! I'm Staci from lizard & ladybug. I am loving the Roadtrip Ready series that Kelli is having!! I'm thrilled she's having me today! I don't know about you but having 2 little ones (4 and 6) in the car for more than a Target run can be stressful. In the event we have to take a long trip, I've put together some baskets for each of them full of goodies to keep them quiet busy :)
 I ran to Dollar Tree to pick up a few essentials. Baskets, lined paper, magnetic letters, flash cards and pizza pans. The pizza pans are magnetic and make the perfect 'board' to use the letters.

I also added some crayons and a crayon box.

 I found these cool 'window' markers (anyone try them?) I thought the kids would get a kick out of writing on their windows.
The kids can draw, play with the letters, practice their math (lizard) and letters (ladybug) And if all else fails, I have candy :)
There you have it. My "Keep Them Busy Baskets".
Thanks for letting me visit & I hope you'll stop by my blog and say Hi!
Pin It!

Tuesday, May 29, 2012

Roadtrip Ready: Travel Bingo

Hello, everyone! My name is Amy, and my blogging home is Positively Splendid. It is my goal for my blog to be a haven of DIY and crafting inspiration where creative minds of all skill levels can come and feel right at home. I would love for you to stop in for a visit! I am thrilled to be a part of Kelli's Roadtrip Ready series! With summer upon and and roadtrips right around the corner, I have gotten so many fabulous ideas throughout the last few weeks for making all of those hours in the car a little more bearable. Today I am going to share a game I am planning to play with my kiddos during a roadtrip we have planned in a couple of weeks: Travel Bingo!
This bingo game is played exactly as you would traditional bingo. I recommend printing off a copy of each of the game boards below, and then having them laminated to make them sturdy. 
To play, as you travel to your destination, kids keep an eye out for all of the items on their respective card that they see along the way: trucks, trains, cows, horses and many more. When an item on a card is spotted, have dry erase crayons or makers on hand so they can mark off the spaces as they go. The first one to get a Bingo can be awarded a special treat. Or, to make the game last even longer, play a game of Black-Out where the winner must mark off every square on their board in order to win!
To download the Travel Bingo printables, simply click on the arrow with the line below it at the bottom right-hand side of the boxes below.
Card #1


Card #2


Card #3


Card #4


Thanks so much to Kelli for having me over today! Y'all are welcome at Positively Splendid any time.
Happy travels, everyone!


Photobucket
Pin It!

Friday, May 25, 2012

Roadtrip Ready: Altoids Souvenir Tin

Souvenirs are a big part of any trip...but they can get expensive. That is especially true if you are on a roadtrip with stops at a lot of different places. Plus if you anything like me, your vehicle {and/or camper} is probably already packed pretty tight, so there isn't a lot of space for a bunch of big souvenirs. I saw this idea for Mint Tins Collection {the blog post has quite a few ideas for using Altoids tins, but this was by far by favorite} a few months ago, and I decided it would be the perfect way for my boys to take a little bit of each place home with us...without breaking the bank or overloading the car:)
I started with a couple empty Altoids tins, some white cardstock, and a variety of letter stickers.
Simple turn your tin upside down on a piece of cardstock and trace around the lid. Cut it out and hot glue it onto the lid of your tin.
Then use your stickers to decorate the lid. I chose to just use letters and spell out the places we are visiting on our trip, but any fun stickers would work. Maps, brochures, and postcards would also be great to use for covering the lid of your Altoids tin.
When you are on your roadtrip, simple collect small things that fit into your tin and will remind you of your trip. You can also add a piece of paper with the date of you visit along with any other information you may want to remember. Pictures from each of your stops would also be a really fun addition {I'm thinking some great Instagram shots would be perfect in these}! There are a million and one ways that you can personalize these for your vacation, the main idea here is to take a small memento from each place without spend a ton of money or taking up value leg room in the car:)
Does your family collect anything special when you are on a roadtrip?
Pin It!

Wednesday, May 23, 2012

Roadtrip Ready: Make a Padded Camera Bag

I have wanted {and needed} a nice bag for my DSLR camera since the first day I bought it. I got the plain black camera bag at the store when I first bought my camera...and it worked fine when I only had one lens. But when you start adding lenses and accessories, those standard black bags just won't cut it. I have drooled over some fancy leather camera bags online, but I just can't make myself spend $100 or more on a bag {and yes most of my purses cost less than $30 and are from Target or Kohl's}. So a few weeks ago when I saw this AMAZING tutorial from Make it and Love it I knew that instead of continuing to drool over camera bags, that I would just make my own.

I started out with a bag from Target that cost $15. The thing that I liked about this bag is that it has the longer strap, so you can wear it across you chest...that way you can do a million other things and not worry about dropping your camera bag. And even though I love the leather bags that I've seen online, this fabric one was way cheaper and I can just toss it in the wash if it gets dirty!
I {kinda/sort of/halfway} followed the tutorial from Make it and Love it and created this cute little padded insert that slips right into my bag. All you need it a little bit of foam and some pretty fabric. I'll  let you click over to the tutorial for the details because although my bag is functional for me, I didn't include a lot of the extra things {like Velcro to hold the divider in place} that the original tutorial did.
After I made the padded insert, I just slipped it down into my bag and added in my camera. Now my camera has a pretty and safe place to stay while we are roadtripping across the West this summer:)
How do you keep your camera safe when you are on the road?
Pin It!

Tuesday, May 22, 2012

Roadtrip Ready: Elastic Bookmarks


Hi Friends...I'm (the other) Kelli and I am honored to be over at THE Kelli's spot today.

I blog over at Outside My Kitchen Window where I randomly talk about my life...my walk with Christ, my hubby and two kids, crafting, and my attempt at organizing my life :)

Today I'm sharing something neat that I discovered a few years ago...simple elastic bookmarks.

On road trips I read a lot in the car and so does my oldest child.  Since we have enough stuff to keep track of on a road trip it is nice to have something that we don't have to worry about losing.  These bookmarks stay in place all of the time...so Jamison and I don't have to worry about losing our place in our book if we happen to fall asleep while reading.  This also eliminates having to search the already-crowded car for a bookmark.

Here's what you'll need:
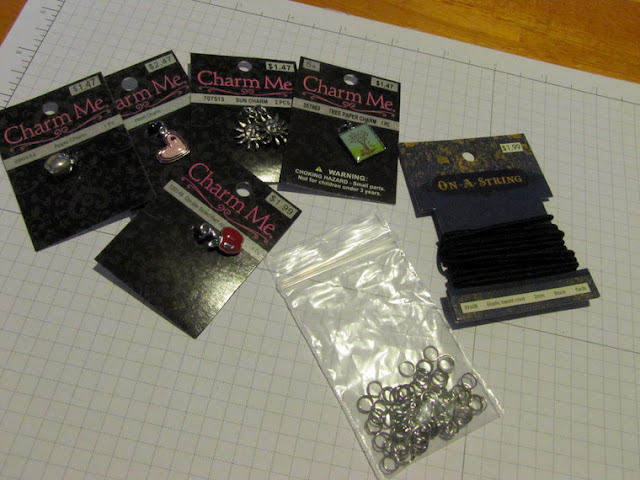
Charms, rings & elastic string.  All of these things you can find in either Michaels or Hobby Lobby in the jewelry making section.  I found all of this at Hobby Lobby (one of my favorite places).
There are usually a wide variety of charms to choose from...I'm using this one for Jamison's teacher.  The one I made for Jamison has a cupcake charm :)
Here's another charm and that thought was really cute.
Once you have all of your materials you will measure your string...you need 15 inches.

Depending on which charm you have will depend on whether or not you will need the ring.  This apple charm already has an extra ring so you can just slide the string directly through the ring of the charm.
This charm has a smaller ring and does not have an extra ring so you will need to take one of your rings and attach it to the charm...like you would attach a key ring.
Now you are able to string your charm.
See...
*Please excuse the blurry picture*  You will make a knot to secure the charm.
Then make a knot at the top.
Finished product!
You will then simply loop the bookmark around the book to hold your spot.  You can leave the bookmark in the book while you're reading too because it doesn't get in the way.  This way you never have to take it out of the book...you just move it to the next place that you stop.
See...doesn't fall out!

So there you have it...a simple bookmark...leaving you with one less thing to worry about and allowing for more joy on the road.

Thanks for having me Kelli :)
Pin It!
Related Posts Plugin for WordPress, Blogger...