Home AboutMe Crafts Food
Showing posts with label Crafts. Show all posts

Friday, March 15, 2013

St. Patrick's Day Reverse Applique Shamrock Initial Tee

If you've been around my blog long, you know that crafty shirts are one of my favorite things to make for my boys! I have made them for almost every holiday, birthday, and special occasion for the past few years. This year I decided to some cute shirts for St. Patrick's Day...but they needed to be church friendly since St. Paddy's day falls on Sunday this year. So I picked up a couple green polo shirts from Target and added a cute, but subtle shamrock to each of them using a reverse applique technique.
The first step is to decided what kind of design you want. I decided to go with a smallish clover with each of the boys' initials placed inside the clover. I found a clip art clover, opened it up in photoshop, added the letters on top of the clover, and then printed out the page. 

To get the shirt ready, decided where you want your design to be. Then pin your fabric of choice to the inside of the shirt with the right side of the fabric facing the shirt. Sounds kind of confusing, but the picture on the left should help a little. Then turn your shirt right side out and pin your design to the shirt making sure that all of the design fits where you pinned the fabric inside. 


The next step is to sew around the edges of your design. For my shirts, I sewed around the clover and also around the outside of each letter. 
Once you finish sewing, simply pull up the paper to reveal your design. 
Now, comes the fun part! Using a small pair of scissors, carefully cut out the inside of your design as close to the stitching as you can get without cutting it and without cutting through the layer of fabric underneath. I usually start in the center of the design because it is easiest to separate the shirt from the fabric. For my shirts I had to go around the inside of the clover and also around the outside edge of the boys' initials. 

And this is what the finished project looks like! You can also start out easy with just a solid shape so you don't have to deal with cutting around the initial. I think they turned out pretty cute for a basic polo, a scrap of fabric, and a little bit of time!

Linking up here..
Pin It!

Wednesday, February 13, 2013

Love at 1st Bite Valentines

Valentine's Day is one of my favorite holidays. It is full of pink and kisses and candy and hearts and sparkle. Basically it's a little girl's dream...and a little boy's nightmare! It can be really hard to come up with Valentine ideas that don't leave boys running for the dirt pile, and I have to admit that in the past I've made my boys suck it up and take pink, girly Valentine's to school. But last year after Halloween when I came across these cute Glow in the Dark teeth on clearance, I knew they would make a really fun and very boyish Valentine!

I started with a couple packs of clearance Glow in the Dark teeth, cute chevron bags, sticker paper, washi tape, and mini candy bars. I designed the cute Love at 1st Bite printable on my Silhouette software and then print and cut them out with my Silhouette. I saved the printable without my boys' names too, so if you have a Silhouette and you want the printable file just send me an email {kellibwilson @ gmail.com}.
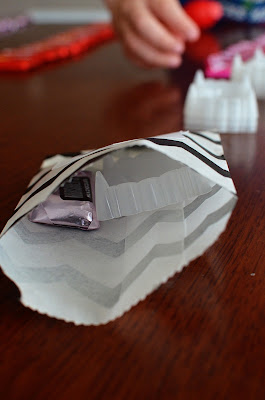
I stuck a sticker onto the cute chevron bags...
...and then stuck in the Glow in the Dark teeth and a mini candy bar. I made the black bags for the boys and the pink ones for the girls.

To close up the bags, I folded over the edge and secured it with a little bit of washi tape.
I think my boys are going to be excited about taking these Valentine's to school tomorrow. They are boyish enough for them, but still really cute and Valentine-like for me {and all the girls in their classes}!
Pin It!

Monday, February 11, 2013

Eleven Fun and Easy Valentine Ideas

For some reason Valentine's Day crafting and creating has been difficult for me this year! I'm not sure if it's because I used up all my creativity over the last few years, or if Pinterest has made me feel way less creative than I thought I was. Either way, the new Valentine ideas have just not been flowing much this year. So I thought  it might be fun to recap a few of my past Valentine's Day ideas in one big Valentine Round Up post!  They are all really cute and really easy to do...which is perfect for all us busy moms who really don't have to make all of those amazing Pinterest level crafts!


Pin It!

Thursday, February 7, 2013

Kaleidoscope Valentines

Valentine's Day is such a fun holiday! I have so many great childhood memories of making Valentine boxes and passing out cute cards in class. And as fun as store bought cards are, I really love making and sending more personalized Valentines to my boys' classmates. {You can look back HERE and HERE to see other examples of the cute Valentine's that I've come up with for my boys to send to school.} This year, I struggled a little with finding a fun {and original} idea...mostly because there are SO many great ideas on Pinterest these days! Anyway, as I was browsing the aisles of The Dollar Tree last week, I came across these packages of cute Kaleidoscopes that I knew would make adorable Valentines. And the major bonus here is that I made enough for Eli's whole class for around $2.00!
I started with these little kaleidoscopes. I picked them up at the dollar store and they came 8 in pack for $1.
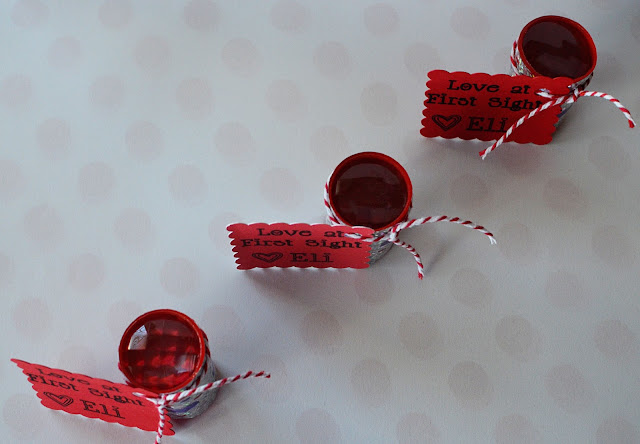
Then I used my Silhouette to cut out these little tags that say "Love at First Sight". If you don't have a Silhouette, you can easily just print the saying on card stock and then punch them out with a decorative hole-punch or even just cute them out scissors.
I tied the little tags on with some red and white bakers twine...and ended up with these adorable Kaleidoscope Valentines!
And a bonus with these Valentines is that the kiddos are getting a little toy to play with instead of even more candy!
Simple, easy, and SUPER inexpensive Valentines from just a few supplies and a little trip to the dollar store!

Linking up here..
Pin It!

Thursday, December 20, 2012

Easy Teacher Gifts in Jars

*mason jars*
*fabric*
*string*
*gift tags*
*& some kind of sweet treat*
 *quick, easy, inexpensive, and SUPER cute*

Pin It!

Friday, December 14, 2012

Pallet and Hay Christmas Display

I never thought that back in August when I asked Jason to bring an old pallet home from work, that I would still be using it in December! That one pallet has gone from Barynyard Party to Fall Display to Christmas picture backdrop, and now I'm using it in my Pallet and Hay Christmas Display! It has been one of the most versatile outdoor decorations I've every had...and it was basically free except for the embellishments that I added to it! 


To dress the pallet up for Christmas, I turned it 180 degree so that the fall saying was at the bottom {that way I can use it again next year}. Then I added a Christmas Bible verse to the top with some vinyl that I cut with my Silhouette. I would recommend using outdoor vinyl, but if you don't have any {like I didn't} you can use regular vinyl and then spray a really good coating of clear sealer over the letters after you stick them to the pallet. At night our Mary, Joseph, and Baby Jesus light up, so I kind of want to add a light up star to the display somehow but I haven't quite figured it out yet!

Linking up here..
Pin It!

Thursday, December 6, 2012

Washi Tape Christmas Trees: Easy Kid's Craft

If you  are looking for a fun, quick, and easy Christmas craft to do with your kiddos, look no further! It doesn't get cuter or easier than these Washi Tape Christmas Trees!
Start with a print out of a Christmas tree outline, some colorful washi tape, and scissors.
 Let your kiddo cut out the Christmas tree, 
 then give them a couple of rolls of washi tape and let them get busy covering the whole tree.
 They can do a solid color tree, 
 make a pattern, or just decorate it randomly. 
 I let my boys cover their tree on our kitchen table making sure to go all the way {and past in some cases} to the edges...the beauty of washi tape is that is isn't so sticky that it leaves a mess if it sticks to furniture {or kids or clothes}.
 When they are done covering the whole tree, simply peel it up, turn it over, and trim off the excess tape.
 Showing off their Christmas trees!
 Laughing at the silly dogs who photo-bombed us:)
 These would be really cute framed, strung up together to make a garland, or even sent to friends and family in the mail! So break out the washi tape and get busy making some cute and easy Christmas trees!

Linking up here..
Holiday
Pin It!

Monday, November 19, 2012

I am Thankful For Printable

Last year I shared these really cute I am Thankful for printables that I made. I actually loved them so much that they stayed up all year!
Now that Thanksgiving has rolled around again, I thought it would be fun to use the same printable again and just update the picture and let the kiddos update what they are thankful for! So I searched through my pictures from last year and found a couple cute ones of the boys and printed them out again using THIS printable and Photoshop. I thought since it was such a big hit here last year, I would work on making it a printable so you could print it out too:)
******
You can right click and save or open up THIS link and head over to Google documents to download it.

After you download the file, just open it up in Photoshop {or whatever photo editing software you use} and place your picture on top of the gray square. If you don't want to deal with photo editing software, you can always just print it out and tape your picture right to the page!
**************
I'm still working on getting the boys to finish up their drawings and getting them hung up, but when I do I will share a picture with you! And if you use this printable, I would love to see what your kiddos are thankful for too!
Pin It!
Related Posts Plugin for WordPress, Blogger...