Home AboutMe Crafts Food

Monday, April 30, 2012

April Recap Via Instagram

Road trip to Atlanta
 Yummy food at the Varsity
 Homemade marshmallows for Easter
 Assembling Ikea furniture for the Airstream
 Map covered table in progress
 BBQ at the Shed!
 Listening to the Easter Story at the egg hunt
 Easter eggs
 Ice cream for Henry's 8th birthday
 Eating grilled corn in the back yard
 Homemade Mint Cookies and Cream ice cream
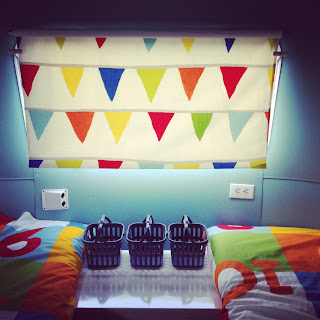
 Fabric covered roller shades in the boys' room in the Airstream
 Eli covered in dirt from playing outside
 Bowling ball cupcakes for Henry's party
 Silly boys on the way to the bowling alley
 STRIKE!
 Birthday cake
 I started reading the Hunger Games....so good!
 My new bike
 Eli and his pillow fort
 Early morning P90X workout
 A tractor plowing a field near our house
 Going for a bike ride
 A week full of field trips
 Phoebe recovering from surgery
 Book #2
 Field trip to the movies
 Eli's first dentist visit
 Henry putting together one of his birthday presents
 More fabric covered roller shades in the Airstream
 Phoebe getting a little fresh air
 Back to the walking track to get in {better} shape before our trip!


Pin It!

Friday, April 27, 2012

Strawberry Tallcake

Jason's birthday was last week. We really don't make a big deal about our birthdays anymore. It seems like once you have kids, their birthdays are fun and your birthdays just mean you are getting older:) Even though we don't do much, I do always make some kind of special cake for my hubby. I've made some fun cakes for my hubby over the years, like a Krispy Kreme donut cake and an Oreo cake {which I apparently didn't blog about}. But this year he wanted something different...something from our past that we both loved: Strawberry Tallcake! Do any of you remember this SUPER delicious treat that they had on the menu at Ruby Tuesdays a few years ago. It must have been really popular when Jason and I were dating and in college, because I remember a ton of times that we went and order just a Strawberry Tallcake with two spoons as a special treat. 
The recipe to make this Strawberry Tallcake is a little complicated. It was kind of a lot of work, but it was so worth it! Basically it's sponge cake layered with a strawberry mouse then topped with strawberry syrup, ice cream, and whipped cream. Getting to the assembling and layering part takes quite a few steps....BUT this cake seriously tasted just like the Strawberry Tallcakes that Ruby Tuesday used to bring to our table in a huge glass goblet.
I found the recipe HERE.
Sponge cake:
5 eggs, separated
1 1/2 cups sugar
1/2 cup cold water
2 tsp vanilla
1 1/2 cups AP flour
1/2 tsp baking powder
1/2 tsp salt
1/2 tsp cream of tartar


1. Preheat oven to 350 degrees
2. Beat the egg yolks until they are creamy and lighter yellow. Add in the sugar and blend well. Add water and vanilla mix until combined.
3. Sift together flour, baking powder, and salt and add it to the yolk mixture. Mix well until the batter is smooth. In a separate bowl, beat the egg white until smooth, then add the cream of tartar. Continue beating until the egg whites are stiff and form peaks. Fold the egg whites into the batter and mix slowly until well combined. 
4. Pour the batter into an ungreased 17X11 cookie sheet and bake for 25 to 30 minutes or until the top of the cake is a light brown color. 

Strawberry Mousse and Syrup:
10 oz package of frozen strawberries in syrup
1 3/4 cups of water
3 oz. package of strawberry Jell-O
1 cup of heavy cream

    1. Defrost the frozen strawberries and pour the entire package, including syrup, into a blender and puree for 10 to 15 seconds until smooth. Combine  puree with 1 1/2 cups of the water in a small saucepan over medium heat. When the strawberry mixture comes to a boil, add the entire package of Jell-O, stir to dissolve, and remove the pan from the heat to cool. When the strawberry mixture has cooled to room temperature, divide it in half into two medium bowls.
    2. Beat the whipping cream until it is thick and forms peaks. Fold the cream into one of the bowls of the strawberry mixture until well combined. This is your strawberry mousse. Cover and chill. To the other bowl, add the remaining 1/4 cup of water. This is the strawberry syrup. Cover and chill this mixture as well.
After the cake has cooled and the mousse and syrup have been chilled, you are ready to started assembling your Strawberry Tallcake. Divide the cake into three even pieces. Put down the first cake section, cover it with half of the mousse mixture. Add another cake section and cover it with the rest of the mousse mixture. Top the whole thing off with the last section of cake. {You could also make these individual sized by cutting small circles of cake and layering them with the mousse.} The layered cake can be refrigerated for a few days until you are ready to serve the cake. To serve, cut a piece of cake and place it in a bowl or large goblet. Top it with a couple of scoops of vanilla ice cream, a drizzle of the strawberry syrup, and a good squirt of whipped cream.
{Recipe adapted from recipecircus.com}
Pin It!

Thursday, April 26, 2012

Roadtrip Ready Blog Series

As most of you know, we are heading out on a big roadtrip in a few weeks. I have a ton of projects {besides the Airstream} that I am working on in preparation for our trip. So I decided it might be fun to put all of my ideas {and a few guests posts too} into a blog series. I'm calling this fun new series "Roadtrip Ready" and for the whole month of May I will be posting great tips, crafts, and recipes that will help you get ready for a roadtrip. 


I'm still looking for a few more guest posts, so if you have any blog posts {new or old} that you think would be a great addition to the series, send me an email and we can work something out!

Check back next Tuesday {May 1st} to see the first post in the series! It is going to be a fun one! 
CLICK HERE TO SEE ALL THE POSTS IN THE SERIES!
Pin It!

Tuesday, April 24, 2012

Doggy Drama

Back in January I introduced you to our new puppy Phoebe.

I also admitted that I'm really not a dog person, but I wanted the boys to have a pet so we brought home a cute little puppy for them. Since then Phoebe has been a great pup for the boys. Other than chewing up a few things here and there and barking at the wind at 10 o'clock at night, she really has been the perfect little puppy.
But since yesterday, Phoebe the puppy has been stressing me out! Something happened to her Sunday afternoon. We still aren't quite sure what. Possibly she got hit by a car, or maybe she got kicked by our neighbors' horse, or maybe a bigger dog attacked her. We're not sure how, but Phoebe got hurt and not just a little hurt apparently.
Jason took her to the vet in our little community first thing Monday morning. They did an exam and an x-ray of her back legs, which seemed to be the major problem. They didn't find anything serious and said that maybe she has sprained something. They let Jason bring her home with instructions to keep her in the house and confined for about two weeks to give her sprain a chance to heal. So after paying $300 in fees, he brought her home, gave her some food and water, and put her in her little doggy cage.
When I got home from school with the boys, I noticed that she seemed worse than she had that morning. I think Jason thought she was just tried or hurting, but I knew something wasn't right. She ate a little bit, went out to do her business, and then laid down. I brought her back in so I didn't have to worry about her running around and hurting herself more, but after a while I noticed she wasn't breathing right. We let her out thinking maybe some of the medicines had given her an upset stomach. She walked around for a while, and looked like maybe she was trying to vomit. Then she laid down in the edge of the flower bed and didn't really move...she was just really laboring to breath.
So at 7:45 last night Jason took her over to an emergency clinic about 20 minutes away. They examined her ans said she was obviously in pain and that she was really dehydrated. They ended up putting in an iv and then keeping her to run a bunch of tests. Jason was told they would call back within the hour with the results and let us know what they found.
We stayed up for a while waiting on a call back, and when we hadn't heard anything around 10:00 we called over to check on her. The doctor called us back about 30 minutes later and said that from the x-ray they did it looked like she had probably been hit by a car. Her diaphragm had a tear in it and it looked like she was bleeding internally. The tear and the bleeding was making it hard for her to breath which is why she was in so much pain. The doctor said they really needed to go ahead and do surgery to repair the tear right then, because she was just getting worse and worse.
Without know just how much doggy surgery was going to cost, we told her to go ahead with it. As much as I'm not a dog person, I really couldn't bare the thought of her hurting like that, and I knew the boys would be so heartbroken if she didn't come home. They did the surgery, and called about a little while later to say that things had gone pretty well. We went to bed last night hoping and praying that she would be fine through the night.
We are up and going this morning. The boys have asked where Phoebe is and all I've told them is that she is at the doctor still. I don't want to tell them about all the details until we get an update on her. I'm hoping that we get a call with an update soon this morning. I've never been through this kind of thing with a dog, and I'm really not sure what to expect over the next few weeks. How does a dog recover from surgery? Especially an outside dog that is used to running around wild!
Anyway, for now I am stressed and we are waiting.
Hopefully, we'll have good new soon. In the meantime, I'm wondering just how much emergency surgery on a dog costs!
Pin It!

Friday, April 20, 2012

Project Airstream Update: A Video


We have been working hard on Project Airstream....and it's been a while since I've shared about our progress. So this time instead of just posting a couple of not so great picture {It is really hard to take good shots in such a small space!}, I thought I would share a little video tour. I have to tell you that I went WAY out of my comfort zone to film and share this video. I hate the way my voice sounds on recordings...and I almost thought about doing a silent video tour. But I decided you really needed a little narration to know what you were looking at, and then I just couldn't stop talking! This video is a little longer than I was planning...apparently I got more comfortable talking and filming as time went by. And hopefully my shaky filming doesn't make you too queasy! Enjoy the video:)

Here's a few quick pictures just in case you don't have time to watch the video right now:


We've come a long way from the 1977 {retro & not in a good way} Airstream that we brought home last June {click HERE to see pictures of what we started with}, but we still have a lot to do to get ready for our big trip at the end of May! I would love to know what you think about our progress so far!
Linking up here..
Pin It!

Wednesday, April 18, 2012

Earth Day Waffles

Earth Day is this Sunday, and I thought it would be fun to whip up some waffles to celebrate. I have to admit though that other than the fact that these waffles look {a little bit} like the earth, there isn't anything really "earthy" about them. As I was mixing in the food coloring to make the blue and green batter, I realized that it would have been much more "earthy" for me to use fruits and veggies to dye the batter. So if you really want to celebrate Earth Day the right way with these waffles break out the blueberries and spinach...or you can be like me and just add in a little dye and enjoy the pretty colors:)
 I started by mixing up some store bought waffle mix according to the package directions. Again if you want to be extra "earthy" make your own homemade waffle mix...and I guess you could even grind your own flour too if you REALLY want to be "earthy"!
 Divide the batter into two bowls pretty evenly...even though there is way more water than land on our planet it is a lot easier just to put equal amounts of both colors onto the waffle iron:) Then add a little bit of green {either food coloring or pureed spinach} to one bowl and a little bit of blue {either food coloring or pureed blueberries} to the other bowl. Let your little assistant give each bowl a good stir with a whisk until you get the color that you want.


Spray your preheated waffle iron with non-stick spray and add the batter onto the waffle iron. You can just pour it on and spread it around or you can really try to make it look like a view of the Earth. I tried to make mine look like the Earth...can you see North & South American on the left, a little bit of Europe on the top right, and Australia on the bottom right?!? After you've added your batter cook your waffles on a pretty low setting to prevent it from browning too much. 
Our waffles ended up getting a little more brown than I wanted, but I just called it dirt and took a few pictures to share with you:) They tasted the same even if we had to pretend that the brown parts were dirt!
I think these is going to be my boys' after school snack today and then maybe we will work on a recycling project to really get us in the Earth Day mood!

Do you do anything to celebrate Earth Day?
Linking up here..
Pin It!

Tuesday, April 17, 2012

HGTV.com feature

A few weeks ago,  I got an email from a writer for HGTV.com asking if they could feature my Outdoor Toy Organizer in an article on the HGTV.com website.
To say that I was excited would be a major understatement!
I love watching HGTV and I love browsing HGTV.com for awesome ideas....so knowing that one of my projects would be featured there was such an honor. I got an email today saying that the article was up and I was so excited that I just had to share it here with y'all! The article is called Clever Uses for Everyday Items in the Garage. I know my original project was for outdoors, but honestly it would work even better inside a garage! Here's a little preview of what the article is about straight from HGTV.com:
Upcycled decor is smart and savvy, so why save all the best ideas for inside the home? We've gathered clever redos from inspired DIYers with a talent for giving new life to old things that are perfect for the garage.


I would love for you to hope over to HGTV.com and check out the article. I know you have all seen my Outdoor Toy Organizer before, but there are also a ton of other great ideas that are perfect for organizing your garage or outdoor space...just in time for spring cleaning too! 
Pin It!

Monday, April 16, 2012

How to Plan a Bowling Party in Less Than a Week

I love a good kid's birthday party. Especially if it is a theme party with lots of fun details....and that is usually the kind of party that I plan for my boys. But somehow life got SUPER busy these last few months and Henry's 8th birthday got here way too fast. It probably didn't help that his birthday was a few days after Easter and during the boys' spring break! The week before his birthday, I hadn't done much of anything as far as planning goes....actually I was still trying to decided between a baseball party or a bowling party. I had considered taking Henry and a few of his friends to a minor league baseball game in a nearby city, but in the end bowling won out mostly because it was easier to take kiddos to the bowling alley during the day than to have them out at a baseball game until 10 o'clock at night!
************
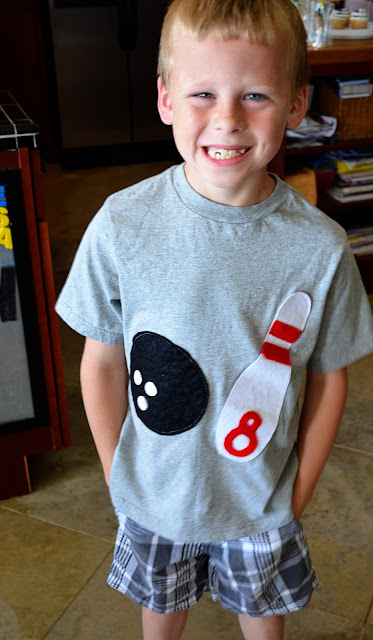
The first thing I did to get ready for Henry's birthday was to make him a birthday shirt. I printed out a clip art bowling pin and bowling ball, cut them out with some felt scraps, and sewed them onto a t-shirt.  I added the 8 to the bowling pin since it was Henry's 8th birthday:) He LOVED his shirt {and so did the manager at the bowling alley...she took Henry's picture in his bowling shirt to add their website!}
 I made a dozen cupcakes and decorated them like bowling balls. I used a black sheet of that sugar paper stuff that they have in the cake decorating section, and then I added a few dabs of white icing for the holes in the bowling balls using a ziploc bag.
 I also put together some cute party favors for the boys. I bought a pack of plastic trophies at the party store, then I added a sticker that said "Best Bowling Buddy" along with each of the kiddos' names. I also added a sticker to the back that said "Thanks for making Henry's party a BALL".To finish the party favors, I filled the trophies with gumballs and put them in small clear bags.
 And then we went bowling:
 We also had a small family party the next day. Instead of just having a generic party, I decided to continue the bowling theme. I decorated the house with bowling ball balloons that I made by sticking small white circle stickers onto black balloons. I attached 8 of the bowling ball balloons on the stairs just for fun:)
 For some reason I didn't get a picture of the cute bowling ball plates that we put together for the party, but they were simple black plates with the same white circle stickers stuck on to make them look like bowling balls. I also bought a cute plastic bowling set for the kids to play with during the party, but it ended up being WAY too windy for they played bowling on the wii instead:)
**************
After a little wii bowling it was time for food! We had some yummy bowling ball treats made with Ding Dongs and a little leftover icing.....
 ...and we also had a SUPER yummy cake that matched Henry's birthday shirt.
Considering that both of Henry's bowling parties were planned in about a week, I thought they turned out pretty cute...and I know the boys had a ton of fun celebrating Henry's birthday!
Linking up here..
Pin It!
Related Posts Plugin for WordPress, Blogger...