Home AboutMe Crafts Food
Showing posts sorted by date for query vinyl. Sort by relevance Show all posts

Friday, December 14, 2012

Pallet and Hay Christmas Display

I never thought that back in August when I asked Jason to bring an old pallet home from work, that I would still be using it in December! That one pallet has gone from Barynyard Party to Fall Display to Christmas picture backdrop, and now I'm using it in my Pallet and Hay Christmas Display! It has been one of the most versatile outdoor decorations I've every had...and it was basically free except for the embellishments that I added to it! 


To dress the pallet up for Christmas, I turned it 180 degree so that the fall saying was at the bottom {that way I can use it again next year}. Then I added a Christmas Bible verse to the top with some vinyl that I cut with my Silhouette. I would recommend using outdoor vinyl, but if you don't have any {like I didn't} you can use regular vinyl and then spray a really good coating of clear sealer over the letters after you stick them to the pallet. At night our Mary, Joseph, and Baby Jesus light up, so I kind of want to add a light up star to the display somehow but I haven't quite figured it out yet!

Linking up here..
Pin It!

Thursday, December 13, 2012

Reading Fair Project 2012

The Reading Fair always seems to fall during the most busy part of the year...right between Thanksgiving and Christmas...but somehow we manage to find enough time to make a fun project each year. This year Henry's school is waiting until January to do their Reading Fair, which meant we only had to worry about Grant's project. Grant picked out a really cute book that we got at the Scholastic Book Fair back in October to use for his project: Pete and Penny's Pizza Puzzles The Case of the Secret Sauce. Grant read the book, then I read the book, then we got busy brainstorming project ideas.
We decided that making his board look like the outside of a pizzeria would be really cute! Grant started by painting the background of the board. I cut a kitchen sponge into the shape of a brick and mixed up a little bit of red and brown paint. I showed Grant how a brick pattern worked and he got busy stamping the board. He actually did a really great job and only got paint on one of my chairs in the process:) Jason found an old cardboard box and helped Grant cut the awning out with his exacto knife.To decorate the awning, Grant used my paper cutter and cut strips of red and white paper then attached them with spray adhesive. 
I used my Silhouette to cut out the name of the book onto vinyl and Grant helped me add it to a piece of brown paper that he had cut to look like the sign for the pizzeria. Grant also added a big door, two windows, and two cute little bushes to write all of the required information on. After we got the windows finished, they needed a little something extra so I got out my circle punches and some pipe cleaners and Grant made some flowers to add to a window box. 


To add a little bit more to the project, we made a jar of molasses {the secret ingredient that the kids in the book are looking for} out of an old Starbucks jar and some brown paint. Grant also decorated a pizza box that I picked up from our local pizza shop. He copied a couple of the puzzles from the book and we placed them inside the box. 
I was so proud of Grant for working hard and only complaining a couple of time! And I was even more proud when he won first place in his division at school! He was so cute when we were waiting for the winners to be announced...he had his fingers crossed on both hands! I think he wanted to win:) Since he won in his division, we get to move on to the district level in January.
Pin It!

Friday, September 28, 2012

Pallet and Hay Fall Display

So I've been a little absent from the blog world lately, mostly because things have been really busy around here...but also because I feel like I've lost a little bit of my creativity. I thought when Eli started preschool two days a week, that I would have a ton of time to do some crafting, creating, and decorating. But so far that hasn't happened. Instead my house is a wreck, my craft room is still nonexistent, and I can not for the life of me keep up with the laundry! Despite all of that {and sorry for my whining, but surely I'm not the only one feeling like this right now!?!}, I did manage to get a few fall decorations put up last week. I created this fun outdoor display from a few things leftover from Eli's Barnyard Brunch birthday party along with some of my usual fall decorations and a some things from a local nursery. 
 I think my favorite part of this whole display is the fun pallet with the vinyl saying. This is the same pallet that was the backdrop for the food table at Eli's party. I had already added the whitewash effect, which I thought was very fun and fallish. But it needed something a little more, so I broke out my Silhouette and cute out the cute Happy Fall, Y'all saying. I think it adds a ton of whimsy to the display! The best thing about it is that if I want to use this pallet again for something else, all I have to do is peel off the vinyl!
I also love the look of the funky pumpkins stacked together. I originally had a triple stack of pumpkins and another cute orange one, but the Mississippi heat was too much for the pumpkins and I ended up with some gross rotten pumpkin soup. I managed to salvage the two in the picture, but I don't think they are going to last much longer either....I'm starting to see the beauty of the fake, crafty pumpkins:) I threw in a couple of mums to complete the whole fall look, and I think it turned out pretty cute! 
Do you put any fall decorations outside?
{And do your pumpkins still look perfect, or do you have rotten pumpkin soup like me?!?}
Pin It!

Tuesday, May 1, 2012

Roadtrip Ready: Travel Snack Boxes


Welcome to day one of my new series Roadtrip Ready! I am so excited to share all of my fun roadtrip ideas, and few of my friends' great ideas as well. Today I am sharing a fun idea inspired by a project I saw on Pinterest. The idea behind these travel snack boxes is that each kid gets a box full of snacks at the beginning of the your trip. They get to eat the snacks any way they want...all at once or spread out through the day...but when it's gone, it's gone! It's a great idea, but I took it one step further by adding a fun chalkboard to the top. Now it's entertainment and snack in one!
I started with these divided boxes that I picked up at Ikea for about $4 each. You can find similar boxes at the hardware store or the craft store. 
I added a piece of chalkboard vinyl to the top of the boxes. I was careful not to cover up the places on top where the boxes stack on top of each other...that way they are easier to store when not in use.
Then I cut the boys' names out with  my Silhouette and added the names to the top of the boxes.
Henry got blue, Grant got green, but Eli ended up with yellow because I didn't have any orange vinyl. 
The great thing about these boxes is that you can fill them up with anything you want. That means they can be way more healthy {and a lot cheaper} than all those gas station snacks! I added a bottle of water and a yogurt in the large compartment. To keep things cool longer, you can freeze both of these. Then I filled up the boys' boxes with a variety of snacks: blueberries, carrots, almonds, Oreos, animal crackers, and pretzels. The possibilities are endless!
And when the kiddos start chanting "I'm bored" all you have to do is hand them a piece of chalk! That should keep them busy for about ten minutes a while:)
What kind of snacks do you like to take on roadtrips?

Linking up here..
Pin It!

Thursday, March 29, 2012

Never Underestimate the Power of a Hot Glue Gun

A couple of weeks ago, I came across this tutorial for Fabric Covered Roller Shades on Pinterest. I immediately pinned it to my Project Airstream board because I knew it was the perfect solution to replace the hideous 1970's wall to wall curtains that we took out of our Airstream. I kept the idea for those cute fabric covered roller shades in the back of my mind, and on one of the many days that we were shopping at Lowes last month I decided to grab a few of the cheap vinyl roller shades and experiment. 

Now if you can't tell from the title of this post, I did NOT start out using my hot glue gun first. Honestly I thought  for sure that the hot glue would melt the vinyl and make a huge mess. So I kept my trusty hot glue gun in the drawer and tried a few other things.


My first attempt was with spray adhesive {yes I know it's number 2 in the picture, but it was the one I tried first}. It was a major FAIL! The spray adhesive was way too sticky and it was nearly impossible to get the fabric attached to the shade without a ton a wrinkles. I sprayed the fabric and carefully placed it onto a scrap piece of roller shade, but it was really crooked and wrinkled. So I tried to reposistion it....and it just went downhill from there. Needless to say, spray adhesive is not the way to go when making fabric covered roller shades!

After the spray adhesive failed, I did a little more research and found a couple of people who said they used fabric glue. So I picked up a big bottle {for $12} at the fabric store, and came home all excited to make this project work the second time around. I was so sure that the fabric glue was going to work that I started with the actual shade and not a scrap. The only problem was that I think I was a little too excited because I used way too much fabric glue, which then soak through my fabric and left a gross dried glue film all the way up both sides of my roller shade...not a pretty look. I attempted to salvage the roller shade by covering the edges with some white ribbon, and it turned out okay. But I was not going to take the time to line all the edges of the {7 other} roller shades with ribbon...so it was on to plan C!

Plan C included my trusty hot glue gun {who I should probably apologize to for doubting}! I pulled out a scrap piece of roller shade, plugged in my hot glue gun, and decided that even if it instantly melted a huge hole right through the darn roller shade that I was at least going to give it a try! And surprise, surprise it worked! No melted hole, no soaking through the fabric, no weird dried glue film....just a perfectly attached piece of fabric! 

As of now I don't have a single shade finished and hanging to share with you, but I do at least know HOW I'm going to go about doing it now! And hopefully this post will help anybody who is thinking about making a cute {but not nearly as simple as it seems} Fabric Covered Roller Shade. When I do get all my roller shades covered and hanging in the Airstream, I will be sure to share a few pictures. And just in case you missed it, the moral of the story today is "Never Underestimate the Power of a Hot Glue Gun"!

Linking up here..
Tatertots and Jello
Serenity Now
Someday Crafts
Skip to my Lou
Pin It!

Tuesday, February 14, 2012

Sonic Drink Holder Valentine Gift Box

Back in November I started collecting those cardboard drink holders from Sonic. I had seen some really cute gift baskets made with lots of different kinds of drink holders and the Sonic ones seem to be the best...plus who doesn't want a reason to order a few yummy drinks at Sonic:)  Anyway, I was planning to use the drink holders at Christmas to make the boys' teachers gifts. I ended up giving them a different gift, which means my stash of drink holders {yes they are part of collecting vs. hoarding issues too} was still sitting in the dining room waiting to be turned into a cute gift box. I decided that Valentine's Day would be a great reason for me to pretty up the {kind of plain} cardboard drink holders and add a few goodies!
 I started by gathering up a few things to put into the gift box: a coffee cup, hand sanitizer, a Starbucks drink, and a recycled PB jar full of yummy cookies. 
 I used some left over Christmas wrapping paper {red and white polka dots work for so many things} and some scrapbook paper to cover all four sides of the drink holder. I simply placed the drink holder on the backside of the paper and traced around the part that I wanted to cover. I used spray adhesive and a glue runner to attach the paper to the box.
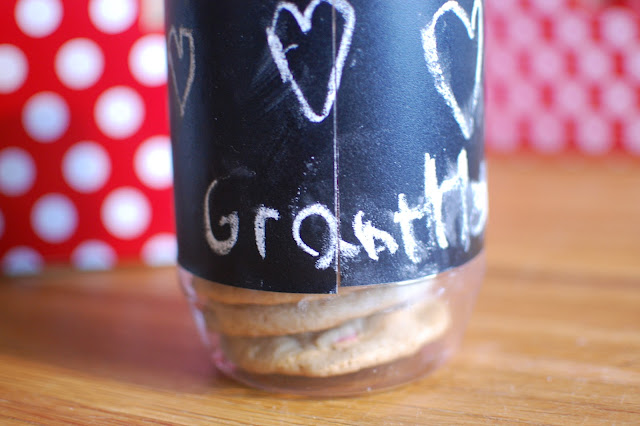
 I added a few vinyl letters to the coffee cup and the hand sanitzier just to make them more personalized. I also added a strip of chalkboard vinyl to the peanut butter jar {to cover up the sticky glue that wouldn't come off}. Then I let the boys decorate the jars with chalk. They wrote Happy Valentine's Day, drew a few hearts, and signed their names.

 I added a circl of scrapbook paper to the top of the jar to cover up the Jif label and then filled it up with yummy Valentine M&M cookies.
To finish off the gift box, I wrapped up the Starbucks drink, added a few pink & white paper straws, and tied on a cute tag with some bakers twine. The boxes took a little bit of time and effort, but they only cost a few dollars {around $7 each} to put together and they turned out SUPER cute! I hope the boys' teachers like them:)
Linking up here..
Tatertots and Jello
Serenity Now
Someday Crafts
Skip to my Lou

Pin It!

Wednesday, February 8, 2012

Project Airstream: A Shelf, Updated Bathroom, and All the Walls

We are still working on our 1977 Airstream Ambassador. Things are going slowly, but they are going. I honestly didn't think it had been so long since I had updated about our progress, but my last post was in July! Apparently last year flew by without me noticing. If you want to take a look back at where we started with this project, you can check out these posts here, here, and here

The outside of the Airstream hasn't changed much. Jason has repaired a few of the outside vents, and all the windows have been repaired and rescreened. Most of our time has been spent working on the inside though.
 This is a view of the front part of the Airstream {this will be the living room/mine and Jason's bedroom}. We actually started working from the back so this is the least completed part of the whole camper...and it has become a bit of a storage space to hold all of Jason's supplies and tools:)
 This shelf is the one big thing that has been done in the front though. There was originally a big plastic shelf here that had a few cracks and was a lovely aged yellow color. Jason pulled it out and repaired the wall around it, then built this wooden shelf in it's place. I just painted it this weekend with the green paint we picked out a few months ago. I think it adds a lot of fun color to a space that has pretty neutral so far...and it kind of reminds me of the 70's:)
 This is the space that will soon be our kitchen. Jason gutted the whole area and reworked the plumbing. We bought a big butcher block slab yesterday to make a countertop out of of and we bought a new sink and stove top. Jason is working on reassembling this section of the camper right now, and hopefully it will be done in the next few weeks.
 We bought a new fridge for the space and all of the camper walls are back in place. There was originally a big shelving unit attached to this wall. We are planning to putting a flat screen tv here with a small shelf underneath it to hold dvds and books.
 This is a view looking down the hallway towards the back of the camper. You can see that all the walls are back up. The closet is past the fridge on the right hand side, and the bathroom is on the left hand side.
 The bathroom was completely gutted, but Jason kept all the parts and refinished them. Reusing what was originally there was a lot more cost effective and a lot easier to fit into this really small space. The countertop and shower stall was repainted with a special plastics paint. We bought new fixtures and a new toilet. Jason has also been really busy spray painting all the trim pieces white {they started out a nice bronze color}. We still have to find lights and a mirror for the bathroom, but all the plumbing is fully functioning which was a big step!
 This is the refinished shower stall....if you look back at the older pictures you can see how far this space has come. I didn't even want to look at the old bathroom because it was so gross, but now everything is new and shiny white!
 This is the boys bedroom. We reused the bed bases, mostly because Jason liked the sleek almost airplane look of the original storage cabinets. Everything got a good cleaning and a couple coats of white spray paint. We have foam mattresses for the beds, but I am still working on sewing covers for them. 
 Jason rewired the old speakers and bought new covers for the electrical and 12 volt power outlets. Our plan is to add bunk beds above the two bottom twin beds, but that is still in the planning phase right now:)
 This is the view from the very back of the camper looking toward the front. It may not seem like much, but we have come a LONG way from where we started....and there is still a ton of work to do!

Next on our list of things to do is getting the kitchen completed. Then hopefully we can work on installing the vinyl wood flooring. I am going to try hard to keep you a little better updated...and be better about documenting our progress! Hopefully I can share a couple pics of the kitchen and new floor before February is over!
Linking up here..
Tatertots and Jello
Serenity Now
Someday Crafts
Skip to my Lou
Pin It!

Friday, February 3, 2012

Valentine Mailbox Magnets

I'm still working on getting our house ready for Valentine's Day. We really don't have a ton of decorations out other than the cute Chalkboard Candy Boxes that I made a few weeks ago, and this really cute printable that I pinned and then downloaded from Oopsey Daisy. For the last few years, my boys have had some cute little metal mailboxes that I picked up at Target {don't you LOVE the Dollar Spot} and decorated with a paint pen...obviously before my days of owning a Cricut or Silhouette:) I pulled them out of storage and Eli promptly sat on two of them and bent them all out of shape! Needless to say, the last time I as at Target there were three new little metal mailboxes in my shopping cart. I decided to try something a little different this time. Instead of just decorating the boys' Valentine mailboxes with their names or initials, I thought it would be really cute to include a picture of them too...but I wasn't quite sure how to achieve that. Then I walked past our fridge and noticed two old magnets that I had saved just in case I wanted to craft something, and a light bulb went off! Those little mailboxes are metal which means a magnet will cling to it with no problems! So I set out to make some cute Valentine Mailbox Magnets!

Here are the cute {but oh so plain mailboxes} that I started with.
They look really cute {but oh so plain} sitting the edge of our stairs with the Chalkboard Candy Boxes...but they needed something to jazz them up a little and make them pop!
I started with two 4 inch by 4 inch magnets that I cut in half. I ended up with 4 inch by 2 inch magnets, so I opened up a few pictures of the boys in PSE and cropped their pictures to fit the 4 X 2 magnet. I printed the pictures out in black and white and made sure that they were the right size.
I used my paper cutter to trim the picture to the right size, and then I used spray adhesive to attach the pictures to the magnets.
After the spray adhesive dried, I grabbed a red Sharpie and added a little bit of fun Valentine graffiti to the boys pictures. The black and white pictures were kind of plain and this was a quick easy way to add a little color. You could also add some cute stickers or even attach some pretty Valentine scrapbook paper. 
Then to seal the pictures, I added a few thin coats of Mod Podge.
I also cut out some red vinyl initials with my Silhouette, but stickers or scrap book paper would work great here too!
After the Mod Podge was dry I simply stuck the magnet to the side of the mailbox and they were ready to go! Eli was so excited to see his face on the side of  his Valentine mailbox:) Now I just have to come up with some fun stuff to put inside their mailboxes!

Linking up here..
Tatertots and Jello
Serenity Now
Someday Crafts
Skip to my Lou

Pin It!

Friday, December 30, 2011

Oh My Crafts Vinyl

I got an early Christmas present in the mail a few weeks ago...a big box of vinyl from Oh My Crafts! Even though we got a ton of packages in the mail in December, I was extra excited about getting this big box of goodies, and I was SUPER excited to open it up and start creating.

The first thing I noticed when I opened up my box of goodies was that the vinyl wasn't in rolls but big sheets.  I was really used to the rolls I've bought before from craft stores and Silhouette, so I was a little uncertain about the sheets...but they ended up being way better than I could have imagined! The best part about these sheets is that they load into my Silhouette 100 times easier than the rolls! I normally have to try and load a piece of roll vinyl at least three times before it goes in straight...and the first time I put a piece of Oh My Crafts vinyl in my machine it went in with no problems! The vinyl sheets are 12 X 24, so I do have to trim down the sheets because my Silhouette will only load a 9 inch wide sheet, but if you have the newer Cameo or the bigger Cricut you won't have to trim at all! Oh My Crafts also sell rolls of vinyl but I think I may be sold on sheets instead:)
Before Christmas I used my Oh My Crafts vinyl to make a ton of great gifts. These cute paint bucket tins were in the dollar section at Target. I added an initial with red vinyl and some pretty red and green ribbon. Then I filled them up with goodies and I ended up with the perfect teacher gift for Christmas! I ended up making 13 of these little cuties and only used about half a sheet of vinyl!
My box of goodies also included a Vinyl Squeegee Tool. I have always just used my ruler or scissors to smooth down my vinyl...and I am so glad I have this Squeegee now! I'm actually kind of mad at myself for not spending the $3 on one a long time ago! It made applying my vinyl so much easier!
After I finished up teacher gifts, I moved on to the kiddos' class party stuff! I used a piece of my black Oh My Crafts Vinyl to make lots and lots of little circles {aka snowman eyes and smiles}...
...to make these:

The last vinyl project I have to share with you is a really fun one that my boys love:) And yeah, if you are thinking it's kind of hard to come up with a vinyl project for boys you are right!

Henry and Grant both got bow and arrow sets for Christmas this year and a couple of the arrows have suction cups on them. In true boy fashion, they got a huge kick out of shooting them at the glass on our doors....so Jason grabbed a dry erase marker and drew a bulls-eye for them. But after a couple of hours and more than a few kiddos taking trips in and out the door, the dry erase marker had been smeared and wiped off. So I decided a nice vinyl bulls-eye would work perfectly!  
{Apparently my boys feel the need to run around without shoes or shirts on in the middle of December! It was in the 70's that day so I didn't worry about him too much.}
I used my Silhouette to cut out a couple of circle on some fun red glittery vinyl to make the bulls-eye. It's kind of hard to see up on the door, so I included this picture so you can see how pretty and sparkly it is!
I was very impressed with all of my Oh My Crafts vinyl and I can't for things to slow down a little here so I can create even more fun crafty things with my new stash of vinyl! If you are interested in trying out Oh My Crafts vinyl, now is a great time! They have some great deals going on right now and if you use the code OMCBLOG10 you can save 10% on your entire order!

*Thanks so much to the people at Oh My Crafts for providing me with a free sample of their vinyl. No other compensation was given and all opinions are mine!*

Pin It!
Related Posts Plugin for WordPress, Blogger...