Home AboutMe Crafts Food

Monday, October 31, 2011

Monster Brownies & Halloween Costumes

I saw these SUPER cute Monster Brownies over at Amanda's Cookin' last year...and I have been waiting for a reason to make them ever since! I can't remember why I didn't make them for Halloween last year, but I knew they would be the perfect treat to take to our annual Halloween gathering this year! 
 I started with a box brownie mix. I know a lot of people who say they LOVE homemade brownies, but I've never made homemade brownies {and I've tried lots of times} that taste as good as Duncan Hinds Chewy Fudge brownies! I mixed my brownies according to the chewy {NEVER cake-like} instructions, let them cool, and then cut them into squares and rectangles. Then I made a quick icing from powdered sugar, water, and green food coloring. I piped a border around the the edge of each brownie, let it harden, and filled in the inside with the same icing. Then I got busy making some monsters with M&M's, mini marshmallows, licorice, and colored icing. Pretty cute, SUPER easy, and the perfect treat for the kiddos to help with! Make sure to head over and check out Amanda's Monster Brownies...they are WAY cuter than mine:)
 Here's a BIG little sneak peek of the boys' Halloween costumes for this year: A shark and a surfer dude!
You may notice that we are a man surfer dude down...that's because Grant has been sick since Friday. I finally took him to the doctor Sunday afternoon {thank goodness for after-hour and weekend sick appointments}, and he has pneumonia! Needless to say, he wasn't feeling up for costume night at Awana's last night! He started on antibiotics yesterday, and he is already feeling a ton better. I'm hoping to get a picture of all three boys in the costumes this afternoon...and I'm hoping Grant is feeling well enough to trick or treat at a couple of houses too!
Have a safe and HAPPY Halloween!
Miscellany Monday @
lowercase letters
Pin It!

Saturday, October 29, 2011

Shutterfly: Christmas Cards & So Much More!

Last year on my blog, I raved about how much I love Shutterfly! I loved them even more after I got my 50 free Christmas cards in the mail and I saw how awesome they were...seriously the best quality cards I have seen in my 6 years of ordering photo Christmas cards! So I'm going to spend a little time this year telling you about how great Shutterfly really is....and then I might just tell you how you can get some free cards too:)

Here are a few of my favorite photo cards from this year...though it is pretty hard to top our Shutterfly card from last year!


Can you tell that I love the look of a square card:) Now I need to get busy picking out clothes and planning a photo session!

I love the great quality cards that Shutterfly offers for the holidays, but did you also know you can get some really awesome photo gifts to give to aunts, uncles, and grandparents! My mom has already requested a photo book of my boys as a Christmas present for this year:) I'm fine with that, because I know she will love it....and I will have a great time designing it on Shutterfly's website.

If you are planning a holiday party in the coming months, you can check out the great selection of invitations that Shutterfly has on their websites too! I'm thinking it would be really fun to host a cookie swap, and I would love to send out some of these fun invitations:
I'm off to browse Shutterfly's amazing selection of cards, and try to make a decision about which card to chose for this year!
Which Shutterfly Christmas card do you like best?

*I received a code for 25 free Christmas cards from Shutterfly for sharing about their cards with you. All opinions are my own. If you have a blog and you want to join their blogger program, click HERE.*
Pin It!

Friday, October 28, 2011

Friday Flashback: Candy Corn Edition

I love decorating with stuff that can be used for multiple seasons and holidays. I love that instead of sitting in the attic for 11 months out of the year, that I can change some of my decor up and use it year round. So when I started working on new decorations for Halloween/fall I knew I could figure out a way to makes something that would work for Christmas, Valentine's Day, and maybe even Easter.

I started with some clear glass bottles that I have been saving for three years. I knew at some point I would find a good use for them:)
 I used my Cricut and cut out some vinyl letters.
 I used some transfer paper to attach the letters to the clear glass bottles.
 I lined the bottles up to make sure that the letters were even...the "d" is a little high, but not enough to worry about.
 I spray painted the lids white so they would match almost any holiday decor.
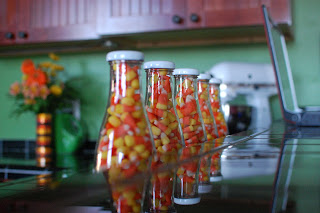
 Then I filled the bottles up with CANDY CORN...
 ...and lined them up on my kitchen counter.

This was a SUPER inexpensive project...all I really bought was the candy corn. Now when fall is over and Christmas decorations start going up, all I will have to do is empty out the candy corn and add in some red, green, and white M &M's!

**This is a post from last year that has been one of my most popular through the year. I actually have the same jars sitting on my counter right now...they just aren't filled with candy!**
Pin It!

Thursday, October 27, 2011

Trick or Treat, Smell my Feet! Halloween Shirts for a Trio

I love a good holiday shirt! {You've all seen my past 4th of July, Disney, birthdayHalloween, and Thanksgiving shirts:)} And I love a funny set of holiday shirts even more...especially for Halloween! So instead of making my normal initial tees {that my boys have way to many of anyway}, I decided to make some fun "trick or treat, smell my feet" Halloween shirts for my boys this year! I think they are pretty cute...Jason thinks I'm weird! The boys love them and really that is all that matters!
I started with some fabric from Hobby Lobby and a few white t-shirts. I printed out my words{I used the font Smiley Monster which is one of my new favs} in mirror image.
I used spray adhesive to attach the words to the backside of my fabric with the printed side of the word facing out. A little complicated, but it makes cutting the letters a lot easier.
I cut out the letters, squaring off any of the edges that seemed like they might be hard to sew....I've been sewing for a while, but curves and circles still give me trouble:)
My original plan was to just sew the letters onto the shirts, but when I laid them out on the white shirts they were really hard to read.
I pulled a little bit of black felt from my fabric stash and decided that they looked 100 times better against the black fabric. I simple cut the felt big enough for the letters, sewed the letters onto the felt, then sewed around the edges of the felt to attach it to the shirt. I also used my monogram machine and some orange thread to add the words "smell my" to Eli's shirt.


Now I just need to find the time to finish making their Halloween costumes!

Pin It!

Tuesday, October 25, 2011

Sweet Potato Pecan Dessert

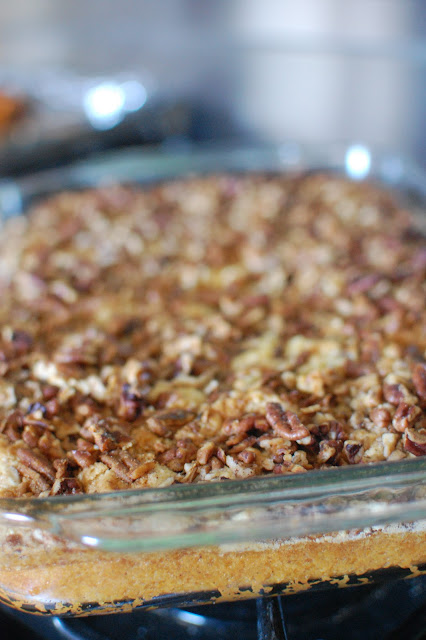
Last week, I shared a picture of my abundant supply of sweet potatoes and I asked for your suggestions on what to make with them. I got a ton of great ideas {like sweet potato fries} that I am planning on trying...but first I had to make this yummy dessert that I found on Pinterest. The original recipe is called Pumpkin Pecan Dessert and it is from a scrumptious blog called Glorious Treats! I know that pumpkins and sweet potatoes aren't the same thing, but they are pretty much interchangeable in  recipes...at least they are for me. So I took the original recipe and simply switched out the pumpkin for my sweet potatoes, and I came up with Sweet Potato Pecan Dessert!


Ingredients:
4-5 medium sweet potatoes, baked
1 can (12 oz) evaporated milk
3 eggs
3/4 cup sugar
pumpkin pie spice or cinnamon to taste

1 boxed yellow cake mix
1 1/2 cups chopped pecans
3/4 cup butter, melted

Directions:

1. Bake your sweet potatoes at 350 until tender. Scoop out the insides. You will need about 15 oz of sweet potato for this recipe. 
2.  In a large bowl add the first 5 ingredients, and stir to combine.
3.  Pour sweet potato mixture into 9" x 13" dish that has been sprayed with cooking spray.
4.  Sprinkle dry cake mix evenly over the sweet potato layer.
5.  Add chopped pecans.
6.  Pour melted butter over top.
7.  Bake 50-60 minutes on 350. 
Top with whipped topping or ice cream before serving.
Adapted from Glorious Treats who got the recipe from the Betty Crocker Holiday Recipes booklet
Pin It!

Friday, October 21, 2011

Homemade Halloween Costume Ideas for Boys

I love Halloween!
The weather, the candy, the fall festivals, the decorations, but most of all I love a great homemade Halloween costume! I know that some people just don't have the time or the skill to make homemade costumes, but I love the challenge of it...even though it really isn't as challenging as some people think. I have made homemade costumes for my boys every year since Henry's first Halloween in 2004...that's a total of 15 Halloween costumes! They have been everything from a scarecrow to a caveman, and they have all been homemade! For the most part I use inexpensive fabrics {like felt} and most of the costumes are held together with hot glue.

I decided to share a few pictures of some of our past homemade Halloween costumes {and a few details about how to make the costumes} with the hope that it will encourage a few of you to try and make some homemade costumes this year. They will save you a ton of money and create a ton of great memories too!

*KNIGHTS*
Last year the boys were knights. I used white & grey felt, blue cotton material, and some silver sparkly trim to make the costumes...and it was all put together with hot glue. I basically cut out a rectangle big enough for each boy and then cut out a neck hole. The side were held together with ties {look closely at Eli's} that went through a hole on each side of the costume. The boys worn grey thermal underwear underneath and the the helmets came from the dollar section at Target!

*CAVEMEN AND A DINOSAUR*
The dinosaur costume was a hand me down that Grant had worn a few years ago. This was sewn using a Simplicity sewing pattern {see below for more details about the pattern}. It was one of my first big sewing projects, so I was glad it was worn more than once:) Henry and Grant's Cavemen costumes were made out of {really cheap} fake fur. I cut a basic rectangle out and then sewed up the sides and cut out a neck hole. Henry asked for a one armed costume which was a little more complicated, but still pretty easy. I made boot covers using their shoes as a template...and Jason helped me out with those!
 Their necklaces where made with big wooden beads from the craft section of Hobby Lobby and the boys helped me make them. I tied a little twine around the boys waists and in this picture you can see the fun edge that I cut on the bottom to make their costumes look a little more primitive.

*SUPERHEROES*
I think these were some of the boys most favorite costumes ever...especially since they still play with them sometimes! I made the capes out of felt and {some kind of shiny} silky material. They were sewn together, but you can easily make a no sew cape with material that doesn't fray and some iron on adhesive for the emblem. Their shirts {I used two per costume to make the emblem and their belt} and pants came from Walmart and they were only $3 each. 
 I even made Eli a little superhero costume by sewing a small cape onto the back of a onesie and adding a belt {with an E} to the front of it.

*PIRATES*
These costumes were really simple to make, and they were no sew! I got black sweat pants for the boys and cut the leg holes kind of jagged. I probably spent less than $5 at the fabric store for the yellow fabric and the red and white striped fabric. I simple cut all the pieces to length for each boy and then tied them on! The pirate accessories came from the dollar section at Target, and if you look closely they even had a gold earring {that was clipped onto their headpiece not their ear}.

*DINOSAURS*
This is the one {and only} year that I have sew the boys entire costumes...and it was a lot of work! They were totally worth it though {especially since Eli wore the green dinosaur costume again}! This was made with a Simplicity pattern that was actually pretty easy to follow. Here's a link to the pattern { 2506 }just in case anyone is interested. 

*SCARECROW*
For Henry's first Halloween he was a scarecrow. He was an adorable little scarecrow and this was a really cheap and easy costume to put together. I used a pair of overalls from a thrift store and stitched on a few patches. Then I hot glued some raffia around the leg holes. I braided a few pieces of raffia for a belt and made a cute hat out of some black felt. Add a plaid shirt and a little face paint and you've got a cute homemade scarecrow!
I know that it may be easier to just buy a costume at the store, but think of all the fun memories that you can make by doing something homemade for you kiddos this year...not to mention the money you can save! There is still more than a week left before Halloween, so head to the craft store and start working on some fun homemade Halloween costumes! 
**If you do decide to try one of my costume ideas {or if this post encouraged you to try any homemade costume} send me some pics or a link to your blog...I would love to feature a few homemade costumes here!**
Weekend Bloggy Reading
Pin It!
Related Posts Plugin for WordPress, Blogger...