Home AboutMe Crafts Food

Wednesday, November 17, 2010

Tuesday, November 16, 2010

Homemade Chocolate Pudding

A few weeks ago, as I was attempting to not spend a small fortune on groceries, I saw milk on sale at Target for an unbelievable low {aka less than $3 a gallon} price. So crazy, thrifty me decides to lug home 6 gallons of milk...because the price was just too good to pass up. Well, a week later when the milk was about to expire and I still had a whole gallon unopened I figured I better find a great "use up a lot of milk before it goes bad" recipe!
And what recipe uses up large amounts of milk better than chocolate pudding?!? No other...at least none that I could find! Hasty Chocolate Pudding from allrecipes.com is what I settled on after checking out a few recipes and scoping out my pantry to see what I had on hand.
In addition to the 2 cups{ when I made it, I doubled the recipe} of milk, you also need
1/2 cup white sugar
1/3 cup unsweetened cocoa powder
3 tablespoons cornstarch
&
2 teaspoons vanilla extract
Add all of the dry ingredients into a microwave safe bowl..
..and wisk them together getting out any big lumps.
Then slowly add in the milk.
Microwave on high for 3 minutes. Stir and then microwave in 1 minute intervals until the pudding is thick.
Stir in the vanilla and then scoop into individual bowls...
...or refrigerate {covering top of the pudding with a layer of plastic wrap} the whole batch until cold. 

Chocolate pudding that is both yummy and practical...at least it's practical if you have a bunch of milk to use:)
Pin It!

Monday, November 15, 2010

Shirt of Plenty

I have seen a ton of cute turkey shirts for Thanksgiving floating around the internet lately. I had intentions of making my boys a cute turkey shirt, but was really wishing I could make something a little different and a little more fun instead.

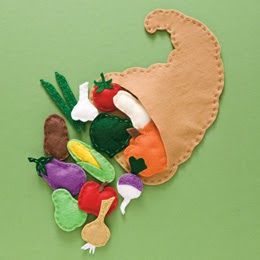
The Shirt of Plenty is what I ended up with after a TON of inspiration {and a template} from Family Fun magazine.
This is the original craft shared in the November issue of Family Fun...SUPER cute Thanksgiving themed felt food. I simply decided to turn my felt food into a shirt instead of making a toy:)
The first step in making this SUPER cute shirt is to print the templates and cut them out. Sometimes the template calls for two of each shape, but you usually only need one.
Use spray adhesive and stick the cut out shapes to different colors of felt. You can mix and match however you want, or follow the suggestions on the templates.
Then add iron-on adhesive to the backside of the felt following the directions on the package.
Cut out the shapes following the template, then remove the paper and the iron-on adhesive backing.
Lay out your design on the shirt and decide where you want each piece to be. Iron the pieces onto the shirt following the directions on your package of iron on adhesive.
The finally step to making The Shirt of Plenty is the most tedious and time consuming....but it also makes a big difference in the appearance of the shirt. Using coordinating colors of embroidery thread, go around the edges of each piece of felt with a running stitch. Make sure to tie off each end of the embroidery thread well, so that the felt pieces stay securely attached.
And that is how you make a SUPER cute Thanksgiving shirt!
Now if I can only find the time {and energy} to make two more:)

Pin It!
Related Posts Plugin for WordPress, Blogger...