Home AboutMe Crafts Food

Tuesday, May 17, 2011

Cookie Palm Trees

Summer is right around the corner and the cookies I am sharing with you today are perfect for all of those end of school/luau/beach/pool parties that everyone is sure to be having soon!
The beauty of these cookies is that you only need two ingredients. Pirouette cookies and green fruit slices...plus a few tooth picks to hold them together.
Using a very sharp knife, cut each fruit slice into three pieces as shown below.
Arrange three slices in a palm tree pattern making sure to overlap the top edge of each fruit slice. Push a toothpick into the fruit slices and be careful that you catch all three of the pieces with the toothpick.
Place the palm leaves {with toothpick attached} on top of the pirouette cookie and push the toothpick into the the fudgy inside of the cookie.
I added these Cookie Palm Trees to a Jello Island for Grant's Luau Party at school, but these Cookie Palm Trees would be really adorable on top of a cake or even cupcakes too!
I'm still trying to think of a way to display these without sticking them in another snack {because they are just that cute on their own}, so if anyone has suggestions I would love to hear them:)
Pin It!

Monday, May 16, 2011

Miscellany Monday

1. I have been doing the Couch to 5K program for the last couple of weeks with a few of my friends. We started out barely able to jog the 90 seconds and today we jogged for 20 minutes without stopping! It is hard for me to believe that we made it this far in just 6-7 weeks. I'm not sure how far we jogged because we are slow we have been more focused on time instead of distance...but I'm thinking we did around a mile and a half today!

2. Friday is the boys' last day of school and I don't know if I'm excited or nervous! Summer means entertaining 3 SUPER energetic boys all day long! Thank goodness my mom has a pool:)

3. Eli has decided that it is fun to ride his tricycle in the house. So now every time I turn around he is dragging it in the back door to ride. I would have never let Henry or Grant ride their tricycles in the house...I think I'm slacking with the third one!

4. Today I am sharing a fun spray paint tutorial at 3 Sun Kissed Boys. Go over and check it out, leave some comment love, and also check out all the awesomeness that is Yanet's blog too!

5. The rest of my week is going to be filled with making end of the year teachers gifts and working on scrapbooks for all 27 kids in Grant's class! I am totally not a scrapbooker, so I've been putting it off for a while but now that we only have 4 more days of school I have got to get  busy. Procrastination at it's finest I guess!

6. Don't forget about the Thank You Cards Shop giveaway that ends tonight! The winners {there are two} gets to pick 10 free cards of their choice...and let me just say the choices are all SUPER cute!

Miscellany Monday @ lowercase letters
Pin It!

Friday, May 13, 2011

Wooden Cross Redo & a Spray Painting Tip

I bought this gorgeous handmade wooden and metal cross last year at an arts and crafts festival. At 6:00 am in the morning under very dim light, the color on it looked like a perfect match for my bedroom. Unfortunately when I got home the color just wasn't right...but I didn't know for sure what I wanted to do about it. Last month when I decided to start redecorating my master bedroom {remember I added black, white, and red into my turquoise room}, I knew the the best solution for the cross was a coat of red spray paint.
 After I spent more than a few minutes trying to cover the white cross with painters tape, my genuis husband shared with  me that he thought the pieces would all come apart. And they did! So I pulled off all the painters tape and got ready to spray paint just the blue cross!
 Now the only problem was the metal nail heads on the blue cross, which I definetly didn't want to paint over. Again Jason came to the rescue with an idea. Apparently you can cover anything metal with Vaseline before you spray paint and that will prevent the spray paint from getting on it...and to remove it all you do is wipe it off after the paint has dried! Genius idea right!?!
 So I used a Q-tip and carefully applied Vaseline to all the nail heads being careful not to get it on the cross.
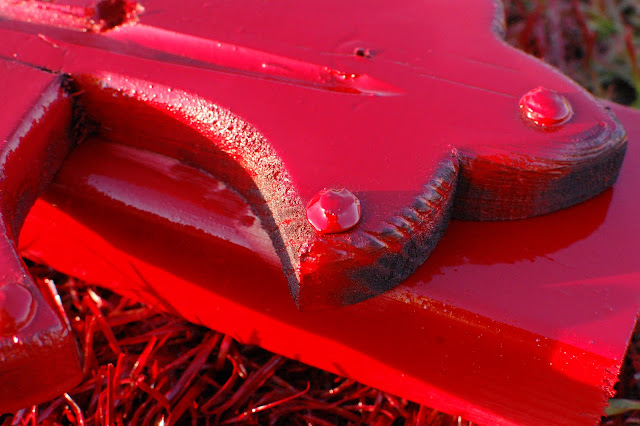
 I sprayed the cross down with a liberal coat of Krylon Cherry Red spray paint. Check out how the paint just sat on top of the Vaseline coated nail heads!
 After the paint dried for about 30 minutes I simply used a paper towel and wiped the now red Vaseline off of the nail heads. Seriously check out how well that little spray paint tip worked!
 Here is how the {reassembled} newly painted cross looks against the turquoise walls in my bedroom...not too bad! Now I just have to decide exactly where I want to hang it:)
I have another fun spray paint project that I am sharing as a guest post next week too!
Have you done any spray painting lately?!?
Pin It!

Wednesday, May 11, 2011

Wordless Wednesday: Green Thumb & Red Berries


**Now if we can figure out how to keep the birds from eating half of them maybe we can attempt to make strawberry jelly.**
Pin It!

Tuesday, May 10, 2011

Fluffer Nutter Cupcakes

For Mother's Day my hubby made me an awesome breakfast of pancakes with fresh strawberries and whipped cream. Like most men, my hubby is the master of breakfast....but not so much a dessert kind of guy. I knew that, so on Saturday I decided to make some yummy cupcakes for our Mother's Day dessert. I came across this recipe and I was hooked as soon as I saw the peanut butter/marshmallow fluff combo! I've also been wanting to try the fun chocolate dipped technique since I saw these Hi-Hat Cupcakes made by none other than Martha Stewart. Please don't compare mine to her's because I obviously need to work on my piping skills:)
Now before we get to the recipe, do you see those awesomely beautiful cupcake wrappers? I picked them up at Winn-Dixie {while on a twenty minute quest to find marshmallow fluff which they were sold out of}. They are Reynold's brand cupcake holders that are lined with foil. Do you see how pretty they still after I baked my cupcakes? The usual paper cupcake wrappers fade and get kind of greasy...not these! They stayed pretty! And you can even use them without a cupcake pan because they are lined with foil! They were a little more expensive than the normal paper cup, but so worth it for that pretty wrapper:)

Fluffer Nutter Cupcakes
This recipe is adapted from one I found at parenting.com.
It is from the Betty Crocker's The Big Book of Cupcakes and they are called Peanut Butter Cupcakes.

Cupcakes
  • 3 cups AP  flour sifted
  • 1 tablespoon baking powder
  • 1/2 teaspoon salt1cup butter, softened
  • 2 cups granulated sugar
  • 4 eggs
  • 2teaspoons vanilla
  • 3/4cup milk
Frosting
  • 1 1/2cups butter, softened
  • 1 1/2cups creamy peanut butter
  • 1 jar (7 oz) marshmallow creme
  • 3 cups powdered sugar
  • 2 teaspoons vanilla
Chocolate Coating
  • 3 cups chocolate candy melts
Heat oven to 350°F. Place baking cups in 28 regular-size muffin cups. Sift together flour, baking powder and salt; set aside.

Beat 1 cup butter and the granulated sugar with electric mixer on medium speed about 5 minutes or until light and fluffy. Add eggs, one at a time, beating well after each addition. Add 2 teaspoons vanilla. On low speed, alternately add flour mixture, about 1/3 of mixture at a time, and milk, about 1/2 at a time, beginning and ending with the flour mixture.  Beat just until blended. Divide batter evenly among muffin cups.

Bake 20 to 24 minutes. Cool 5 minutes. Place on cooling racks. Cool completely, about 30 minutes.

Beat 1 1/2 cups butter and the peanut butter with electric mixer on medium speed until smooth. Beat in marshmallow creme. On low speed, gradually add powdered sugar until blended. Add 2 teaspoons vanilla; beat 3 minutes longer.

Add frosting into decorating bag fitted with large round tip {I used a large ziploc bag and it worked okay, but I think a really icing bag would work better}. On top of each cupcake, pipe frosting in circles making cone shape with peak in center. Refrigerate cupcakes at least 45 minutes to harden frosting before dipping in chocolate coating.

Microwave your chocolate candy melts until smooth. Dip frosting on each cupcake into chocolate coating to coat frosting completely, letting excess chocolate drip off. Refrigerate to set coating, about 5 minutes.
Visit thecsiproject.com
****************************
In case you missed it yesterday, I shared a SUPER fun tutorial on how to make Sidewalk Chalk Paint at Positively Splendid as part of the Summer Survival Guide. Head over and check it out!
Positively Splendid
Pin It!
Related Posts Plugin for WordPress, Blogger...