Home AboutMe Crafts Food

Friday, April 29, 2011

Countdown to Summer Board

Yesterday I shared with you how I won a great giveaway full of fun Elmer's craft supplies, and I also gave you a sneak peek of the project I created with them. Today I have the full step by step for you just in case you want to create your own Countdown to Summer Board....and if you enter the Craft and Tell Giveaway {you still have a few more days to enter}, you may be the lucky winner and get some of the same crafty goodies that I used:)

I started my Countdown to Summer project with the Elmer's Bi-Fold Foam Board and some fun summer fabric. I sprayed one side of the foam board with spray adhesive and attached my fabric to it.


To hold down the edges of the fabric on the backside of the board, I used the Elmer's Glue Dot Runner.
I used my hot glue gun to add some decorative trim, ribbon, and a fun polka dot paper clip to hold the countdown numbers.
I printed out my countdown numbers on blank 3X5 notecards. I used a fun font {Summer Funkyness from Kevin & Amanda} to give the board a little bit of whimsy:)
I used my Cricut to cut out letters that say "Days til Summer".  If you don't have a Cricut, you could easily write this by hand or print it out in a fun font that matches your numbers. I attached the letters to a piece of colored cardstock and then I attached the cardstock to the fabric covered board with the Elmer's glue dot runner.
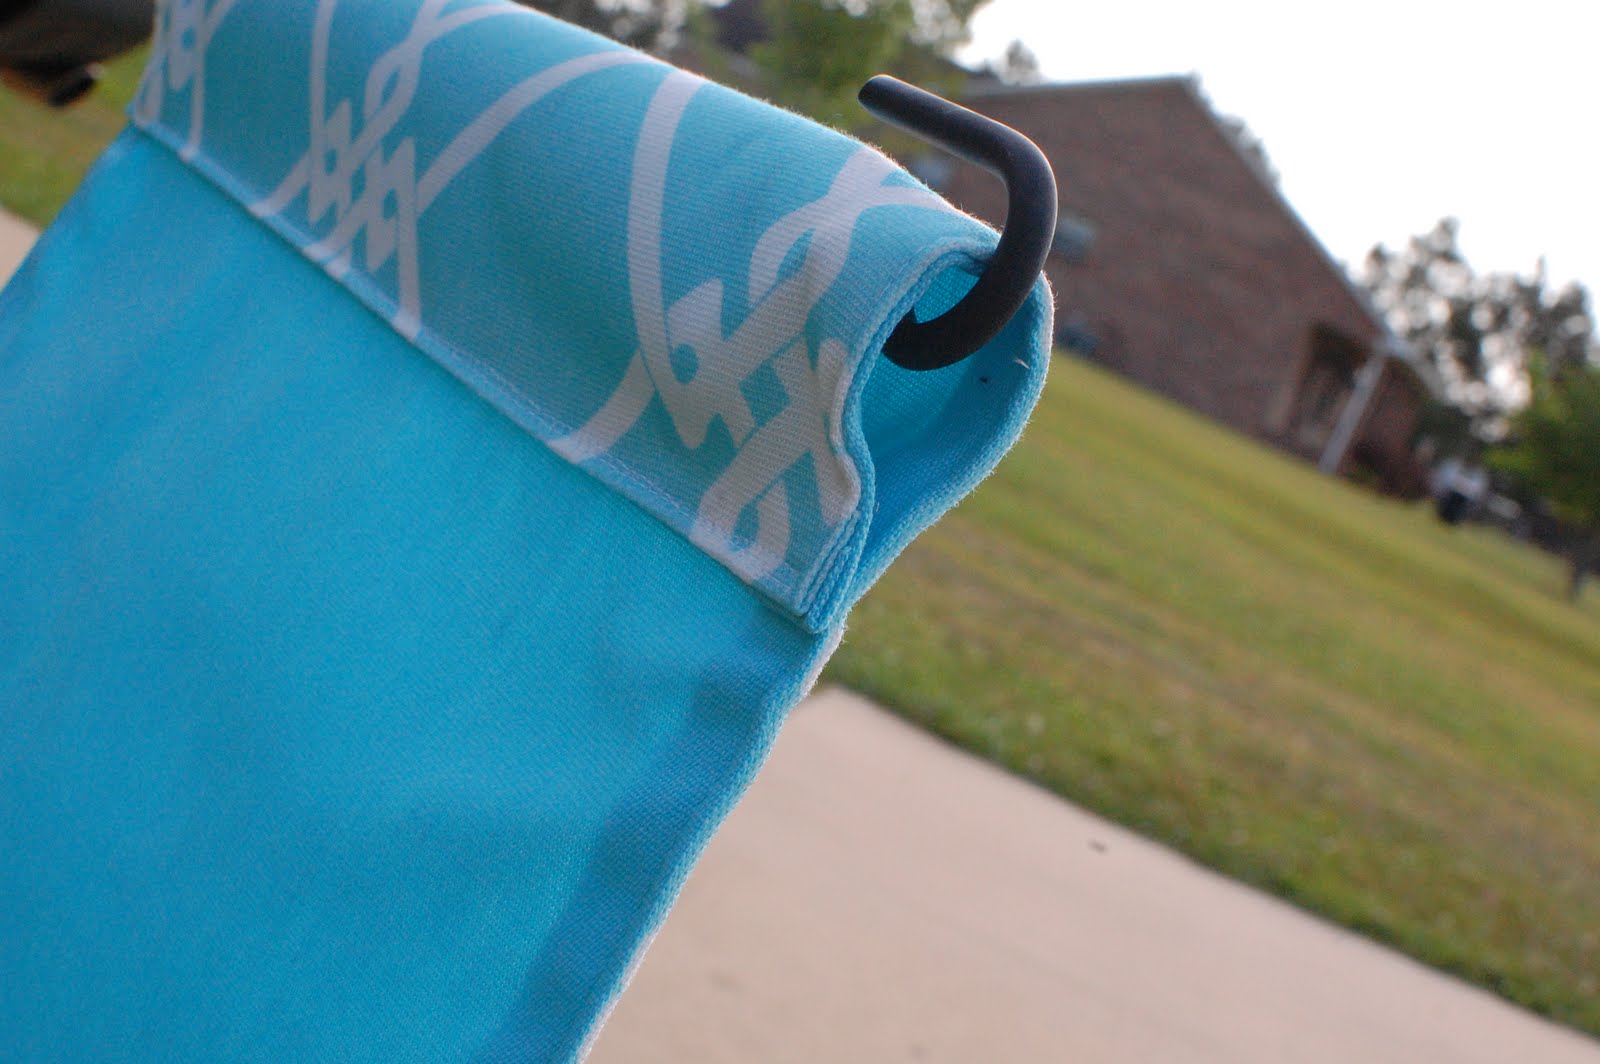
 I used my X-ACTO knife to cut two small X's in the top of the foam board for my ribbon hanger.
For the ribbon hanger, I simple pulled a piece of ribbon through the board and then tied a knot on the front to hold it in place. To finish off the project I added a cute fabric flower and a little more ribbon.
And now we are ready to Countdown to Summer!
The boys last day of school is on May 20th so I'm thinking our countdown is going to start May 1st and we will countdown to the last day of school!
Serenity Now Crafty Cutter PartyVisit thecsiproject.com
Pin It!

Thursday, April 28, 2011

Virtual Elmer's Craft & Tell Party & a Giveaway for YOU!

This giveaway is now closed. Congrats to Amy from Amy's Cooking Adventures!
**************************
A few weeks ago I won a really great giveaway from Amy at Positively Splendid: a bunch of great Elmer's crafting supplies!

But the best part about winning the giveaway was that I got to participate in Amy's Virtual Craft and Tell Party! Basically, the five winners of her giveaway were challanged to create something with the things they won and then they get to share their creations at her virtual party....SUPER fun right!?!
*********
Here is a little sneak peak at what I created:

You can head over to Positively Splendid to see my finished project and what the other 4 winners created.
*****************
Now the really fun part for you is that Elmer's wants to continue the Craft and Tell fun, so today I am giving away a Mini Craft and Tell Party Pack full of great Elmer's crafting goodies! Seriously check out all the craft supplies you can win to use at your own crafting party:
3  X-ACTO Retract-a-Blade knives
3  CraftBond Extra Strength Glue Sticks
3  CraftBond Tape Runners
3 Mini Bi-fold 9x12 Foam Board packs
1 Painters Markers pack
1 X-ACTO Decorative Edge Scissors pack
1 Circle Cutter
1 X-ACTO Self-Healing Mat
1 Glue Dots pack
2 Photo Corners packs (various colors)
1 Gel Pens pack
1 Tacky Glue bottle
**That is plenty of stuff to get you and two friends crafting for hours!**

 To enter:
Leave a comment telling me who you would love to craft with!
Head over to Amy's and leave a comment on her Craft and Tell Showcase Post


Follow Random Thougths of a SUPERMOM! and leave a comment telling me that you do.

Follow me {@SUPERMOM_Kelli} on twitter and leave a comment telling me that you do.
 
Follow {@Elmer's} on twitter and leave a comment telling that you do.

Tweet about this giveaway and include a link to this giveaway post in the tweet.
Great giveaway for a mini Craft & Tell Party Kit from @ and @ Check it out:
****************
This giveaway is open to U.S. residents only. The giveaway will end next Thursday, May 5th at 10 pm CST and I will chose a winner via random.org. Please make sure to leave an email address in your comment if it is not in your profile. Good luck and thanks for entering!
Pin It!

Tuesday, April 26, 2011

Dessert From Heaven

Like most holidays, I was asked to bring some type of dessert for our Easter lunch this year. I really don't mind bring dessert because I LOVE to bake and really don't like to cook...so dessert is right up my alley:) I spent more than a few hours in the kitchen this past weekend whipping up some fun treats for church, making peanut butter cookies, and trying out this new {amazing} recipe for Angel Food Cake.

Heavenly Angel Food Cake

From allrecipes.com

Ingredients

  • 12 eggs
  • 1 1/4 cups confectioners' sugar
  • 1 cup all-purpose flour
  • 1 1/2 teaspoons cream of tartar
  • 1 1/2 teaspoons vanilla extract
  • 1/2 teaspoon almond extract
  • 1/4 teaspoon salt
  • 1 cup sugar

Directions

  1. Separate eggs; discard yolks or refrigerate for another use. Measure egg whites, adding or removing whites as needed to equal 1-1/2 cups. Place in a mixing bowl; let stand at room temperature for 30 minutes.
  2. Meanwhile, sift confectioners' sugar and flour together three times; set aside. Add cream of tartar, extracts and salt to egg whites; beat on high speed. Gradually add sugar, beating until sugar is dissolved and stiff peaks form. Fold in flour mixture, 1/4 cup at a time. Gently spoon into an ungreased 10-in. tube pan. Cut through batter with a knife to remove air pockets. Bake at 350 degrees F for 40-45 minutes or until cake springs back when lightly touched. Immediately invert pan; cool completely before removing cake from pan.
This cake was great on it's own, but it was even better with fresh strawberries and whipped cream on top! YUM! And the best part is that one serving of this cake is only 101 calories!


Pin It!

Sunday, April 24, 2011

He is Risen!

He is not here; he has risen, just as he said. Come and see the place where he lay. Matthew 28:6


Pin It!

Saturday, April 23, 2011

More Easy Easter Treats

We are spending the morning at an Easter egg hunt, but I wanted to share one last quick and easy Easter treat with you!
**************
I whipped these treats up for Henry's class in literally less than 30 minutes. I started by making a regular batch of Rice Krispy Treats. Then I used my cookie scoop and put a big heaping scoop of the warm Rice Krispy mixture into muffin tins that had been sprayed with cooking spray. I let the mixture cool just a little then I used my finger to make a well in the middle to make it look more like a nest. Then I added in a few colorful jelly beans in the middle to look like eggs. Let the nests harden for about an hour or overnight.
 These are a quick and easy treat that you can throw together in no time! One batch should make about 24 little birds nests so all the kids {big and small} can enjoy them!
I hope you are having a fun Easter filled weekend!
Pin It!

Friday, April 22, 2011

Froot Loop Easter Egg Treats

Making fun treats with my kiddos is one of my favorite things about any holiday. We always make gingerbread men at Christmas and some kind of red, white, & blue dessert for the 4th of July. This year I wanted to make something new for Easter since we don't really have a traditional Easter treat that we always make.  I took an idea that I saw in my Family Fun magazine for Rice Krispy Eggs and changed it around a little to make things more colorful...and frooty!
We started with a big box of Froot Loops and bunch of empty bowls. Henry and Grant got busy sorting the Froot Loops by color, and Eli got busy eating the few Froot Loops that I gave him to sort:) You could also make this without sorting and have fun rainbow Froot Loop Eggs....but the sorting was half the fun for my boys!
I placed the sorted Froot Loops in my small chopper and pulse it a few times just to break the cereal up a little. Don't chop it up too small or it will turn to powder! Repeat this step for each of the colors of cereal and place them into 6 separate medium sized bowls.
Melt down marshmallow and butter like you would for Rice Krispy Treats. After the mixture is completely melted, allow it cool slightly then evenly divide the marshmallow mixture into the 6 bowls of different colored cereals.
Stir the cereal into the marshmallow mixture using a spoon or your hands. Either way you chose to do it is fine, just make sure to keep the cooking spray handy so that the marshmallow doesn't stick to your spoon or your hands.
Once everything is mixed together, hand it over to your kiddos and let them have fun stuffing it into {washed, dried, and sprayed with cooking spray} plastic eggs.
Put the cereal mixture into the two pieces of the eggs and then squish them together to make a solid cereal egg. We let ours cool a little inside the plastic egg so that it would hold it's shape better.
You can serve them up on a cute Easter plate....
...or display them in a basket as the centerpiece of your Easter table!
I love that they are colorful just like the real eggs we dye every year, and my boys love that they got to help make such a fun and yummy treat!


This week I'm linking up with my sweet friend Amanda and her fun Weekend Bloggy Reading linky! If you have some down time this weekend go check out all the fun!
Weekend Bloggy Reading
Pin It!

Thursday, April 21, 2011

Pen and Pencil Caddy: Kids Recycling Project

In celebration of Earth Day tomorrow, Henry had to make a recycling project for school. We thought of a bunch of ideas from a soda bottle bird feeder to a fold up race track made from a big box, but in the end we made a cute Pen and Pencil caddy out of an old cereal box and some toilet paper tubes.
 We started by cutting the bottom of the cereal box off just a little bit shorter than the toilet paper tubes. Then Henry got busy measuring, cutting, and then gluing decorative paper to the box and 5 toilet paper tubes.
 I used an X-acto knife to straighten up the top edge of the box.
 When all of the toilet paper tubes were covered, we placed them inside the box.
 I printed out a Pens & Pencils label for the front just to make sure his teacher knew what he had made:)
 And that is how you make a really cute, easy, and RECYCLED Pen and Pencil Caddy!
Have you recycled anything today?
{For more fun Earth Day ideas, check out this fun post from last year when we made upcycled sand toys!}
What kind of fun treats are you making for your kiddos this summer?
Visit thecsiproject.com
Pin It!

Monday, April 18, 2011

Adding a Little Spring

I have a love of pretty placemats...but the funny thing is there actually aren't any placemats on the tables in my house. Instead we have placemats on our couch, and now we have placemats on our porch and in our yard!
I saw these really pretty placemats a Target a few weeks ago and knew that they were just the pop of spring color that I was missing in my front yard. I picked up three of them at $2.99 each, and for less than $10 I created a new garden flag and covered two outdoor pillows.  Let me start by saying that these were a little more heavy duty than the placemats I have bought previously, so I have a feeling they were made for outdoor use...and so far so good. 
 To make the garden flag, all I did was fold over one of the short ends of the placemat and sew in place making a loop to hang the flag. I didn't add any embellishment to the flag because I love the pattern of the placemat, but you could easily sew or glue on an initial or monogram.
 I also covered my outdoor pillows that sadly still had the black and orange covers on them from fall!
 To cover the pillows, I simply used my seam ripper to take out the seam from on of the short sides of the placemat. Then I slipped the placemat over the pillow and folded down the extra fabric.
I think these were just the thing my front yard needed to get ready for spring!
Pin It!

Friday, April 15, 2011

Dirt Cups

Last week, one of Grant's teacher asked if I would mind bringing Dirt Cups for the kids in his class. I said sure....no problem. The only problem was that I really hadn't ever made Dirt Cups before and I didn't have a recipe! Luckily my lovely blog/twitter friend Angie came to the rescue after I sent out a distress tweet asking for a recipe! She sweetly emailed me a copy of a recipe out of a church cookbook from her childhood! I used her recipe as a base, changed up a few things, and made it times 1 1/2 so that I would have plenty for the almost 30 kiddos in Grant's class!
:Dirt Cups:
2 packages of Oreos
3 8oz. packages of cream cheese
3 cups of powdered sugar
1 large box of instant chocolate pudding
3 cups of milk
12 oz of Cool Whip
gummie worms
::::::::::::::::::::::::::::::::::::::::::::::::::
I started by putting one package of Oreos at a time in my food processor and letting them whirl!
 You want the cookie crumbs to be the texture of real dirt, and that only takes a few seconds in a food processor!
 In my lovely {but oh so old} KitchenAid mixer I added the 3 blocks of cream cheese and the 3 cups of powdered sugar. I slowly incorporated the two so that powdered sugar didn't fly all over my kitchen, then I set it on medium speed and let it go until it was well blended and a little fluffy.
 While that mixture was working, I added my pudding mix and 3 cups of milk into a bowl and whisked them together well to get out any lumps.
 Then I added in my Cool Whip and slowly whisked it in until the mixture was smooth.
 Next I added my pudding/Cool Whip mixture slowly into the cream cheese/powdered sugar mixture. Beat on low until all ingredients are well mixed making sure to scrap the sides of the bowl....the cream cheese mixture likes to hang out on the side of the bowl and not mix in so work it a little!
 The last thing I added to the mixture was about a third of the cookie crumbs from earlier. I didn't really measure, just dumped in enough to give the mixture a little fun texture!
The next part is one of the most important: quality control. Before you serve up this yummy mixture, you really should lick the beater to make sure that it taste just right....or at least that they way we roll at our house:)
 Scoop up the mixture into small clear cups and top the cups with the remaining cookie crumbs and a gummie worm!
 I think the kiddos in Grant's class are learning about insects this week, but this would also be a great snack for Earth Day next week too! It was seriously so yummy that we may be making it again next Friday:)

Visit thecsiproject.com
Pin It!
Related Posts Plugin for WordPress, Blogger...