Home AboutMe Crafts Food

Friday, February 17, 2012

Planning is Half the Fun

We are 98 days from our BIG TRIP! It doesn't seem possible that in less than 100 days we will be off on a journey to see parts of the world we've only ever seen in pictures {and on the Brady Bunch}. All kidding aside, we are SUPER excited about our trip! Jason and I sat down and mapped out a tentative course. We've made a few reservations at campsites, but the whole trip isn't set in stone just yet. This is a map that I used to figure out how far we will be going on our trip. In total it will be over 5,000 miles! That is a long way to drive...and a really long way to pull an rv! There are some definite stops on our trip, and I've included most of them on the map below. 

We are still looking for great places to visit along the way, so any and all suggestions or links are welcome! I picked up a few books at the library yesterday so that we could start looking for some "off the beaten path" types of places and make sure that we hit all the "must see" sites too! I would love to take the boys to some fun "kitschy" places along with all the great wilderness & learning things we are planning to see!

We are pretty set in our plan up until we leave the Grand Canyon. We have either made reservations or called about places to stay up to that point, but after the Grand Canyon it gets a little complicated. Apparently Yosemite & Kings Canyon can get a lot of snow in the spring so they don't always make reservations for their campsites until they know they will be able to open. I get that...but I also don't want to drive more than halfway across the country without a plan of where we will be staying {I'm not very spontaneous, can you tell?}. And after we leave Yosemite & Kings Canyon we are moving on to big cities...while pulling an rv. I have to say that is just a little bit scary! But we want to see San Francisco{which btw is totally spelled wrong on my map!} and our plan for heading home is to drive through Los Angeles and hit 1-10 and come all the way back to Mississippi {with a couple of stops on the way}.  

Even though we have a map, some reservations, and sort of a plan, we still have a lot of planning to do....and planning is half the fun:) Oh and we have still have a TON of work to do on the Airstream too!
Pin It!

Tuesday, February 14, 2012

Sonic Drink Holder Valentine Gift Box

Back in November I started collecting those cardboard drink holders from Sonic. I had seen some really cute gift baskets made with lots of different kinds of drink holders and the Sonic ones seem to be the best...plus who doesn't want a reason to order a few yummy drinks at Sonic:)  Anyway, I was planning to use the drink holders at Christmas to make the boys' teachers gifts. I ended up giving them a different gift, which means my stash of drink holders {yes they are part of collecting vs. hoarding issues too} was still sitting in the dining room waiting to be turned into a cute gift box. I decided that Valentine's Day would be a great reason for me to pretty up the {kind of plain} cardboard drink holders and add a few goodies!
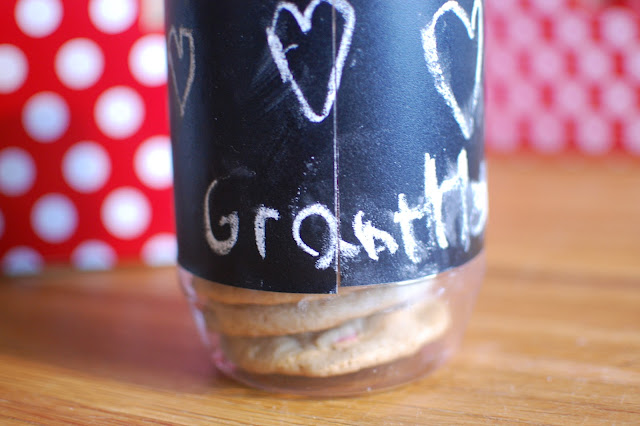
 I started by gathering up a few things to put into the gift box: a coffee cup, hand sanitizer, a Starbucks drink, and a recycled PB jar full of yummy cookies. 
 I used some left over Christmas wrapping paper {red and white polka dots work for so many things} and some scrapbook paper to cover all four sides of the drink holder. I simply placed the drink holder on the backside of the paper and traced around the part that I wanted to cover. I used spray adhesive and a glue runner to attach the paper to the box.
 I added a few vinyl letters to the coffee cup and the hand sanitzier just to make them more personalized. I also added a strip of chalkboard vinyl to the peanut butter jar {to cover up the sticky glue that wouldn't come off}. Then I let the boys decorate the jars with chalk. They wrote Happy Valentine's Day, drew a few hearts, and signed their names.

 I added a circl of scrapbook paper to the top of the jar to cover up the Jif label and then filled it up with yummy Valentine M&M cookies.
To finish off the gift box, I wrapped up the Starbucks drink, added a few pink & white paper straws, and tied on a cute tag with some bakers twine. The boxes took a little bit of time and effort, but they only cost a few dollars {around $7 each} to put together and they turned out SUPER cute! I hope the boys' teachers like them:)
Linking up here..
Tatertots and Jello
Serenity Now
Someday Crafts
Skip to my Lou

Pin It!

Friday, February 10, 2012

Collecting or Hoarding?

I have a habit slight obsession of collecting empty jars and containers. I'm not quite sure if it qualifies as collecting or hoarding though...where do you draw the line? Anyway, I find myself keeping lots and lots of empty peanut butter jars {they are perfect for gifting cookies in}, empty pasta sauce jars {there are so many mason jar type crafts out there that I want to try}, and empty trail mix containers {because we might make our own trail mix one day}. 
 They usually sit by the sink for a few days until I decide to finally wash them. Getting the labels off some of the containers is difficult sometimes so I procrastinate cleaning them until I get a small collection going:) 
 I had been storing my collection in one of our kitchen cabinets, but it started taking over a little bit {I think this may be where my collection is borderline hoarding}. We are in the process of moving Eli out of the nursery, which will be turned into my craft room...so I moved my collection into one of the emptied-out drawers in the nursery/craft room. They are out of the way for now which makes me feel like less of a hoarder:)

 The point of this post isn't to embarrass myself with pictures of my jar collection, but to share the awesomeness that can be made with said collection! This is the happy that I sent to school with Grant today for his assistant teacher's birthday. Sorry for the not so great pics, but I forgot to snap a shot before we left home so these are iPhone pics {with Instagram which I LOVE} that I took in my car when we pulled up in the school parking lot.
 This was a trail mix container {probably from Target because we love their Monster Trail Mix} that I cleaned up, added some polka dot paper over the stickiness from removing the label, added a tulle bow, and a chalkboard label to the top with a little happy birthday note. And it turned out really cute. It is the perfect way to gift some yummy goodness like homemade peanut butter cookies {which is why we have so many empty peanut butter jars}.
Please tell me I'm not the only one who collects random thing that other people throw away!?! What kind of collections do you have at your house?!?
Linking up here..
Tatertots and Jello
Serenity Now
Skip to my Lou
Pin It!

Thursday, February 9, 2012

I Love You More Than Chocolate Marshmallow Hearts

Eli and I are heading to library story time today. I'm kind of embarrassed to admit that my poor neglected third child has never been to story time. I took the boys all the time when Henry and Grant were little, but for a million and one reasons I've never taken Eli. A friend has invited us a few times over the past few months, and I had planned to start going in January....but I got sick, and it rained, and I had laundry to do...a million and one reasons! So we are going today! And today just happens to be the special Valentine party, which means if I'm going to show up for the first time I have to bring something cute with me:) Actually I probably don't have to take anything, but I bought these cute heart shaped marshmallows at Walmart a few weeks ago and I was kind of excited to have somewhere to take them!
So here are my SUPER simple, less than ten minutes to make, and really really really yummy
I Love You More Than Chocolate Marshmallow Hearts!
 I started with a bag of pink and white heart shaped marshmallows, melted chocolate candy coating, and a handful of toothpicks.
 Stick the toothpick into the side of heart shaped marshmallow and then give it a good dunk in the melted chocolate. Carefully shake off any excess chocolate.
 After dipping, place them on foil...
 ...and add a few shakes of some pretty Valentine sprinkles.
 After the chocolate hardens, carefully pull out the toothpick. You can dip another toothpick into the melted chocolate and covered up the hole where you pulled out the dipping toothpick, or you can just leave them as they are. 
Place your chocolate marshmallow hearts directly on a serving tray, or put them into cute papers cups like I did. They fit perfectly into mini baking cups that I picked up on clearance last year at Target. These were a big hit at our house yesterday {my boys begged to eat the extra chocolate marshmallow hearts last night after dinner}, so I'm hoping they will do just as good at story time today. What preschooler doesn't love sprinkles?!?
Linking up here..
Tatertots and Jello
Serenity Now
Someday Crafts
Skip to my Lou

Pin It!
Related Posts Plugin for WordPress, Blogger...