Home AboutMe Crafts Food

Friday, May 11, 2012

Roadtrip Ready: I Spy Book

Hey y'all! My name is Kate and I am so excited to be sharing with you all today here at Random Thoughts of a Supermom!

When you get a minute be sure to check out my blog; Embracing Life's Journey. I blog about life after the loss of a child - our 14 month old son Charlie, life with our new son Cannon, DIY crafts, recipes and so much more!

Today I am going to share with you all an amazingly easy project that I first learned about in my moms club in Florida. These are some of the most creative and awesome ladies ever, and I am so excited to share this I Spy Book with you.

Okay, so here we go...


There are 6 very simple steps to the process and depending on how old your kiddo is you can get pretty creative and complex.

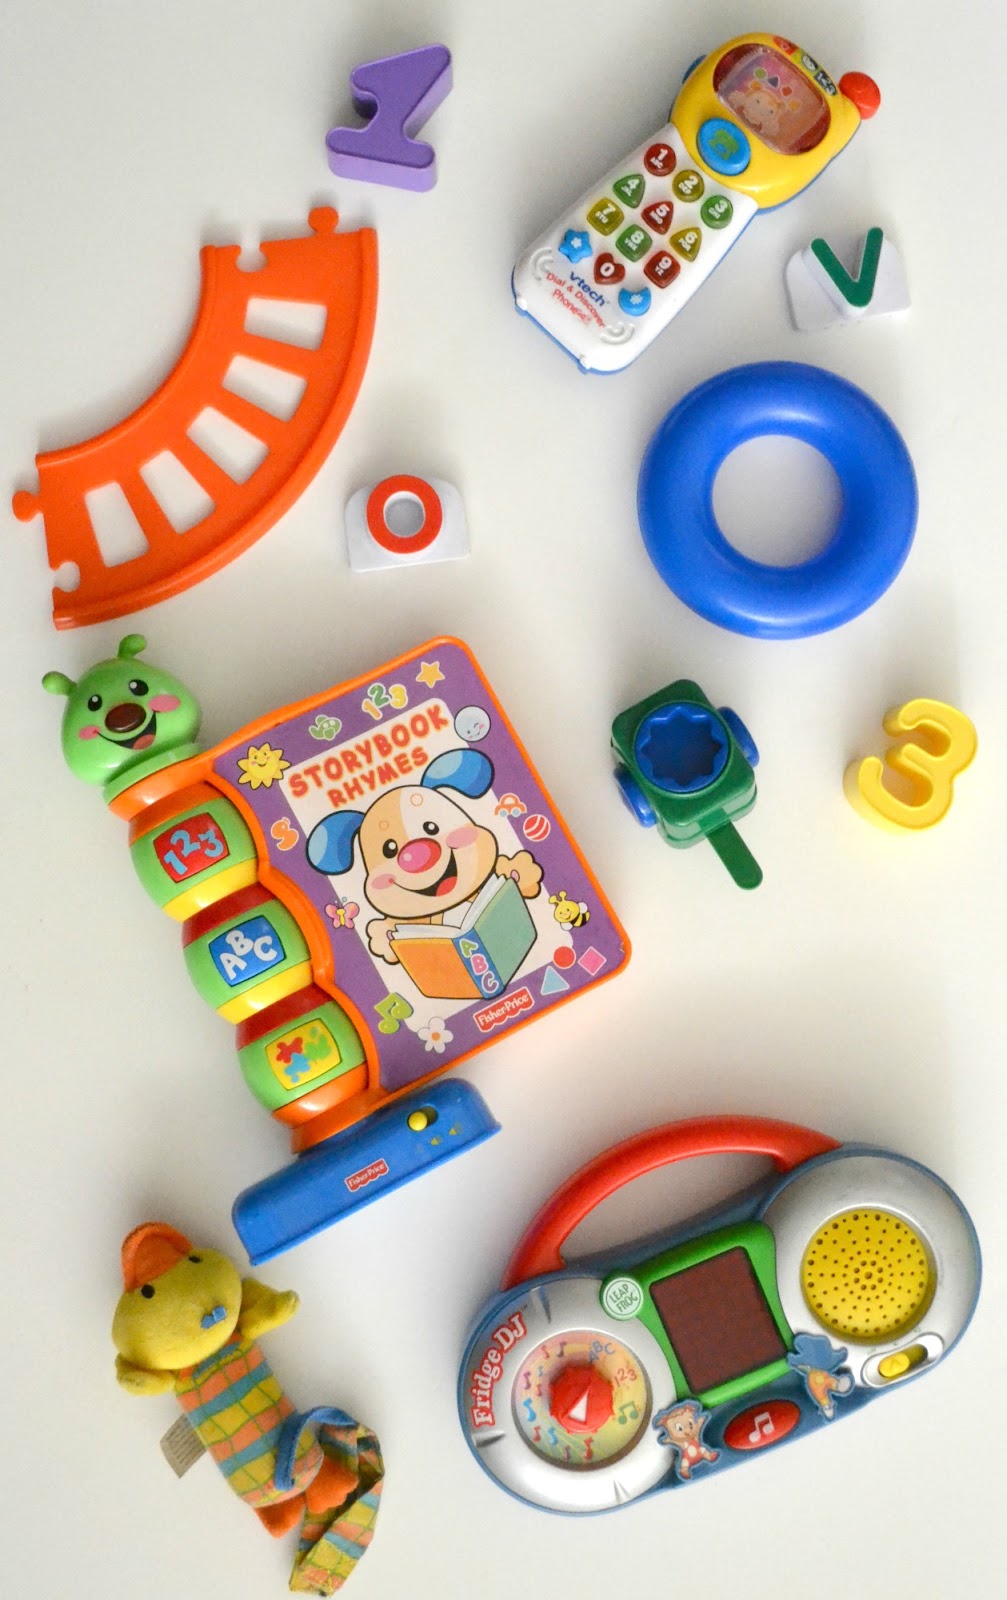
Step 1: Gather and lay out on a poster board random toys.

Step 2: Snap a picture of them and don't worry about zooming in perfectly.


Step 3: Remove most of the items leaving only a few for the key side of the page.


Now upload the pictures into your photo editing software. If you don't have one do not fret, there are plenty of free editing websites that do not require registration, like picmonkey.

Step 4: Edit the photos. All I did to mine was use auto adjust and crop since I wasn't trying to accomplish anything fancy. I also just shot them on auto but with no flash...I really don't like flash.


Step 5: Either print out the photos or upload them to a site to have them printed. I did mine through Walgreen's and they were ready in 1 hour. Be careful to remove the auto adjust option otherwise they might cut off your items and change the exposure.

You will repeat these steps for as many pages as you would like to do.

Step 6: Assemble your book.


Of course I had to do a University of Michigan one...


That's it, easy huh? I think some nature ones would be pretty fun too! And if your kids are a little older they can even help you pick out what to use.

I hope you enjoyed my tutorial and thank you so much to Kelli for having me as a guest blogger today!


embracinglifesjourney.com

Linking up here..
Pin It!

Wednesday, May 9, 2012

Roadtrip Ready: Roadtrip Behavior Clips

When we first started planning our big roadtrip, I immediately got on Pinterest to look for ideas. One of the first things I came across was this great idea from Less Than Perfect Life of Bliss for what she called Kid Clips. I knew this was something I had to make for my boys. Being in a car for 10 straight hours is going to require some kind of reward for good behavior, and this was just right for a roadtrip. The concept behind these clips is that you put them up at the beginning of your trip. If one of the kiddos misbehaves, whines, fights, or makes a bad choice then their clip comes down. At every stop on your trip, whichever kids still have their Roadtrip Behavior Clip up gets a treat. Genius idea right?!?
I started with a couple of sheets of cardstock and scrapbook paper and a clothespin for each kid. As you can tell I kept with my color coding system: blue for Henry, green for Grant, and orange for Eli.
I used my Silhouette and a circle punch to cut out a few different sized circles. My biggest circle is 3 inches in diameter and it was the perfect size to cover the entire clothespin. I layered two papers to add a little interest and attached them to each other with a glue dot roller.
Then I added each of the boys' initial to their clip.
I added a coat of Mod Podge to make them a little more sturdy and to protect the paper.
The last you do is add a little bit of hot glue to one side of your clothespin....
...and then stick your paper circle on.
After the hot glue cools, you are ready to hang them on your sun visors and hit the road!

I can't wait to use these Roadtrip Behavior Clips in a few weeks! I have a feeling the boys may test the system a little bit to begin with, but after they see someone else get a treat at a stop I have a feeling they will take it more seriously:)
How do you get your kids to behave on a long roadtrip?

Linking up here..
Pin It!

Tuesday, May 8, 2012

Roadtrip Trial Run

This past weekend we loaded up the Airstream and took her on a trial run. Basically we wanted to make sure we could make it down the road without any of our millions of redos and changes messing up. We also needed to see how camping was going to work, and make sure we had thought of everything before we head out across the country in a few weeks!
Our inaugural trip went pretty smoothly. We made it to our destination {and over a huge bridge that I shared a picture of on Instagram} without any trouble. Brakes, lights, hitch...everything worked just like it was supposed to!
 We arrived at the campsite and Jason got busy unhooking and setting up everything...and the boys got busy exploring:)
 We stayed close to the campground the first night because it was kind of late by the time everything was set up and ready to go. But the next morning we headed out to explore the island. We checked out the public beach area and the pier. 
 And we rode our bikes all over the island. I think we must have ridden at least 15 miles over the weekend..and I was so proud of Eli for keeping up with us the whole time! We did have to slow down for him a few times, but for the most part he stayed right with us pedaling his little legs as fast as they would go!
 We took in a little history lesson at Fort Gaines. I obviously didn't pay very close attention because I can't remember exactly what war this fort was built for...I'm assuming the Civil War though:)

 Then we let the boys play at the beach for a while.

 After all our exploring, we were ready for a snack! We found a little place that had yummy {but SUPER expensive} snow cones:)
 The next day, we got up early and did a little bird watching...well at least as much bird watching as three loud boys can do. Basically we just walked through the bird sanctuary and read a couple of signs. Grant did find a couple of birds though:) 
 We ended our camping trip with a quick lunch at the picnic table. Then it was time to start packing up to head home.
And obviously our weekend trip wore the boys out because all three of them passed out about halfway home! I think that means our trial run was a success!

Pin It!

Monday, May 7, 2012

Roadtrip Ready: Let the Kids Research

Planning is half the fun of a vacation...at least it is for me anyway! But planning a roadtrip can be SUPER stressful! There are a lot of things to consider: what route to take, where to stay, where to eat, what attractions to visit, what to pack, and a million more decisions that have to be made before you leave and during your roadtrip. So why not let the kids help out with some of the research and planning. They will learn a little about your destination, and they may even stumble upon something really cool that you had passed over! 
I picked up all three of these books at my boys' school book fair this year. They are full of information from the names of all the state capitals to crazy facts like it's illegal to steal an alligator in Louisiana:) These books also have information on lots of fun and interesting places that my boys have asked to visit on our roadtrip. They are helping the boys get a better grasp on US geography and understanding where we live in relation to where we are going this summer. One of the best things about these books is that after the kiddos research and help plan, they can bring the books along in the car and play the games and work the puzzles! I'm sure you could find these books {or similar ones} at a book store or even at Target.
Another great {and inexpensive} book to pick up is an atlas. The kids will love following along on the roadtrip and you could even get them to "help out" by telling you which city is next on your route or which road is your next turn. For younger kids you can start out with your route marked on the map for them, and for older kids you can give them a marker and let them mark the route as you travel. I'm sure your kids' future geography teachers will appreciate the fact that your kids will know how to read a map:)


Another great way to let your kiddos do a little roadtrip research is to pick up some books at the library. Since we are going to be camping, I found a couple of camp themed books along with a few family vacation books too. You can let the kids read the books before your trip to get a feel for how family vacations/roadtrips work, or you can save them for the car during the trip {as long as you won't be gone longer than the loan period for your library!}.
The best thing about letting the kids help with the planning and research is that they will be even more excited about your trip when you finally head out!

Linking up here..
Pin It!

Friday, May 4, 2012

Roadtrip Ready: Two Cookie Recipes


Hello Random Thoughts of a Supermom readers!  I'm Paula, from Sweet Pea, and I'm happy to guest post for Kelli while she's getting ready for a road trip with her family in her super-cool airstream.  I'm looking forward to hearing all about Kelli's trip once she returns home.

When my husband and I take a road trip, it's usually to the beach.  If it's to the beach, I'm sure to make a batch or two of cookies to enjoy both on the road and while we are relaxing in our cottage.

My husband is a real-life cookie monster and chocolate chip cookies ranks as his number one favorite.  I know there are thousands of versions of chocolate chip cookie recipes to be found and I’ve tried quite a few of them. The version that I’m sharing today is my favorite and it’s so easy to make. My favorite thing about this recipe is that it calls for melted butter, so there’s no waiting around to make cookies until the butter softens.
Wouldn’t you like to share some of these with your family tonight?  This cookie is quick and easy to make and is oh-so-good!

Chocolate Chip Cookies
2 cups plus 2 T unsifted all-purpose flour
1/2 tsp salt
1/2 tsp baking soda
1 1/2 sticks unsalted butter, melted and cooled until warmed
1 cup brown sugar (light or dark)
1/2 cup granulated sugar
1 large egg plus 1 egg yolk
2 tsp vanilla extract
2 cups chocolate chips


1. Heat oven to 350 degrees.
2. Mix flour, salt, and baking soda together in medium bowl; set aside.
3. Mix butter and sugars until blended. Mix in egg, yolk, and vanilla. Add dry ingredients; mix until just combined. Stir in chocolate chips.
4. Scoop dough onto parchment or Silpat lined baking sheets. Bake 7 minutes or until just brown. Let cool for a few minutes on baking sheets and then transfer to wire racks to completely cool.


I usually make a batch of these prior to our beach trip and freeze them until the day we leave.  They thaw in the car are neither their taste nor their texture is compromised by being frozen.

These cookies are always a hit!


A second recipe that frequently travels with us to the beach is my hands-down, all time favorite peanut butter cookie. The ratio of brown sugar to white sugar in this recipe results in a flat, chewy cookie. This recipe is from a cookbook called From Granny's Apron Pocket.


Chewy Peanut Butter Cookies

5 1/2 oz (2/3 cup) butter
6 1/2 oz (3/4 cup) peanut butter
3 cups brown sugar
2/3 cup sugar
2 eggs
2 cups flour
1 tsp. baking soda
2/3 tsp. baking powder
1/2 tsp. salt

Cream butter, peanut butter, and sugars. Add eggs and continue to beat. Sift together flour, soda, baking powder, and salt and add to creamed mixture. Mix well. Drop on cookie sheet and flatten with fork. Bake at 350 degrees, six - eight minutes. Do not over bake.

This peanut butter cookie is sweet, chewy, and I'll bet you won't stop be able to stop with just one.  This has been a favorite cookie recipe at my house for many years.

Thanks to Kelli for inviting me to guest post today.  I love making new blogging friends and invite you to visit my blog, Sweet Pea, where I blog about crafting, decorating, gardening, cooking, and my travels.


Linking up here..


Pin It
Pin It!
Related Posts Plugin for WordPress, Blogger...