Home AboutMe Crafts Food
Showing posts with label Crafts. Show all posts

Friday, April 9, 2010

Applique Towel Tutorial: Again!

As you can tell from yesterday's post, I am currently SUPER busy! So, I decided to repost one of my very first tutorials. I thought my applique towel tutorial was very fitting since I am currently sponsoring a fun giveaway for one over on Amanda's blog! Go enter! And then if you don't win, you can use this tutorial to make your own:)
***********************
ORGINAL POST:
I have been having a ton of fun with appliques lately.
So I thought I would share some of my {non-professional} techniques, so you can make your own SUPER Cute Personalized Towel!

Start with a towel of your choice! I made one for each of my boys.
Henry's towel is blue
Grant's towel is green
Eli's towel is orange
Using my computer, I found a font that I liked and printed out an H, G, and E. {You can make the letter as big or small as you want.} You can use any font you like, but the simpler the font, the easier it will be to cut out and sew onto the towel. I cut out the letter, traced it onto some interfacing, and cut it out again.
Then I used spray adhesive and attached the cut out interfacing to my fabric of choice {make sure to attach the letter upside down so that the fabric will be on the top and the interfacing on the bottom}.
Next, I cut out the fabric letter and use more spray adhesive to attach the letter to the towel. This helps keep the letter in place so that it doesn't move around while you are sewing! The next step is to sew the letter onto the towel.
You can use either a zig-zag stitch or a straight stitch. I have tried it both ways, and they both work pretty well...it is really just a matter of preference. The zig-zag stitch is a little harder to master, but once you finish sewing you are basically done. If you want to do a straight stitch {which I did on these towels} you will have to wash the towel after you sew it, and then trim up any of the frayed edges with some scissors.
Basically with both stitches, you just follow along the outline of the letter to attach the fabric to the towel.
And you end up with a SUPER Cute Personalized Towel!
I hope this was helpful and maybe inspired some of you to get out your sewing machines! If you have any questions or need {non-professional} help with anything just let me know.
Join us Saturdays at tatertotsandjello.com for the weekend wrap up party!
DIY Day @ ASPTL


The Girl Creative


Pin It!

Tuesday, April 6, 2010

Magnet Board

We have all stainless steel appliances in our house. They look beautiful, but the one thing {besides the fingerprints} I have always hated was that my boys never had anywhere to play with magnets. When Henry and Grant were younger I would give them a cookie sheet and some magnets to play with, but that just was never as much fun as playing with them on the wall or on the refrigerator.magnet board sneak peekSo, I made my own magnet board for the kitchen {with a little TON of help from my hubby}.

SUPPLIES:
Sheet of metal
wood trim
spray paint
buffing compound
adhesive

I picked up the supplies for this project for around $20 at Lowes. The sheet of metal was around $10, the trim was around $6, the spray paint was $3, and Jason already had the buffing compound and the adhesive.First, we had to decide how big we wanted our magnet board to be. Ours was only going to be a little bit smaller than the precut pieces of metal at Lowes, so Jason brought it home and trimmed it down. I'm pretty sure that they will also cut it to size for you at the store.

Then, Jason cut the frame and I spray painted them with at least three coats of black. I knew there would be lots of little hands on this, so I wanted it to be as durable as possible.

Jason also used some buffing compound to polish the metal so it would be shiny. We used some spray adhesive to attach the metal to the side of the kitchen cabinet, and then we attached the frame to the metal piece using the same adhesive. You could also use screws or nails to hold the metal and frame into place depending on where you put it. Now the boys have a fun place to play with magnets, and because it is in the kitchen {but not close to the stove} they can play in the kitchen more while I am cooking dinner. Now maybe I can get my tupperware cabinet organized:)


Visit thecsiproject.com


DIY Day @ ASPTL


The Girl Creative
Pin It!

Friday, April 2, 2010

Easter Baskets and Bunny Cake

I decided that after five years of using the same small {and SUPER cute} Easter baskets, that I need to upgrade the boys' baskets to something that will hold more than 3 eggs a little bigger.

I found some cute fruit baskets at Hobby Lobby for $3.99 each, and I decided that they were just the right size for Easter baskets. I also picked up some polka dot ribbon and some wooden tags while I was there. With a little bit of spray paint and hot glue, I knew I could make some SUPER cute Easter baskets!supplies I painted the baskets and let them dry over night.
glue on ribbonI used my hot glue gun to attach a strip of ribbon around the basket.
I followed the brace in the center of the basket, but you could really put the ribbon anywhere you want.
Cute bows Then I tied a cute little bow on one side of the basket for a little more color.
wooden name tags I used some wooden tags {4/$1 at Hobby Lobby} and Mod Podged each of the boys' names on them in colors that coordinated with the ribbon. {In case you haven't noticed before, Henry's color is always blue, Grant is always green, and Eli is always orange} Then, I used my Cropodile to add the grommet, but you could just make a hole and pull the ribbon through without it.
add Easter grass I tied the name tag on with another piece of polka dot ribbon, and filled the basket up with green paper Easter grass.
Cute Easter BasketsNow my boys have baskets big enough for a SUPER Easter egg hunt:)
************************
BUNNY CAKE
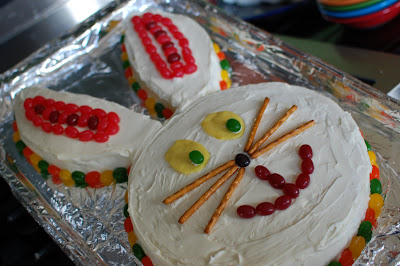
Henry's class had an Easter party yesterday, so I decided to make a Bunny Cake.
You need two round cakes, icing, and candy to decorate with.
Leave one of the round cakes whole and cut bunny ears out of the other. {You can also make the extra piece from the ears into a bow tie, but I didn't have room for it on my baking pan.}
Cover the cake in icing.
And then decorate away. I usually cover the whole cake in coconut, but I figured the Kindergartners might turn their noses up at it:)
Bunny CakeA simple and easy Bunny Cake perfect for an Easter party!
I hope everyone has a great Easter weekend!

(46) and Jesus said to them, “Thus it is written, that the Christ should suffer and on the third day rise from the dead, (47) and that repentance and forgiveness of sins should be proclaimed in his name to all nations, beginning from Jerusalem. Luke 24:46-47

Visit thecsiproject.com
Pin It!

Tuesday, March 30, 2010

Personalized Plate

They other day I was feeling crafty, but I didn't have a lot of time.
I made this SUPER cute personalized plate in about 20 minutes one afternoon while Grant and Eli were napping!I started with a white plate
{that has been in my cabinet & not used for probably 5 years!}, contact paper,
black spray paint,
and my Cricut.
I used the Cricut to cut a W out of contact paper.

Then, I attached the W to the center of the white plate and spray painted the entire plate black. I put two coats of paint to make sure it was covered, and then sprayed a little bit of clear sealer on it too. The hardest & longest part of this project was waiting for the paint to dry:)

After the paint dried, I peeled up the W. I used the end of a spoon to clean up any of the edges where paint had seeped under the contact paper.

And now I have a SUPER cute W plate for my dining room!
Now I just have to figure out what to make with the three other white plates in my cabinet!


DIY Day @ ASPTL

The Girl Creative

My fork and spoon redo is also being feature over here today...go check it out and leave Emily some comment love:)


Pin It!
Related Posts Plugin for WordPress, Blogger...