Home AboutMe Crafts Food
Showing posts with label Vacations and Holidays. Show all posts

Saturday, March 16, 2013

Rainbow Oatmeal for St. Patrick's Day

Two out of three of my boys love oatmeal...the other takes a little bit of coaxing and he will normally eat about half a bowl. But when I put this bowl of rainbow oatmeal in front of him it took way less convincing to get to him to eat his oatmeal! St. Patrick's Day is such a fun holiday, and I've made quite a few different rainbow treats to celebrate over the years. But this year St. Patrick's Day falls on a Sunday which means we will be short on time to make fun treats since we will be running around trying to get to church on time. I decided to make some healthy oatmeal and add a little bit of a St. Patty's Day twist with a couple shakes from my sprinkle stash:)
Raid your sprinkle stash {or buy a couple bottles of sprinkles in all the colors of the rainbow}!
 Fix up your kiddos' favorite oatmeal and then simply add the sprinkles on in the shape of rainbow.
They turned out so pretty, and once your kiddos mix the sprinkles into their warm oatmeal, their whole bowl will be colorful!
 Our fun rainbow oatmeal even got this oatmeal non-lover to smile!

Pin It!

Friday, March 15, 2013

St. Patrick's Day Reverse Applique Shamrock Initial Tee

If you've been around my blog long, you know that crafty shirts are one of my favorite things to make for my boys! I have made them for almost every holiday, birthday, and special occasion for the past few years. This year I decided to some cute shirts for St. Patrick's Day...but they needed to be church friendly since St. Paddy's day falls on Sunday this year. So I picked up a couple green polo shirts from Target and added a cute, but subtle shamrock to each of them using a reverse applique technique.
The first step is to decided what kind of design you want. I decided to go with a smallish clover with each of the boys' initials placed inside the clover. I found a clip art clover, opened it up in photoshop, added the letters on top of the clover, and then printed out the page. 

To get the shirt ready, decided where you want your design to be. Then pin your fabric of choice to the inside of the shirt with the right side of the fabric facing the shirt. Sounds kind of confusing, but the picture on the left should help a little. Then turn your shirt right side out and pin your design to the shirt making sure that all of the design fits where you pinned the fabric inside. 


The next step is to sew around the edges of your design. For my shirts, I sewed around the clover and also around the outside of each letter. 
Once you finish sewing, simply pull up the paper to reveal your design. 
Now, comes the fun part! Using a small pair of scissors, carefully cut out the inside of your design as close to the stitching as you can get without cutting it and without cutting through the layer of fabric underneath. I usually start in the center of the design because it is easiest to separate the shirt from the fabric. For my shirts I had to go around the inside of the clover and also around the outside edge of the boys' initials. 

And this is what the finished project looks like! You can also start out easy with just a solid shape so you don't have to deal with cutting around the initial. I think they turned out pretty cute for a basic polo, a scrap of fabric, and a little bit of time!

Linking up here..
Pin It!

Friday, March 1, 2013

Treat Round Up for Dr Seuss' Birthday

Dr. Seuss' birthday is tomorrow. I'm not sure if it's because my boys are getting older or because March 2 happens to fall on a Saturday this year, but either way I ALMOST forgot about one of my favorite school celebrations. Luckily I didn't forget and I had time to whip up a few treats for Grant's class {I guess 3rd grade is too old for Dr. Seuss because I don't think Henry's class is doing anything} and time to make a fun lunch for the boys today. Nothing new happening around here this year, but I did put together this round up of a couple of my past Dr. Seuss treats just in case anyone is looking for a fun way to celebrate tomorrow.
Enjoy! 
Pin It!

Wednesday, February 13, 2013

Love at 1st Bite Valentines

Valentine's Day is one of my favorite holidays. It is full of pink and kisses and candy and hearts and sparkle. Basically it's a little girl's dream...and a little boy's nightmare! It can be really hard to come up with Valentine ideas that don't leave boys running for the dirt pile, and I have to admit that in the past I've made my boys suck it up and take pink, girly Valentine's to school. But last year after Halloween when I came across these cute Glow in the Dark teeth on clearance, I knew they would make a really fun and very boyish Valentine!

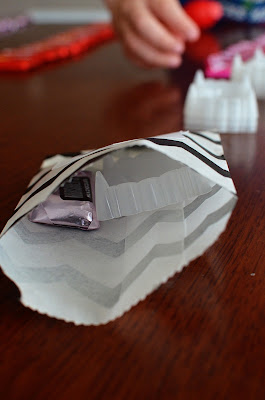
I started with a couple packs of clearance Glow in the Dark teeth, cute chevron bags, sticker paper, washi tape, and mini candy bars. I designed the cute Love at 1st Bite printable on my Silhouette software and then print and cut them out with my Silhouette. I saved the printable without my boys' names too, so if you have a Silhouette and you want the printable file just send me an email {kellibwilson @ gmail.com}.
I stuck a sticker onto the cute chevron bags...
...and then stuck in the Glow in the Dark teeth and a mini candy bar. I made the black bags for the boys and the pink ones for the girls.

To close up the bags, I folded over the edge and secured it with a little bit of washi tape.
I think my boys are going to be excited about taking these Valentine's to school tomorrow. They are boyish enough for them, but still really cute and Valentine-like for me {and all the girls in their classes}!
Pin It!

Tuesday, February 12, 2013

In Celebration of Mardi Gras...

{This a re-post from last year.}
Happy Mardi Gras everyone!
Mardi Gras is a fun holiday for us. I know that it's not as big of a deal in other parts of the U.S., but we are right in the middle of  Mardi Gras country! To our east is Mobile, the official birthplace of Mardi Gras, and  to our west is New Orleans, the place best known for it {sometimes} wild Mardi Gras ways! It is such a big holiday were we live, that the kids get three days out of school for it!

We usually celebrate by going to a local {very family friendly} parade. The boys love all the decorated floats, catching beads, listening to the marching bands, and eating yummy Mardi Gras snacks. Besides the traditional King Cake {which must be from the fabulous Paul's Pastry Shop} that we eat every year around Mardi Gras, we also LOVE a Moon Pie. These sweet treats are so yummy, and they are even better if you catch them at a parade! Unfortunately we missed our usual parade because of storms that came through on Saturday...so no parade caught Moon Pies for us! I decided making some homemade ones would be a fun replacement, and I'm sharing the step by step for those of you who can't get your hands on a store bought Moon Pie!
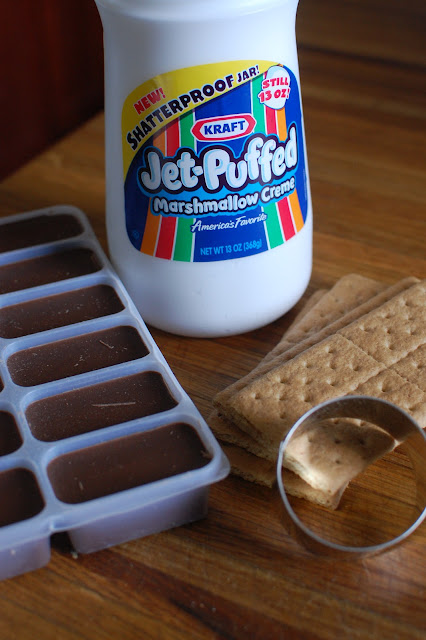
 Start with some really easy ingredients: graham crackers, marshmallow creme, and chocolate. 
 There technically isn't any cooking in this recipe...just melting and assembling:)
Start by using a small round cookie cutter {mine was 2 inches in diameter} to cut your graham crackers into circle. Each cracker should make two rounds.
 Put a good dollop of marshmallow creme on one graham cracker round and then sandwich it together with another cracker. This is easiest to do if you put the marshmallow creme into a ziploc bag and then squeeze it out onto the crackers! Place them in the freezer to chill while you melt the chocolate.
 Toss the graham cracker sandwiches into the melted chocolate and use a fork to turn and coat them. Lift them out of the chocolate and tap off any excess chocolate then place them on foil to harden.
 These aren't exactly the same as a traditional Moon Pie. The crackers are a little bit crunchier, and the chocolate isn't quite the same but they are a pretty close match without a whole lot of effort...and they taste really yummy!
How do you celebrate Mardi Gras?!?
Linking up here..
Tatertots and Jello
Serenity Now
Someday Crafts
Skip to my Lou
Pin It!

Sunday, December 23, 2012

Milk Meets Santa Video

A few weeks ago, my boys and I got a fun opportunity to be part of a Christmas video all about cookies, milk, and Santa for the Milk Mustache campaign. You can check the video out HERE or you can watch by clicking on the Youtube video below. 

 **So what REALLY goes down with Santa on Christmas Eve? Only these kids know the truth. Watch to find out!**


Disclosure: I was compensated by the National Milk Mustache "Got Milk?" Campaign for participating in this video.
Pin It!

Tuesday, December 18, 2012

Snowman Waffles

I pulled out my waffle maker this weekend and whipped up some fun and easy waffles to help get us in the Christmas spirit! I've made waffles for almost every other holiday there is, so I figured it was time to make some for Christmas too! These waffles would be so fun for Christmas morning or even for dinner on Christmas Eve if you don't have big family plans! And the wonderful thing about these cute Snowman Waffles is that you can even use a little help from the store and use frozen waffles instead of making them homemade!
 I started with a stack of three warm and yummy waffles.
 I got out my sifter and my {huge seven pound} bag of confectioners sugar.
 I simply laid the waffles out to look like a snowman and then dusting them liberally with the confectioners sugar.
 After your snowman is all covered with snow, all that's left is to decorate him!
 a couple of chocolate pieces for buttons
Twizzlers for his mouth and scarf
an orange Tootsie Roll for his nose
Banana slices with Sixlets for his eyes
I just used the candy that we had on hand...mostly stuff from the Christmas parade that we went to a few weeks ago! The fun thing about this snowman is that you can pull out all your leftover gingerbread house decorations {or parade candy} and let your kiddos use their imagination to make Mr. {or Mrs.} Snowman anyway they want!


Linking up here..
Pin It!

Monday, November 26, 2012

Pre-Thanksgiving Roadtrip: Fall Creek Falls State Park, TN

The weekend before Thanksgiving, we had plans to go see the Mississippi State Bulldogs play football one last time this season. Since the boys were out of school the whole week of Thanksgiving, we decided to extend our weekend football trip by a few days and take a short trip to Tennessee. I did a little research and found a wonderful State Park about an hour north of Chattanooga {and only about a 6 hour drive from Starkville}. So after the Bulldogs won against the Arkansas Razorbacks, we loaded up the Airstream and headed to Fall Creek Falls State Park.
The namesake falls from the top:
All of us after the hike down to the bottom of the falls:
 The boys had a great time hiking, biking, and exploring all over the beautiful park and campground.
 Two of our favorite places in the whole park were the suspension bridges that crossed over the creeks. I was a little nervous about them, but the boys LOVED them! And they were the perfect setting for some cute group pictures too:)


 This was my normal view for most of the hikes that we took...bringing up the rear and making sure that Eli stayed with the group!
**We had a wonderful time at Fall Creek Falls State Park**
The campground was wonderful {and pretty sparsely occupied since it's off season for camping}.

We saw a ton of deer everywhere.
We had a campfire every night with yummy s'mores & campfire cones.
The boys got slingshots for souvenirs and learned how to shoot acorns with them:)
I managed to get a couple photos of my wild boys so we will always remember our first camping trip in Tennessee!
Pin It!

Monday, November 19, 2012

I am Thankful For Printable

Last year I shared these really cute I am Thankful for printables that I made. I actually loved them so much that they stayed up all year!
Now that Thanksgiving has rolled around again, I thought it would be fun to use the same printable again and just update the picture and let the kiddos update what they are thankful for! So I searched through my pictures from last year and found a couple cute ones of the boys and printed them out again using THIS printable and Photoshop. I thought since it was such a big hit here last year, I would work on making it a printable so you could print it out too:)
******
You can right click and save or open up THIS link and head over to Google documents to download it.

After you download the file, just open it up in Photoshop {or whatever photo editing software you use} and place your picture on top of the gray square. If you don't want to deal with photo editing software, you can always just print it out and tape your picture right to the page!
**************
I'm still working on getting the boys to finish up their drawings and getting them hung up, but when I do I will share a picture with you! And if you use this printable, I would love to see what your kiddos are thankful for too!
Pin It!

Friday, November 16, 2012

Sugar Cone Cornucopia

I saw these SUPER cute Thanksgiving treats floating around the blog world last year. And I have to admit that when I first saw them, I was pretty skeptical that they would work....that's probably why I didn't attempt them last year. But earlier this week when our preschool choir director asked if I could come up with a snack for the kiddos, this was the first thing I thought of. I searched Pinterest and found a couple different versions all with different directions {I never did find what looked like the original inspiration. If you know where it is let me know and I'll credit them!}, so I grabbed a couple of sugar cones and tried out a few techniques. After a failed attempts, I came up with the perfect way to make and fill these cute Sugar Cone Cornucopias!
Start by gathering your supplies:
sugar cones
chocolate 
fall sprinkles
Cool Whip
Reese's Pieces or M&M's
Take a couple of paper towels, fold them up into a square, wet them, and then ring out most of the water. You want them to be damp, but not dripping. Place your wet paper towels on a microwave safe plate, then place the bottom half of the ice cream cones on the paper towels and cover them up. I found that two at a time worked the best because you only have a little bit of time to work with them after they come out of the microwave.


Microwave the cones for around 30 seconds depending on the strength of your microwave. You want the ends of the cones to be soft enough to mold without burning the part that isn't in the paper towel. You also need to re-wet the paper towel after two 30 seconds runs in the microwave.
Remove the plate from the microwave and pull back the paper towel carefully. They will be hot! Pick up your cones, and working quickly bend the end of the cone using your hands, the counter top, or even a clean pencil. You will have to hold the ends in place for a few seconds until they cool enough to keep their shape. 
This is a great projects for kiddos to help with, but they don't need to help with the cone making step because it can be really hot! So let them start helping after all the cones are made:) I actually made all the cones at home and then took them with all the other supplies to church and the kiddos all got to decorate and fill their own cornucopias! 
After you finishing forming all your cones, melt a little bit of chocolate in a coffee cup or small bowl. I used almond bark and I just put one square in my cup and microwaved it until it was melted. 
Then dip just the very end of the cone in the chocolate...
...and place your dipped cone in a small plate of fall colored sprinkles.
Set the cones aside so the chocolate can harden. While you wait on the cones, put your Cool Whip in a small plastic bag and clip off one of the corners.
Use the plastic bag to fill the cone up with Cool Whip...
...then place a couple of Reece's Pieces or M&M's in the Cool Whip. 
Now you have a SUPER cute Sugar Cone Cornucopia that kids and adults will love!

Linking up here..
Pin It!
Related Posts Plugin for WordPress, Blogger...