Home AboutMe Crafts Food
Showing posts with label Crafts. Show all posts

Thursday, May 3, 2012

Roadtrip Ready: Map Covered Cookie Tube

On Tuesday, I share a fun roadtrip snack idea for your kiddos...but us parents need some good roadtrip snacks too! My favorite snack to have on a roadtrip is homemade cookies. The only problem with homemade cookies is that sometimes they are kind of delicate and sticking them in a ziploc bag for a long roadtrip pretty much guarantees that you will end up with crumbly, broken cookies before you get to your final destination. But there is a simple and really cheap solution: a cookie tube!
Start out with a Pringles tube {or three depending on how many cookies you plan on making}. My boys were SUPER excited to see these in the grocery bags, because Pringles are a treat they don't get often...only when I need the tube for a craft project:) After all the chips are gone, clean out the tube with a wet napkin, and get ready to decorate.
 I decided to use a couple of old maps to go along with our roadtrip theme. You can use any kind of paper you would like...cute scrapbook paper, wrapping paper, or even the funnies would be cute. I had an old atlas that had seen better days that I pulled a few pages from, but those state maps that you get at the welcome centers would be perfect for this too.
Trim your map to the same height and circumference at your Pringles tube, then apply a good coat of spray adhesive to the back side. Stick the paper to the tube making sure to get out any air bubbles or wrinkles.
To seal the paper {and protect it from dirty cookie fingers}, coat it well with a layer of Mod Podge.
After the Mod Podge dries, load your tube up with homemade cookies and snap on the lid. Your yummy homemade cookies will stay in one piece for your whole trip inside this cute cookie tube...as long as you don't eat them all first:)
Come back tomorrow for two great homemade cookie recipes that would be perfect for any roadtrip... especially if they are inside on of these cute Map Covered Cookie Tubes!

Linking up here..
Pin It!

Tuesday, May 1, 2012

Roadtrip Ready: Travel Snack Boxes


Welcome to day one of my new series Roadtrip Ready! I am so excited to share all of my fun roadtrip ideas, and few of my friends' great ideas as well. Today I am sharing a fun idea inspired by a project I saw on Pinterest. The idea behind these travel snack boxes is that each kid gets a box full of snacks at the beginning of the your trip. They get to eat the snacks any way they want...all at once or spread out through the day...but when it's gone, it's gone! It's a great idea, but I took it one step further by adding a fun chalkboard to the top. Now it's entertainment and snack in one!
I started with these divided boxes that I picked up at Ikea for about $4 each. You can find similar boxes at the hardware store or the craft store. 
I added a piece of chalkboard vinyl to the top of the boxes. I was careful not to cover up the places on top where the boxes stack on top of each other...that way they are easier to store when not in use.
Then I cut the boys' names out with  my Silhouette and added the names to the top of the boxes.
Henry got blue, Grant got green, but Eli ended up with yellow because I didn't have any orange vinyl. 
The great thing about these boxes is that you can fill them up with anything you want. That means they can be way more healthy {and a lot cheaper} than all those gas station snacks! I added a bottle of water and a yogurt in the large compartment. To keep things cool longer, you can freeze both of these. Then I filled up the boys' boxes with a variety of snacks: blueberries, carrots, almonds, Oreos, animal crackers, and pretzels. The possibilities are endless!
And when the kiddos start chanting "I'm bored" all you have to do is hand them a piece of chalk! That should keep them busy for about ten minutes a while:)
What kind of snacks do you like to take on roadtrips?

Linking up here..
Pin It!

Tuesday, April 17, 2012

HGTV.com feature

A few weeks ago,  I got an email from a writer for HGTV.com asking if they could feature my Outdoor Toy Organizer in an article on the HGTV.com website.
To say that I was excited would be a major understatement!
I love watching HGTV and I love browsing HGTV.com for awesome ideas....so knowing that one of my projects would be featured there was such an honor. I got an email today saying that the article was up and I was so excited that I just had to share it here with y'all! The article is called Clever Uses for Everyday Items in the Garage. I know my original project was for outdoors, but honestly it would work even better inside a garage! Here's a little preview of what the article is about straight from HGTV.com:
Upcycled decor is smart and savvy, so why save all the best ideas for inside the home? We've gathered clever redos from inspired DIYers with a talent for giving new life to old things that are perfect for the garage.


I would love for you to hope over to HGTV.com and check out the article. I know you have all seen my Outdoor Toy Organizer before, but there are also a ton of other great ideas that are perfect for organizing your garage or outdoor space...just in time for spring cleaning too! 
Pin It!

Monday, April 16, 2012

How to Plan a Bowling Party in Less Than a Week

I love a good kid's birthday party. Especially if it is a theme party with lots of fun details....and that is usually the kind of party that I plan for my boys. But somehow life got SUPER busy these last few months and Henry's 8th birthday got here way too fast. It probably didn't help that his birthday was a few days after Easter and during the boys' spring break! The week before his birthday, I hadn't done much of anything as far as planning goes....actually I was still trying to decided between a baseball party or a bowling party. I had considered taking Henry and a few of his friends to a minor league baseball game in a nearby city, but in the end bowling won out mostly because it was easier to take kiddos to the bowling alley during the day than to have them out at a baseball game until 10 o'clock at night!
************
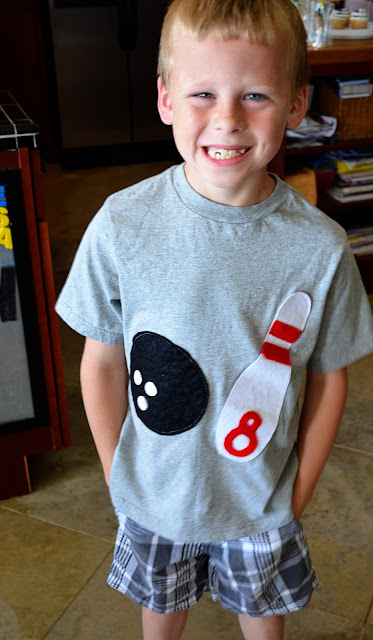
The first thing I did to get ready for Henry's birthday was to make him a birthday shirt. I printed out a clip art bowling pin and bowling ball, cut them out with some felt scraps, and sewed them onto a t-shirt.  I added the 8 to the bowling pin since it was Henry's 8th birthday:) He LOVED his shirt {and so did the manager at the bowling alley...she took Henry's picture in his bowling shirt to add their website!}
 I made a dozen cupcakes and decorated them like bowling balls. I used a black sheet of that sugar paper stuff that they have in the cake decorating section, and then I added a few dabs of white icing for the holes in the bowling balls using a ziploc bag.
 I also put together some cute party favors for the boys. I bought a pack of plastic trophies at the party store, then I added a sticker that said "Best Bowling Buddy" along with each of the kiddos' names. I also added a sticker to the back that said "Thanks for making Henry's party a BALL".To finish the party favors, I filled the trophies with gumballs and put them in small clear bags.
 And then we went bowling:
 We also had a small family party the next day. Instead of just having a generic party, I decided to continue the bowling theme. I decorated the house with bowling ball balloons that I made by sticking small white circle stickers onto black balloons. I attached 8 of the bowling ball balloons on the stairs just for fun:)
 For some reason I didn't get a picture of the cute bowling ball plates that we put together for the party, but they were simple black plates with the same white circle stickers stuck on to make them look like bowling balls. I also bought a cute plastic bowling set for the kids to play with during the party, but it ended up being WAY too windy for they played bowling on the wii instead:)
**************
After a little wii bowling it was time for food! We had some yummy bowling ball treats made with Ding Dongs and a little leftover icing.....
 ...and we also had a SUPER yummy cake that matched Henry's birthday shirt.
Considering that both of Henry's bowling parties were planned in about a week, I thought they turned out pretty cute...and I know the boys had a ton of fun celebrating Henry's birthday!
Linking up here..
Pin It!

Thursday, April 5, 2012

A Little Easter Happy

I'm pretty sure I've confessed my love for the Dollar Spot section at Target at least a hundred times here. I seriously can't go into Target without getting at least one SUPER cute item from the Dollar Spot. It is a great place to pick up treats for the kiddos, party favors, and holiday decor. But my favorite things to find in the Dollar Spot are "happies". You know the stuff I'm taking about...the cute stuff like notepads, picture frames, & pens. I also LOVE all the different containers!

The Dollar Spot is my go to place for teacher happies all year long! A few weeks ago I came across these cute metal buckets {with super adorable gingham ribbon handles} and I knew they would be perfect for some fun spring/Easter happies for the boys' teachers! 
 I picked up a few beauty supplies to place in the Dollar Spot buckets. I figured nail polish would be a great Easter gift so that their teachers could have pretty toes to go with new Easter dresses and shoes:)
****
nail polish {$2 in the beauty section}
nail file {$1 on end cap in the beauty section}
nail polish remover pads {$2 for a pack of ten in the beauty section. Each teacher got two & they are inside the eggs}
Burts Bees Chap-stick {2 pack for $5. Each teacher got one}
 a pretty floral note pad {$1 in the Dollar Spot}
& a cute chalkboard sign {$1 in the Dollar Spot}
****
All that was left was to assemble!
I started by stuffing an empty Target bag into the bucket and then topping it with some white shredded paper....green Easter grass would be really cute too, but the only Easter grass I had was in the boys' baskets and I didn't want to steal theirs:) I wrote a cute Happy Easter note on the chalkboard sign and stuck in in the back, then added all the other happies to the bucket...including the filled Easter egg  to make it look extra Easter-y!
**So if you are looking for some happies to make someone's day a little more special, head to Target & the Dollar Spot!**
Linking up here..
Tatertots and Jello
Serenity Now
Someday Crafts
Skip to my Lou
Pin It!

Thursday, March 29, 2012

Never Underestimate the Power of a Hot Glue Gun

A couple of weeks ago, I came across this tutorial for Fabric Covered Roller Shades on Pinterest. I immediately pinned it to my Project Airstream board because I knew it was the perfect solution to replace the hideous 1970's wall to wall curtains that we took out of our Airstream. I kept the idea for those cute fabric covered roller shades in the back of my mind, and on one of the many days that we were shopping at Lowes last month I decided to grab a few of the cheap vinyl roller shades and experiment. 

Now if you can't tell from the title of this post, I did NOT start out using my hot glue gun first. Honestly I thought  for sure that the hot glue would melt the vinyl and make a huge mess. So I kept my trusty hot glue gun in the drawer and tried a few other things.


My first attempt was with spray adhesive {yes I know it's number 2 in the picture, but it was the one I tried first}. It was a major FAIL! The spray adhesive was way too sticky and it was nearly impossible to get the fabric attached to the shade without a ton a wrinkles. I sprayed the fabric and carefully placed it onto a scrap piece of roller shade, but it was really crooked and wrinkled. So I tried to reposistion it....and it just went downhill from there. Needless to say, spray adhesive is not the way to go when making fabric covered roller shades!

After the spray adhesive failed, I did a little more research and found a couple of people who said they used fabric glue. So I picked up a big bottle {for $12} at the fabric store, and came home all excited to make this project work the second time around. I was so sure that the fabric glue was going to work that I started with the actual shade and not a scrap. The only problem was that I think I was a little too excited because I used way too much fabric glue, which then soak through my fabric and left a gross dried glue film all the way up both sides of my roller shade...not a pretty look. I attempted to salvage the roller shade by covering the edges with some white ribbon, and it turned out okay. But I was not going to take the time to line all the edges of the {7 other} roller shades with ribbon...so it was on to plan C!

Plan C included my trusty hot glue gun {who I should probably apologize to for doubting}! I pulled out a scrap piece of roller shade, plugged in my hot glue gun, and decided that even if it instantly melted a huge hole right through the darn roller shade that I was at least going to give it a try! And surprise, surprise it worked! No melted hole, no soaking through the fabric, no weird dried glue film....just a perfectly attached piece of fabric! 

As of now I don't have a single shade finished and hanging to share with you, but I do at least know HOW I'm going to go about doing it now! And hopefully this post will help anybody who is thinking about making a cute {but not nearly as simple as it seems} Fabric Covered Roller Shade. When I do get all my roller shades covered and hanging in the Airstream, I will be sure to share a few pictures. And just in case you missed it, the moral of the story today is "Never Underestimate the Power of a Hot Glue Gun"!

Linking up here..
Tatertots and Jello
Serenity Now
Someday Crafts
Skip to my Lou
Pin It!

Friday, March 23, 2012

Embroidery Hoop Easter Wreaths

My front doors have been bare since the week after Valentine's Day. For some reason I just couldn't get myself motivated to make something cute and springy to cover up my bare front doors. Maybe it's because I've been SUPER busy with a bunch of nothing....or maybe it's because the weather has been fluctuating between pouring rain and ridiculous heat {at least for March anyway}. Whatever the reason, I figured since we only have a couple of weeks until Easter I should get busy making something kind of spring like before I miss my chance and summer is here!

As I was walking through the fabric store last week looking for some fun green fabric for the Airstream, I noticed these oval shaped embroidery hoop. The first thing I thought when I saw them was that they look just like an egg...I guess that's about right since eggs are oval shaped:) Anyway, I stuck them in my tiny cart on top of with Eli and walked around the store for a while trying to talk myself into buying them. They were kind of expensive {about $13 each, though they did have smaller size that was only $8} to just hang on my front door for a few weeks, but after stumbling across some cute polka dot and paisley fabrics on clearance I decided to buy them and see what I could create.
 cute springy {clearance} fabrics:
 Start by laying out the hoops and cutting the fabric just a little bit bigger than the outside of the hoop.
 Then use a screwdriver to open up the hoop and place the fabric between the two pieces. Pull the fabric until it is smooth, and then tighten the hoop back up with your screwdriver.
 After you have the hoop tightened, turn it over and use a sharp pair of scissors to trim off the excess fabric. 
  Once you have the base of the wreath finished, you can embellish your egg shaped wreaths anyway you want! I created a couple of pennants with a pattern, a sharpie, and some coordinating fabric. Then I hot glued the pennants pieces onto a strip of raffia and attached that to the outside edge of the embroidery hoop. I also added a small sign that says "Happy Easter" with a flower rosette.
 These were really simple to make, and they are the perfect spring addition to my front doors! My favorite part about this project is that you can take the basic idea of an egg shaped embroidery hoop wreath and really turn it into anything you want for Easter!

Linking up here..
Tatertots and Jello
Serenity Now
Someday Crafts
Skip to my Lou
Pin It!

Friday, March 16, 2012

St. Patrick's Day Knee Patch

Last year, I shared about how difficult it can be to come up with cute holiday stuff for boys...so I got creative and made these fun Lucky Shoe Charms. This year I decided to upcycle an old pair of jeans into a cute pair of St. Patrick's Day Pants with a fun shamrock knee patch.
I don't know about your kiddos, but my kids are rough on their clothes. We have lots and lots of blue jeans with holes and rips in them. I know that the worn out, ragged look is in now, but I just can't let my kiddos walk around in clothes with holes everywhere! I think it has something to do with my OCD:)
So instead of donating these well loved pants, I decided to upcycle them into holiday pants! I started by printing out a shamrock just a little bigger than the hole. 
I cut out the shamrock on some cute green and white polka dot fabric.
And then used some spray adhesive to attach the polka dot shamrock to a small piece of green felt.
I used my pinking shears to cut the felt into a circle and then stitched the whole thing on with some green embroidery thread.
I think they look awfully cute paired with Eli's St. Patty's Day Tie from last year:) 
And the best part about this SUPER easy holiday craft is that I can simple clip the embroidery thread after St. Patrick's Day and turn them into Easter pants with a fun egg shaped patch!
Do you wear green on St. Patrick's Day?
Linking up here..
Tatertots and Jello
Serenity Now
Someday Crafts
Skip to my Lou
Pin It!

Tuesday, February 14, 2012

Sonic Drink Holder Valentine Gift Box

Back in November I started collecting those cardboard drink holders from Sonic. I had seen some really cute gift baskets made with lots of different kinds of drink holders and the Sonic ones seem to be the best...plus who doesn't want a reason to order a few yummy drinks at Sonic:)  Anyway, I was planning to use the drink holders at Christmas to make the boys' teachers gifts. I ended up giving them a different gift, which means my stash of drink holders {yes they are part of collecting vs. hoarding issues too} was still sitting in the dining room waiting to be turned into a cute gift box. I decided that Valentine's Day would be a great reason for me to pretty up the {kind of plain} cardboard drink holders and add a few goodies!
 I started by gathering up a few things to put into the gift box: a coffee cup, hand sanitizer, a Starbucks drink, and a recycled PB jar full of yummy cookies. 
 I used some left over Christmas wrapping paper {red and white polka dots work for so many things} and some scrapbook paper to cover all four sides of the drink holder. I simply placed the drink holder on the backside of the paper and traced around the part that I wanted to cover. I used spray adhesive and a glue runner to attach the paper to the box.
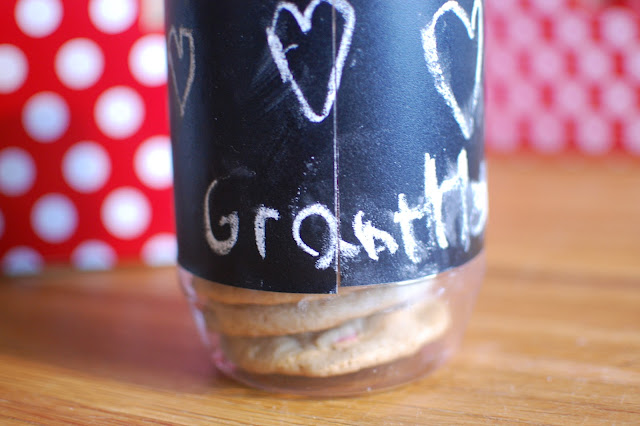
 I added a few vinyl letters to the coffee cup and the hand sanitzier just to make them more personalized. I also added a strip of chalkboard vinyl to the peanut butter jar {to cover up the sticky glue that wouldn't come off}. Then I let the boys decorate the jars with chalk. They wrote Happy Valentine's Day, drew a few hearts, and signed their names.

 I added a circl of scrapbook paper to the top of the jar to cover up the Jif label and then filled it up with yummy Valentine M&M cookies.
To finish off the gift box, I wrapped up the Starbucks drink, added a few pink & white paper straws, and tied on a cute tag with some bakers twine. The boxes took a little bit of time and effort, but they only cost a few dollars {around $7 each} to put together and they turned out SUPER cute! I hope the boys' teachers like them:)
Linking up here..
Tatertots and Jello
Serenity Now
Someday Crafts
Skip to my Lou

Pin It!

Friday, February 10, 2012

Collecting or Hoarding?

I have a habit slight obsession of collecting empty jars and containers. I'm not quite sure if it qualifies as collecting or hoarding though...where do you draw the line? Anyway, I find myself keeping lots and lots of empty peanut butter jars {they are perfect for gifting cookies in}, empty pasta sauce jars {there are so many mason jar type crafts out there that I want to try}, and empty trail mix containers {because we might make our own trail mix one day}. 
 They usually sit by the sink for a few days until I decide to finally wash them. Getting the labels off some of the containers is difficult sometimes so I procrastinate cleaning them until I get a small collection going:) 
 I had been storing my collection in one of our kitchen cabinets, but it started taking over a little bit {I think this may be where my collection is borderline hoarding}. We are in the process of moving Eli out of the nursery, which will be turned into my craft room...so I moved my collection into one of the emptied-out drawers in the nursery/craft room. They are out of the way for now which makes me feel like less of a hoarder:)

 The point of this post isn't to embarrass myself with pictures of my jar collection, but to share the awesomeness that can be made with said collection! This is the happy that I sent to school with Grant today for his assistant teacher's birthday. Sorry for the not so great pics, but I forgot to snap a shot before we left home so these are iPhone pics {with Instagram which I LOVE} that I took in my car when we pulled up in the school parking lot.
 This was a trail mix container {probably from Target because we love their Monster Trail Mix} that I cleaned up, added some polka dot paper over the stickiness from removing the label, added a tulle bow, and a chalkboard label to the top with a little happy birthday note. And it turned out really cute. It is the perfect way to gift some yummy goodness like homemade peanut butter cookies {which is why we have so many empty peanut butter jars}.
Please tell me I'm not the only one who collects random thing that other people throw away!?! What kind of collections do you have at your house?!?
Linking up here..
Tatertots and Jello
Serenity Now
Skip to my Lou
Pin It!
Related Posts Plugin for WordPress, Blogger...