Home AboutMe Crafts Food

Friday, April 16, 2010

Monogrammed Burlap Garden Flag

I wrote this tutorial for a guest post on Tatertots & Jello, but I wanted to share it here too:)
Jen is SUPER crafty and very inspirational and she makes the most amazing things our of burlap! Becuase of that, I knew that I had to attempt something made out of burlap. I also wanted something for my yard, because the grass here is finally starting to turn green! So I came up with a Monogrammed Burlap Garden Flag that is SUPER easy and SUPER inexpensive to make.Monogrammed Burlap Garden Flag Tutorial


Monogrammed Burlap Garden Flag Thanks so much to Jen for letting me share a little bit of my craftiness on her blog! Hop on over to Tatertots & Jello and check out some of the SUPER crafty things that Jen has made!
Join us Saturdays at tatertotsandjello.com for the weekend wrap up party!
this blessed nest

Visit thecsiproject.com

Pin It!

Thursday, April 15, 2010

Sometimes I Wonder....

how the playground has any
sand left
because Grant keeps bringing
it home!


Pin It!

Wednesday, April 14, 2010

Wordless Wednesday: Just Ducky

{This was taken about 10 seconds before the poor little 4 day old duck waddled its way out of Henry's hand and onto the floor. BTW, the duck was fine! This probably wasn't the first or last time the little guy had been dropped considering he sees at least 100 kiddos everyday on field trips!}
*****************************
I am posting a SUPER fun project over at Tatertots & Jello today! Go check it out and leave the awesome Jen some comment love:)

Pin It!

Tuesday, April 13, 2010

A Camp Out Birthday!

I have to say, that I LOVE to plan parties!

Thinking of a great theme and then running with it is so much fun. I love to plan my boys' birthday parties, and luckily they have been fine with all the themes that I have suggested for them {so far}. We have had a farm party, a dinosaur party, a cowboy party, a construction party, a cupcake party, and now a CAMP OUT party!
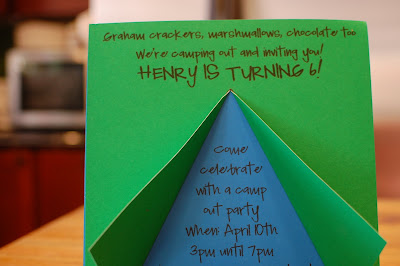
Happy Birthday Signs
The invitations:
Camp out invitation
Camp out invitationWe had a family party the morning of Henry's birthday with a SUPER yummy cake,Camp out Birthday Cakea little bit of opening presents,opening presents and a whole lot of playing with his cousins.clubhouse
**********************
Then that afternoon four of Henry's friends came over to have a real CAMP OUT birthday party!
***********************
The boys found walking sticks and went on a hike {Jason supervised all the outside activites}.
Hike
Then they had a ton of fun on a scavenger hunt!
Camp out Scavenger Hunt 
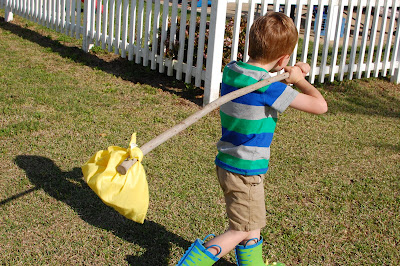
After the scavenger hunt, they used their walking sticks and a hankerchief to make a hobo bag. This was part of their party favor that they got to take home:)
Hobo bag party favor
Jason got out our old tent, and showed the boys how to put it up....and they played in the tent for a while.
Then it was time to sing Happy Birthday to Henry and eat some yummy Campfire Cupcakes. These were SUPER easy to make and they turned out really cute! I made cupcakes from a mix and then iced them with a can of frosting, making sure to mound the icing up on top. Then Jason broke the pretzel sticks to just the right size and I placed them on top of the cupcakes. The flame is a fruit roll up stuck to the top of the cupcake with a little bit of icing!
After cupcakes, Jason taught the boys how to build a campfire.
Then they each found a roasting stick and got busy roasting hot dogs over the fire.Campfire Cupcakes Dinner was a hot dog {that they each roasted}, pretzels sticks {I called them tent poles}, and trail mix.Camp out dinner Finally, it was time for S'MORES!
S'mores The boys had a great time roasting marshallows and making yummy s'mores!
S'mores The sun started to set, and the boys' parents started arriving to pick up their tired kiddos. Each kid got to take home a s'more as a party favor! YUM!
S'mores Party FavorAnd that is how you have an awesome {and exhausting} Camp Out Birthday Party!
Visit thecsiproject.com
Pin It!

Monday, April 12, 2010

I Heart Faces: I Heart Desserts

This I Heart Faces theme was a hard one for me to pick a picture for. Not because I didn't have a picture, but because I couldn't pick between all the yummy desserts that I have made lately:) I decided on this shot of the Rainbow cupcakes that I made for St. Patty's day this year. I just love all the colors!

Head over to i heart faces and check out all the amazing desserts that everyone is sharing this week!

Pin It!

Not Me! Monday


Welcome to Not Me! Monday! This blog carnival was created by MckMama. You can head over to her blog to read what she and everyone else have not been doing this week.
********************************
I did NOT super glue the snaps on one of Eli's outfits this week. I was NOT getting aggravated that every time he bent over, the suit came unsnapped. I did NOT decide that it was better to have a a suit that wouldn't unsnap at the crotch, than to not have a suit at all....especially because it is SUPER cute!
Eli's SUPER glued suitAfter I borrowed Jason's super glue to fix Eli's outfit, I did NOT accidentally put the bottle of glue in the drawer without closing the lid tightly. I did NOT figure this out when Jason went to get the grill lighter out of the same drawer, and it was stuck to the bottom of the drawer! There was NOT superglue all over a bunch of Jason's stuff, because it was NOT his junk drawer that the super glue spilled in.

I did NOT bake almost 60 cupcakes last week for Henry's birthday. Jason and I did NOT stay up until almost 11 o'clock decorating those cupcakes to look like campfires so I could take them to Henry's class on Friday. I {really} do NOT think I will be making cupcakes again anytime soon:) I will NOT be posting picture of the SUPER cute campfire cupcakes and the rest of Henry's Camp Out birthday party tomorrow though!

I am NOT going to be gone all day today. I am NOT going on a SUPER fun stinky, smelly, & hot field trip with Henry to a farm. That does NOT mean that my house and my blog are going to be ignored yet again today! Oh well, maybe I will NOT be able to catch up tomorrow.

Pin It!

Friday, April 9, 2010

Applique Towel Tutorial: Again!

As you can tell from yesterday's post, I am currently SUPER busy! So, I decided to repost one of my very first tutorials. I thought my applique towel tutorial was very fitting since I am currently sponsoring a fun giveaway for one over on Amanda's blog! Go enter! And then if you don't win, you can use this tutorial to make your own:)
***********************
ORGINAL POST:
I have been having a ton of fun with appliques lately.
So I thought I would share some of my {non-professional} techniques, so you can make your own SUPER Cute Personalized Towel!

Start with a towel of your choice! I made one for each of my boys.
Henry's towel is blue
Grant's towel is green
Eli's towel is orange
Using my computer, I found a font that I liked and printed out an H, G, and E. {You can make the letter as big or small as you want.} You can use any font you like, but the simpler the font, the easier it will be to cut out and sew onto the towel. I cut out the letter, traced it onto some interfacing, and cut it out again.
Then I used spray adhesive and attached the cut out interfacing to my fabric of choice {make sure to attach the letter upside down so that the fabric will be on the top and the interfacing on the bottom}.
Next, I cut out the fabric letter and use more spray adhesive to attach the letter to the towel. This helps keep the letter in place so that it doesn't move around while you are sewing! The next step is to sew the letter onto the towel.
You can use either a zig-zag stitch or a straight stitch. I have tried it both ways, and they both work pretty well...it is really just a matter of preference. The zig-zag stitch is a little harder to master, but once you finish sewing you are basically done. If you want to do a straight stitch {which I did on these towels} you will have to wash the towel after you sew it, and then trim up any of the frayed edges with some scissors.
Basically with both stitches, you just follow along the outline of the letter to attach the fabric to the towel.
And you end up with a SUPER Cute Personalized Towel!
I hope this was helpful and maybe inspired some of you to get out your sewing machines! If you have any questions or need {non-professional} help with anything just let me know.
Join us Saturdays at tatertotsandjello.com for the weekend wrap up party!
DIY Day @ ASPTL


The Girl Creative


Pin It!
Related Posts Plugin for WordPress, Blogger...