Home AboutMe Crafts Food

Thursday, December 22, 2011

Upcycled Wooden Nativity

I pinned this really adorable Wooden Nativity a few months ago. {The original idea came from Learning to Be Me and I have seen similar ideas a few other places online too}. When I first pinned it, I figured I would either get Jason to stop and pick up some lumber from the hardware store, or I would raid his pile of wood scraps to find what I needed. But one day I glanced out the back door and noticed this:
If you can't tell what this is, I'll enlighten you:) This is a cute wooden table set {there are two chairs in the set too} that my boys got second hand from my aunt. It survived in our playroom for a few years, and then got moved to the clubhouse a few years later. Needless to say the boys were kind of rough on the table and chairs...a few of the chair slats got broken, as did one of the legs to the table. This table was actually in the trash/burn pile until I decided it would be perfect for the adorable Wooden Nativity sets! The legs of the table were the perfect size for Mary and Joseph and the broken slats from the chairs were just right to make a few Baby Jesus figures.

I don't have any pics of the process...mostly because I was using power tools by myself and I figured operating a saw and my camera at the same time wasn't the best idea ever:)

After I broke off the other three table legs, I used the dimensions from my inspiration {6 inches for Joseph & 5 inches for Mary}, marked the wooden legs with a pencil, and then cut them to size. The Baby Jesus pieces were cut from the chair slats and I made them 2 1/2 inches tall. Joseph got a coat of tan spray paint, Mary got a lovely shade of blue, and I painted the Baby Jesus pieces white. Then I painted the heads an off white/yellowish color {just because that is what I had on hand}. 
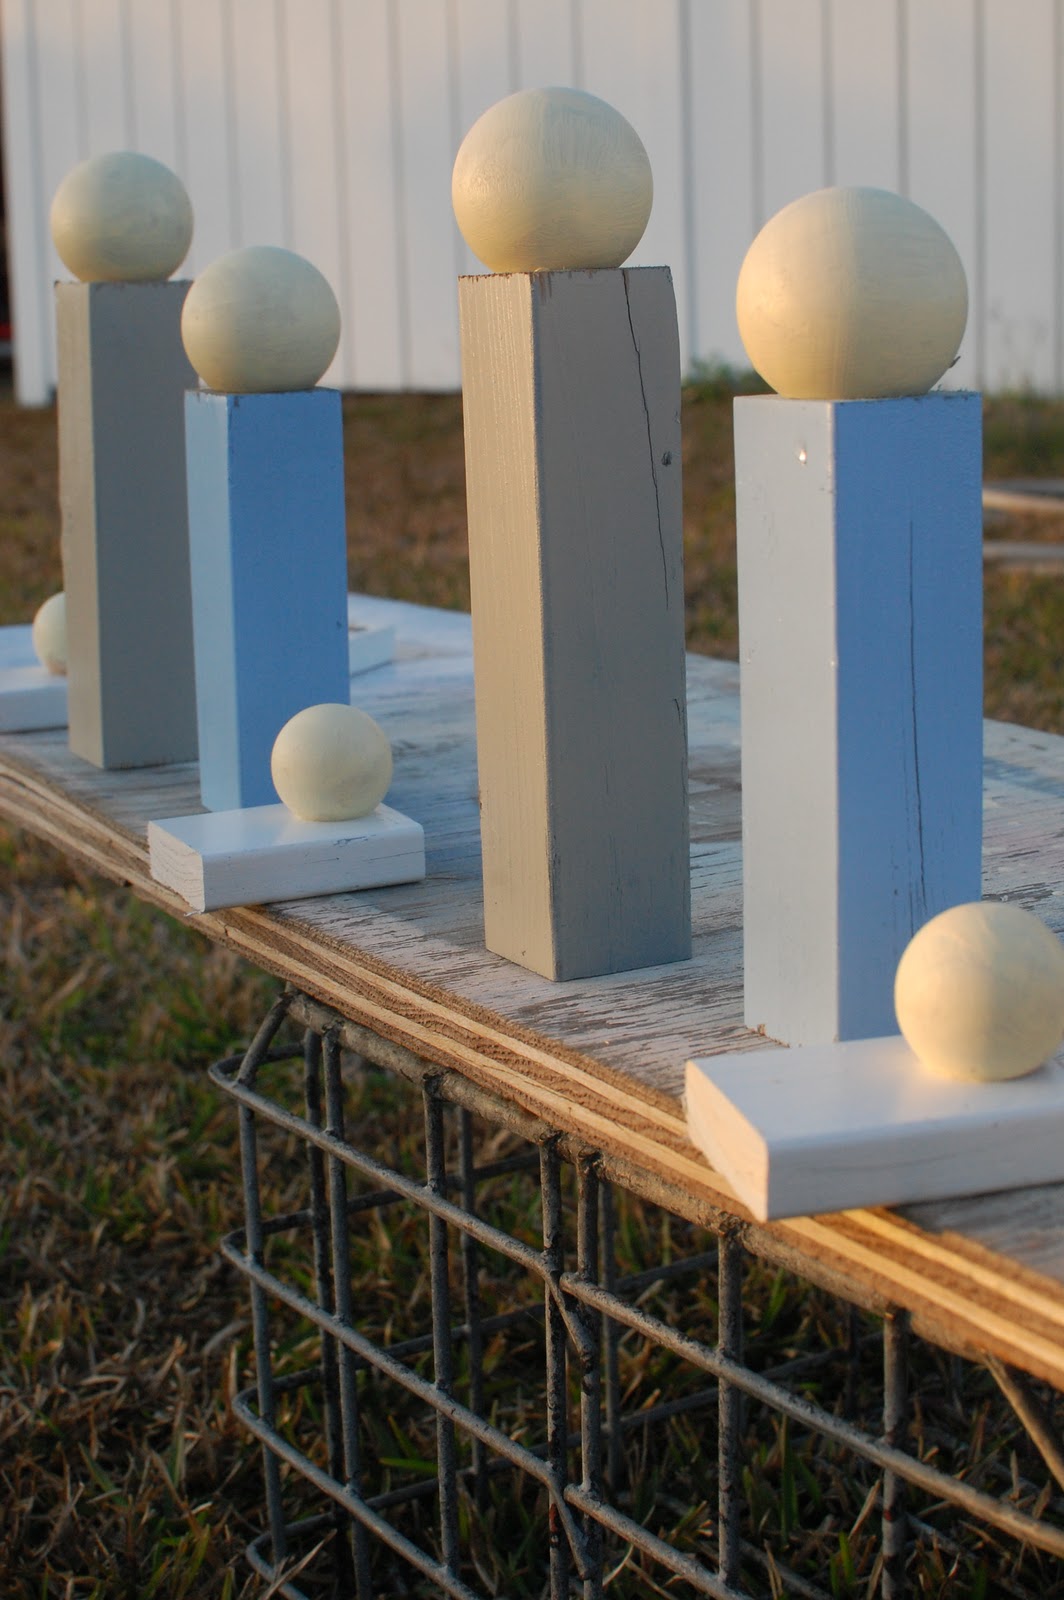
After all the paint was dry, I borrowed Jason's superglue and attached the heads to each of the figures {Mary & Joseph's heads are 1 3/4 inch wooden balls and Baby Jesus' head is a 1 1/4 inch wooden ball that I picked up at Hobby Lobby.} I let the superglue dry for about 20 minutes, then I tied the three pieces together with some raffia. I'm planning on adding a little note with Merry Christmas and the year to the back of each set with vinyl and then giving them out as Christmas presents to a few family members. Not a bad gift considering it started out as a broken table!
Pin It!

Tuesday, December 20, 2011

Christmas Initial Tee's

We have a lot of Christmas traditions.
Christmas Eve breakfast and then ornament shopping, getting three gifts from Santa like the three gifts that Baby Jesus received from the Wise Men, making Gingerbread Houses and Cookie Cutter Men {that's what Eli calls gingerbread men}, new Christmas PJ's....and the list goes on and on! 

One tradition I started a few years ago was making the boys a cute new Christmas shirt to wear during all the fun holiday festivities. You can see some of their shirts from years past here, here, and here

This year I decided to go a little bit funky/non-traditional with their shirts, and I think they turned out SUPER cute {though I don't think Jason was very fond of the yellow chevron fabric I used because he said it wasn't really Christmas-y.} Oh well, the boys got a ton of compliments on their shirts when they wore them for pajama day at school last week! Even thought Eli's not in the picture, he has a shirt too...he just didn't want to wear his new pajamas the day that Henry and Grant wore theirs to school:)
I started with some green long sleeve tee's that picked up at Target for around $4. I dug through my fabric stash and found some cute fabrics that would match the boys new Christmas pajama pants. I ended up with yellow & white chevron fabric, red felt, and just a little bit of green & white polka dot fabric. I grabbed a few bowls from the kitchen and used them to trace circle on the chevron fabric and the felt. Then I printed out each of the boys' initials and used spray adhesive to attach them to the polka dot fabric. I layered the circles, added the initial on top, and sewed everything into place. I used spray adhesive to attach the whole thing to the shirts, then I sewed the biggest circle to the shirts. 

 Oh and did I mention I procrastinated these until the night before the boys needed to wear them, so I whipped up three of these in about an hour...yep that's how simple they are to make, and what a huge procrastinator I am! SUPER simple and SUPER cute Christmas Initial Tee's! 
Pin It!

Monday, December 19, 2011

Candy Cane Cupcakes

I signed up to bring cupcakes to Henry's class party last week...mostly because I wanted to try this fun Christmas twist on Rainbow Cupcakes, and I didn't really have any other reason to make cupcakes:) These cupcakes are SUPER easy to make, but can be a little bit tedious...though not as bad the Rainbow ones that have 6 different colors. Food coloring and a little bit of colored sugar sure do make for some cute cupcakes!
Start by mixing up a white cake mix according to the directions and then dividing it into two bowls. I used two boxes of cake mix because I needed a ton of cupcakes}
Use red and white {YES they make white food coloring! I picked mine up at Hobby Lobby for less than $2 a bottle, and the white really does work...though I did end up just pouring the whole bottle into mine!} food coloring to make your batter the color of candy canes:)
Start with white cupcake wrappers. Add just enough red colored batter to cover the bottom of the cupcake wrapper. 
Then add a layer of the white batter being sure to make the batter completely cover the color underneath.
Continue layering the batter as much as you can until the cupcake is about 2/3 full. I ended up with four layers {red,white,red,white}.
After the cupcakes cooled I iced them with white icing and coated them with red sugar sprinkles...you could also do red icing and even add some crushed candy canes to the top!
When you bite into them, this is what you get:
Not really striped like a candy cane, but still pretty and SUPER impressive to the kiddos:)
Do you make any candy cane themed treats for Christmas!
Pin It!
Related Posts Plugin for WordPress, Blogger...