Home AboutMe Crafts Food
Showing posts with label Vacations and Holidays. Show all posts

Thursday, December 29, 2011

A Few Days Late

I realize that we are 4 days past Christmas, but I haven't said it to all of you yet: MERRY CHRISTMAS!

 We have been way too busy!
{shopping, wrapping, and assembling presents}

The boys got way too many toys!
{The playroom looks like Toys R Us exploded in there}

We have eaten way too much junk food!
{cookies and candy and chex mix. Oh My}


And we still have six more days until school starts and we can get back into our normal routine!
For now we are baking more cookies, jumping in the new trampoline, playing with lots of toys {including my new toy: an iPhone}, working on the Airstream, watching Home Alone on the dvr, and getting a new puppy. I'll be back tomorrow with a review of some awesome vinyl that I got to sample thanks to Oh My Crafts!
 
Pin It!

Tuesday, December 20, 2011

Christmas Initial Tee's

We have a lot of Christmas traditions.
Christmas Eve breakfast and then ornament shopping, getting three gifts from Santa like the three gifts that Baby Jesus received from the Wise Men, making Gingerbread Houses and Cookie Cutter Men {that's what Eli calls gingerbread men}, new Christmas PJ's....and the list goes on and on! 

One tradition I started a few years ago was making the boys a cute new Christmas shirt to wear during all the fun holiday festivities. You can see some of their shirts from years past here, here, and here

This year I decided to go a little bit funky/non-traditional with their shirts, and I think they turned out SUPER cute {though I don't think Jason was very fond of the yellow chevron fabric I used because he said it wasn't really Christmas-y.} Oh well, the boys got a ton of compliments on their shirts when they wore them for pajama day at school last week! Even thought Eli's not in the picture, he has a shirt too...he just didn't want to wear his new pajamas the day that Henry and Grant wore theirs to school:)
I started with some green long sleeve tee's that picked up at Target for around $4. I dug through my fabric stash and found some cute fabrics that would match the boys new Christmas pajama pants. I ended up with yellow & white chevron fabric, red felt, and just a little bit of green & white polka dot fabric. I grabbed a few bowls from the kitchen and used them to trace circle on the chevron fabric and the felt. Then I printed out each of the boys' initials and used spray adhesive to attach them to the polka dot fabric. I layered the circles, added the initial on top, and sewed everything into place. I used spray adhesive to attach the whole thing to the shirts, then I sewed the biggest circle to the shirts. 

 Oh and did I mention I procrastinated these until the night before the boys needed to wear them, so I whipped up three of these in about an hour...yep that's how simple they are to make, and what a huge procrastinator I am! SUPER simple and SUPER cute Christmas Initial Tee's! 
Pin It!

Monday, December 19, 2011

Candy Cane Cupcakes

I signed up to bring cupcakes to Henry's class party last week...mostly because I wanted to try this fun Christmas twist on Rainbow Cupcakes, and I didn't really have any other reason to make cupcakes:) These cupcakes are SUPER easy to make, but can be a little bit tedious...though not as bad the Rainbow ones that have 6 different colors. Food coloring and a little bit of colored sugar sure do make for some cute cupcakes!
Start by mixing up a white cake mix according to the directions and then dividing it into two bowls. I used two boxes of cake mix because I needed a ton of cupcakes}
Use red and white {YES they make white food coloring! I picked mine up at Hobby Lobby for less than $2 a bottle, and the white really does work...though I did end up just pouring the whole bottle into mine!} food coloring to make your batter the color of candy canes:)
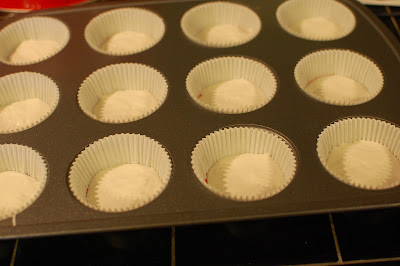
Start with white cupcake wrappers. Add just enough red colored batter to cover the bottom of the cupcake wrapper. 
Then add a layer of the white batter being sure to make the batter completely cover the color underneath.
Continue layering the batter as much as you can until the cupcake is about 2/3 full. I ended up with four layers {red,white,red,white}.
After the cupcakes cooled I iced them with white icing and coated them with red sugar sprinkles...you could also do red icing and even add some crushed candy canes to the top!
When you bite into them, this is what you get:
Not really striped like a candy cane, but still pretty and SUPER impressive to the kiddos:)
Do you make any candy cane themed treats for Christmas!
Pin It!

Thursday, December 15, 2011

Snowman Juice Boxes

Last week when I opened up Grant's backpack there was nice little note from his teacher. It had information about their class Christmas party, and at the bottom it had a little line that said "Can you please send..." You all know that I am kind of an over-achiever when it comes to school treats, so when I saw juice boxes on that little line I was kind of disappointed....until I remembered these cute Mummy and Turkey juice boxes that I had seen earlier in the year! I decided that I wasn't going to just send boring old juice boxes, I was going to rock the juice boxes for Grant's class! I did a little search on Pinterest and surprisingly there were very few {actually I don't think I found any} Christmas themed juice boxes...I'm guessing because most people do the milk and cookies thing! So I brainstormed a few ideas and decided on Snowman Juice Boxes!
 I started by wrapping the front and two sides of the juice box with white cardstock. I decided to leave the back of the juice box uncovered so it would be easy to remove the straw. I measured my juice box, cut the paper to size, applied a few lines of glue dot runner, and then folded the paper onto the juice box. 
 I used my Silhouette to cut out a ton of black circle onto some {Oh My Crafts} vinyl. If you don't have a craft cutter, you could use a circle punch or even a hole punch. I also cut out some cute snowman noses onto some orange paper...I would have used vinyl for that too but I didn't have any orange:) 
 I put the black vinyl circles on the front of the juice box for eyes and a smile and I added the orange noses with a little bit of glue. To finish them off I added a cute scarf to each juice box made out of ribbon and ric rac.
I'm hoping these Snowman Juice Boxes are a hit at Grant's class party tomorrow:)
Pin It!

Thursday, December 8, 2011

Nativity Garden Flag

The busyness of the season has made our holiday decorating plans come to a stand still...especially outside. Other than taking down the fall decor and adding a few red and green things to our front doors, the outside of our house doesn't have a whole lot of Christmas cheer going on right now...no lights, no garland, basically no decorations at all.
Since Jason is the crazy brave one who climbs up on the roof every year to hang the lights {and there was no way I was going to try that while he was out of town for work}, I decided to remedy our lack of outside decorations as much as I could by making a new Christmas themed garden flag for our yard. It was SUPER simple to make, and the whole thing was basically free because I used fabric scraps from my stash:)
Burlap and Felt Nativity Garden Flag:
I started by digging out some red and white material, red burlap, and my bag o' felt scraps.
After a couple of google searches for inspiration,  I drew a little sketch of what I wanted the design to look like...can you tell I'm not an artist!?!
I used an old garden flag as a guide and cut a double layer of the red and white fabric {folded at the bottom to make the bottom edge finished}. I added a little extra length to the top to accommodate for the hanger.
I used my pinking shears to cut the fabric so it wouldn't fray and I wouldn't have to worry about finishing the edges. I sewed around the two sides and the top with my sewing machine. You could easily make this no sew by using a hot glue gun!
I folded over the extra fabric to make the hanger, and then sewed {or hot glue} it into place.
I cut a piece of the red burlap to fit on the front of the flag.
I cut all the shapes for the Nativity scene out of felt. I laid the design out on the red burlap to make sure everything looked good, then I picked it up piece by piece and attached them with spray adhesive. After everything was in place on the red burlap, I turned the burlap over and applied a good coat of spray adhesive to it and then placed it on the flag. I also sewed around the edges of the burlap to secure it {and again you could totally use hot glue if you don't want to sew}.
With all the Santas, reindeer, and snowmen out there it can sometimes be hard to decorate for Christmas with Christ in mind, so I'm glad we have this little addition to our decor to remind us why we really celebrate this season! I'm thinking this might make a really cute kiddos shirt too...what do you think?!?

My sweet friend Richella  over at Imparting Grace is hosting a great linky party called Home for the Holy Days! A great place to share the ways you and your family keep Christ the center of your Christmas. Go over and check it out and say a quick hello to the oh so sweet Richella:)
Imparting Grace
Pin It!

Tuesday, December 6, 2011

What's His Name?

We are still in the process of getting out all of our Christmas stuff and decorating our house. As we were unloading boxes last night I found one of the boys' favorite Christmas decorations....their Little People Nativity Set! We've had this set for quite a few years, and every year the boys love setting it up in the playroom and reenacting the story of Jesus' birth {and a few other Bible stories that they manage to throw into the mix too}.
So last night I sent Grant down to the playroom to set up the Nativity Set just like we do every year. He left, and Jason & I continued decorating the living room with garland and lights. After about ten minutes Grant came back into the room with two of the shepherds in his hand, and with the most serious face ever he asked "Which one of these is Moses?" Jason and I both started laughing:) After checking with Henry about the man's correct name, Grant remember that it was Joseph who was in the manger that night with baby Jesus and not Moses!
I think somebody may be getting some Bible Story Flash Cards in their stocking this year:)
Pin It!

Friday, December 2, 2011

Making a List...

I sat down earlier this week and made a list of all the craft/snack/decorating projects that I want to do before Christmas....my list has more than 25 things on it! That means I have to finish at least one project {maybe even 2} every day between now and the 25th for me to get everything crossed off my list! I don't think it's going to happen!

You would think with a list that long I would get busy trying to cross things off...NOPE! I did get our Advent Calendar on the wall. It looks really cute, but it is completely empty:) I also managed to get the boys' stockings hung even though we don't have a tree or even a plan to go get a tree yet! And instead of tackling my list, I worked on something that wasn't even on my list: my front porch that still had pumpkins and footballs all over it!

I took down all the pumpkins and the footballs and added some red and green in their place! I hung up a cute wooden sign that I bought at a craft fair. Then I whipped up a wreath with some red burlap and leftover Christmas fabric. It's not much, but at least it's not still fall decor!
Even though our front door looks SUPER cute now, my list is not any shorter! Plus there is still a ton of other decorating and light hanging to be done! Please tell my I'm not the only slacker who still has a ton of stuff to go to get ready for Christmas!
Pin It!

Thursday, November 24, 2011

Happy Thanksgiving...

...from my three little turkeys:)
I hope you all had a {family} {food} & {fun} FILLED day!
I ate so much at lunch that I am skipping dinner, and I think I may not be hunger for breakfast in the morning either....unless I burn off all of my lunch shopping till I drop tonight with all the other crazy Black Friday {even thought it technically starts on Thursday now} shoppers!
HAPPY THANKSGIVING
Pin It!

Friday, November 18, 2011

Gobble, Gobble: Turkey Waffles

Yesterday I admitted my obsession with crafty kids shirts, so now it's time for me to admit that I am just a little bit obsessed with fun waffles too! The first waffle I made was a rainbow waffle to celebrate St. Patty's Day. It's fun to have a colorful breakfast to help celebrate a holiday...but once I started I couldn't stop. I've shared some just because waffles {cupcake waffles} and a whole lot of holiday ones too {candy corn and jack o lantern}.

I have been brainstorming Thanksgiving ideas for a while now. It's amazing how hard it is to come up with a good waffle idea for a holiday based around food:) I tried to make Cornucopia Waffles with an abundance of M&M's, but all that did was make a huge mess of the waffle iron. So I decided to give Turkey Waffles a try instead. Now I know the name makes them sound kind of gross because seriously who wants savory turkey hiding in their waffles! Don't let the name scare you off...there is not a trace of real turkey in these fun and colorful Thanksgiving waffles:)
I started with the usual suspects...and my usual helper:) 
**waffle mix, food coloring, and Eli**
 Mix up your waffles according to the directions. You will need four waffles total to make two turkeys. By the way, these are sharing waffles...two people per turkey:)
*Start by making one plain waffle.*
*While that waffle is cooking divide your remaining batter into three bowls.*
*Add green, yellow, and orange food coloring each into one of the bowls and stir to combine.* 
*Cook the three colored waffles and then get ready to assemble.*

Start by cutting the plain waffle in half and the colored waffles into quarters.
Lay out the colored waffles in a turkey tail pattern starting with the outside ones{green here} and working your way in. Lay the half plain waffle on top of the turkey tail and adjust as needed. Use one of the leftover yellow quarter waffles to make a beak for your waffle. I simply cut off the pointed edge and added it on top of the plain waffle. 
What kind of fun foods are you making to celebrate Thanksgiving this year?
Pin It!

Thursday, November 17, 2011

Pilgrim and Indian Initial Tees

I have shared countless times about my slight obsession love of crafty kids' holiday shirts. I'm actually starting to think that maybe I should start a support group, but I might be the only crazy member! Anyway, with Thanksgiving only a week away, I decided to take advantage of our little sick day yesterday and get some sewing done on the boys' shirts for this year. I knew I wanted to attempt a cute turkey face shirt for Eli {I'll share his shirt later after I figure out how to add the eyes without making the turkey look crazy}, but I wasn't quite sure about what to do for Henry and Grant. I stumbled across a Pilgrim initial tee on Etsy earlier this week and as soon as I saw it I knew my boys were getting Pilgrim and Indian shirts this year:)
I won't bore you with all the details{and a million pictures} of how I made these shirts...you can go back and check out one of my other step by step tutorials if you like. But just so this isn't a single picture with a ton of rambling, I will share a quick rundown of how I made these.

**Print out each kiddos initial {mirrored} and attach it to orange and white gingham.**
**Cut out the letters and attach them to some orange felt.**
**Sew the letters to the felt with a zig-zag stitch and then cut around each letter leaving an orange border.**
**Use spray adhesive to hold the letter to the shirt, then stitch around the letter to attach it.**
**Make the pilgrim hat and indian headband out of scraps of felt. **
**Use spray adhesive to hold them in place and then sew them onto the shirts.** 

Really the hardest parts of this project are deciding which font to use for the letters and getting the proportions of the hat right so that it looks like a Pilgrim's hat and not a crazy top hat:) For those of you that don't sew, you could also make this no sew with some ultra hold iron on adhesive! Except for the new white long sleeve shirts, I used all materials that were in my craft stash making these shirts cost around $5 each. Not too bad for two SUPER cute Thanksgiving shirts!
Weekend Bloggy Reading
Pin It!

Tuesday, November 1, 2011

Two Pictures on Tuesday

I managed to get a few more than 50 pictures of all three of my costume clad children yesterday afternoon before trick or treating started.  Grant was feeling much better {thanks for all the get well wishes}, which I'm sure you can tell since he let me paint his nose with "sunscreen" and put his hair in a fauxhawk mohawk. Our little shark didn't quite understand that his fin was on his back so he needed to turn sideways for the pictures....otherwise he would just looked like a little boy in a gray sweatsuit! 

 We took the boys trick or treating to a few houses in my aunt's neighborhood...and Jason & I only had to carry the boys' surfboards about half of the time:) That is one major downfall of having big props that go along with your costume...but for some reason we seem to have props every year!

A Shark and Two Surfer Dudes:

I hope you all had a safe and fun Halloween...now on to Thanksgiving!
Pin It!

Monday, October 31, 2011

Monster Brownies & Halloween Costumes

I saw these SUPER cute Monster Brownies over at Amanda's Cookin' last year...and I have been waiting for a reason to make them ever since! I can't remember why I didn't make them for Halloween last year, but I knew they would be the perfect treat to take to our annual Halloween gathering this year! 
 I started with a box brownie mix. I know a lot of people who say they LOVE homemade brownies, but I've never made homemade brownies {and I've tried lots of times} that taste as good as Duncan Hinds Chewy Fudge brownies! I mixed my brownies according to the chewy {NEVER cake-like} instructions, let them cool, and then cut them into squares and rectangles. Then I made a quick icing from powdered sugar, water, and green food coloring. I piped a border around the the edge of each brownie, let it harden, and filled in the inside with the same icing. Then I got busy making some monsters with M&M's, mini marshmallows, licorice, and colored icing. Pretty cute, SUPER easy, and the perfect treat for the kiddos to help with! Make sure to head over and check out Amanda's Monster Brownies...they are WAY cuter than mine:)
 Here's a BIG little sneak peek of the boys' Halloween costumes for this year: A shark and a surfer dude!
You may notice that we are a man surfer dude down...that's because Grant has been sick since Friday. I finally took him to the doctor Sunday afternoon {thank goodness for after-hour and weekend sick appointments}, and he has pneumonia! Needless to say, he wasn't feeling up for costume night at Awana's last night! He started on antibiotics yesterday, and he is already feeling a ton better. I'm hoping to get a picture of all three boys in the costumes this afternoon...and I'm hoping Grant is feeling well enough to trick or treat at a couple of houses too!
Have a safe and HAPPY Halloween!
Miscellany Monday @
lowercase letters
Pin It!

Saturday, October 29, 2011

Shutterfly: Christmas Cards & So Much More!

Last year on my blog, I raved about how much I love Shutterfly! I loved them even more after I got my 50 free Christmas cards in the mail and I saw how awesome they were...seriously the best quality cards I have seen in my 6 years of ordering photo Christmas cards! So I'm going to spend a little time this year telling you about how great Shutterfly really is....and then I might just tell you how you can get some free cards too:)

Here are a few of my favorite photo cards from this year...though it is pretty hard to top our Shutterfly card from last year!


Can you tell that I love the look of a square card:) Now I need to get busy picking out clothes and planning a photo session!

I love the great quality cards that Shutterfly offers for the holidays, but did you also know you can get some really awesome photo gifts to give to aunts, uncles, and grandparents! My mom has already requested a photo book of my boys as a Christmas present for this year:) I'm fine with that, because I know she will love it....and I will have a great time designing it on Shutterfly's website.

If you are planning a holiday party in the coming months, you can check out the great selection of invitations that Shutterfly has on their websites too! I'm thinking it would be really fun to host a cookie swap, and I would love to send out some of these fun invitations:
I'm off to browse Shutterfly's amazing selection of cards, and try to make a decision about which card to chose for this year!
Which Shutterfly Christmas card do you like best?

*I received a code for 25 free Christmas cards from Shutterfly for sharing about their cards with you. All opinions are my own. If you have a blog and you want to join their blogger program, click HERE.*
Pin It!

Friday, October 28, 2011

Friday Flashback: Candy Corn Edition

I love decorating with stuff that can be used for multiple seasons and holidays. I love that instead of sitting in the attic for 11 months out of the year, that I can change some of my decor up and use it year round. So when I started working on new decorations for Halloween/fall I knew I could figure out a way to makes something that would work for Christmas, Valentine's Day, and maybe even Easter.

I started with some clear glass bottles that I have been saving for three years. I knew at some point I would find a good use for them:)
 I used my Cricut and cut out some vinyl letters.
 I used some transfer paper to attach the letters to the clear glass bottles.
 I lined the bottles up to make sure that the letters were even...the "d" is a little high, but not enough to worry about.
 I spray painted the lids white so they would match almost any holiday decor.
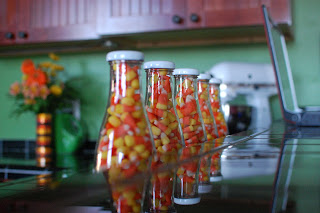
 Then I filled the bottles up with CANDY CORN...
 ...and lined them up on my kitchen counter.

This was a SUPER inexpensive project...all I really bought was the candy corn. Now when fall is over and Christmas decorations start going up, all I will have to do is empty out the candy corn and add in some red, green, and white M &M's!

**This is a post from last year that has been one of my most popular through the year. I actually have the same jars sitting on my counter right now...they just aren't filled with candy!**
Pin It!
Related Posts Plugin for WordPress, Blogger...