Home AboutMe Crafts Food

Monday, December 19, 2011

Candy Cane Cupcakes

I signed up to bring cupcakes to Henry's class party last week...mostly because I wanted to try this fun Christmas twist on Rainbow Cupcakes, and I didn't really have any other reason to make cupcakes:) These cupcakes are SUPER easy to make, but can be a little bit tedious...though not as bad the Rainbow ones that have 6 different colors. Food coloring and a little bit of colored sugar sure do make for some cute cupcakes!
Start by mixing up a white cake mix according to the directions and then dividing it into two bowls. I used two boxes of cake mix because I needed a ton of cupcakes}
Use red and white {YES they make white food coloring! I picked mine up at Hobby Lobby for less than $2 a bottle, and the white really does work...though I did end up just pouring the whole bottle into mine!} food coloring to make your batter the color of candy canes:)
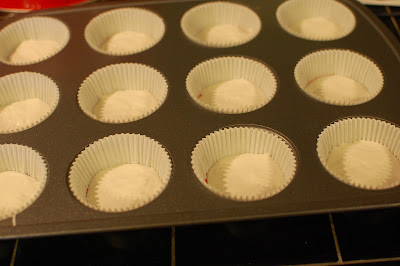
Start with white cupcake wrappers. Add just enough red colored batter to cover the bottom of the cupcake wrapper. 
Then add a layer of the white batter being sure to make the batter completely cover the color underneath.
Continue layering the batter as much as you can until the cupcake is about 2/3 full. I ended up with four layers {red,white,red,white}.
After the cupcakes cooled I iced them with white icing and coated them with red sugar sprinkles...you could also do red icing and even add some crushed candy canes to the top!
When you bite into them, this is what you get:
Not really striped like a candy cane, but still pretty and SUPER impressive to the kiddos:)
Do you make any candy cane themed treats for Christmas!
Pin It!

Thursday, December 15, 2011

Snowman Juice Boxes

Last week when I opened up Grant's backpack there was nice little note from his teacher. It had information about their class Christmas party, and at the bottom it had a little line that said "Can you please send..." You all know that I am kind of an over-achiever when it comes to school treats, so when I saw juice boxes on that little line I was kind of disappointed....until I remembered these cute Mummy and Turkey juice boxes that I had seen earlier in the year! I decided that I wasn't going to just send boring old juice boxes, I was going to rock the juice boxes for Grant's class! I did a little search on Pinterest and surprisingly there were very few {actually I don't think I found any} Christmas themed juice boxes...I'm guessing because most people do the milk and cookies thing! So I brainstormed a few ideas and decided on Snowman Juice Boxes!
 I started by wrapping the front and two sides of the juice box with white cardstock. I decided to leave the back of the juice box uncovered so it would be easy to remove the straw. I measured my juice box, cut the paper to size, applied a few lines of glue dot runner, and then folded the paper onto the juice box. 
 I used my Silhouette to cut out a ton of black circle onto some {Oh My Crafts} vinyl. If you don't have a craft cutter, you could use a circle punch or even a hole punch. I also cut out some cute snowman noses onto some orange paper...I would have used vinyl for that too but I didn't have any orange:) 
 I put the black vinyl circles on the front of the juice box for eyes and a smile and I added the orange noses with a little bit of glue. To finish them off I added a cute scarf to each juice box made out of ribbon and ric rac.
I'm hoping these Snowman Juice Boxes are a hit at Grant's class party tomorrow:)
Pin It!

Tuesday, December 13, 2011

2011 Reading Fair Projects

Last week Henry and Grant both participated in their school's Reading Fair. We ended up deciding on two Eric Carle books, The Mixed-up Chameleon for Grant and A House for Hermit Crab for Henry. Before the boys started their projects, I did a little research online and found some really great slideshows on the Eric Carl website that show how he illustrates his books. After watching the slideshows, we decided to let the boys make part of their boards like Eric Carle makes his books! I don't have any pictures of the process mostly because Henry and Grant did most of the work in the afternoons and it was too dark for good pics...but also because I was too busy trying to keep Eli from running through all the wet paint to take pictures:)
 To make the Chameleon and the Hermit Crab, Jason fashioned a homemade projector out of a work light and a few cardboard boxes. I traced the cover of the book onto a piece of plastic and put it on the projector, then the boys traced the Chameleon and the Hermit Crab onto some white paper using the projector to make them just the right size for their project boards. After they finished tracing, Henry and Grant cut each section of their animal out and made a sort of stencil to use on the colored paper that they had painted. Henry also got to do some splatter painting to make the sand for his board...I think that may have been his favorite part because of how messy it was:)
The boys didn't win anything at the Reading Fair, but they had a ton of fun reading some great books and learning to illustrate like Eric Carle! I think we may have a few more Eric Carle books in our reading fair future!
Pin It!

Monday, December 12, 2011

Nutter Butter Snowman Snacks

If you have kiddos in school, you more than likely have more than one Christmas party to attend this week. That also means you more than likely need to take some sort of yummy treat too. I know some parents would much rather be the plate/cup/napkin bringers, but I LOVE to bring something fun and yummy for the kiddos to enjoy...even if it is way harder than just picking up some cups:) So if you're like me and crazily think that bringing cute treats for your kiddo's class is fun, then try out these {oh so adorable and really not that hard to make} Nutter Butter Snowman Snacks.
 My inspiration for these cuties came from Pinterest {surprise, surprise}. Here's a link to my pin and a link to the blog post {My Pretty Purse} where the pin is from:)
 Start by dipping your Nutter Butter in white candy coating aka almond bark. I used a toothpick stuck in between the two cookie pieces to dip them {though it didn't work every time because the toothpick slipped out or the cookie broke}. While the candy coating is still wet add two M&M's for buttons, mini chocolate chips for eyes and a smile, and an orange tic tac for the nose. They are SUPER cute this way, but to make them even cuter add some earmuffs too! I did the earmuffs the same way I did with my Simple Snowman Snacks last year....curl up the Pull n Peel and place them in the freezer to harden {this helps them keep their shape while the coating dries} then place the Pull n Peel on the snowman's head with two M&Ms on either side.
SUPER cute and really not that hard to make...though a little time consuming with all the small candy pieces. If you are concerned about nut allergies, you can use any other oval shaped cookie in place of the Nutter Butter.
What kind of fun treats are you making for your kiddos this year?
Pin It!
Related Posts Plugin for WordPress, Blogger...