Home AboutMe Crafts Food
Showing posts with label Kids Artwork. Show all posts

Thursday, December 13, 2012

Reading Fair Project 2012

The Reading Fair always seems to fall during the most busy part of the year...right between Thanksgiving and Christmas...but somehow we manage to find enough time to make a fun project each year. This year Henry's school is waiting until January to do their Reading Fair, which meant we only had to worry about Grant's project. Grant picked out a really cute book that we got at the Scholastic Book Fair back in October to use for his project: Pete and Penny's Pizza Puzzles The Case of the Secret Sauce. Grant read the book, then I read the book, then we got busy brainstorming project ideas.
We decided that making his board look like the outside of a pizzeria would be really cute! Grant started by painting the background of the board. I cut a kitchen sponge into the shape of a brick and mixed up a little bit of red and brown paint. I showed Grant how a brick pattern worked and he got busy stamping the board. He actually did a really great job and only got paint on one of my chairs in the process:) Jason found an old cardboard box and helped Grant cut the awning out with his exacto knife.To decorate the awning, Grant used my paper cutter and cut strips of red and white paper then attached them with spray adhesive. 
I used my Silhouette to cut out the name of the book onto vinyl and Grant helped me add it to a piece of brown paper that he had cut to look like the sign for the pizzeria. Grant also added a big door, two windows, and two cute little bushes to write all of the required information on. After we got the windows finished, they needed a little something extra so I got out my circle punches and some pipe cleaners and Grant made some flowers to add to a window box. 


To add a little bit more to the project, we made a jar of molasses {the secret ingredient that the kids in the book are looking for} out of an old Starbucks jar and some brown paint. Grant also decorated a pizza box that I picked up from our local pizza shop. He copied a couple of the puzzles from the book and we placed them inside the box. 
I was so proud of Grant for working hard and only complaining a couple of time! And I was even more proud when he won first place in his division at school! He was so cute when we were waiting for the winners to be announced...he had his fingers crossed on both hands! I think he wanted to win:) Since he won in his division, we get to move on to the district level in January.
Pin It!

Monday, November 19, 2012

I am Thankful For Printable

Last year I shared these really cute I am Thankful for printables that I made. I actually loved them so much that they stayed up all year!
Now that Thanksgiving has rolled around again, I thought it would be fun to use the same printable again and just update the picture and let the kiddos update what they are thankful for! So I searched through my pictures from last year and found a couple cute ones of the boys and printed them out again using THIS printable and Photoshop. I thought since it was such a big hit here last year, I would work on making it a printable so you could print it out too:)
******
You can right click and save or open up THIS link and head over to Google documents to download it.

After you download the file, just open it up in Photoshop {or whatever photo editing software you use} and place your picture on top of the gray square. If you don't want to deal with photo editing software, you can always just print it out and tape your picture right to the page!
**************
I'm still working on getting the boys to finish up their drawings and getting them hung up, but when I do I will share a picture with you! And if you use this printable, I would love to see what your kiddos are thankful for too!
Pin It!

Tuesday, July 17, 2012

A Craft of Olympic Proportions

We love watching sports on tv. My boys could sit and watch ESPN for hours regardless of what sport is on. I love that for the most part {minus some of the commercials} sports on tv are family friendly entertainment for all of us to enjoy. The Olympics are always fun and exciting for me, and this year all of my boys are old enough to really appreciate the idea of the Olympics. So I decided we would turn the Olympics into a bit of a learning experience by making a few flags from some of the nations participating in the Olympics.
 We started with a pack of cardboard flags that I picked up at Michaels. They have a ton of different cutouts available and I just happened to notice these the last time we were browsing. I got a pack of 12 flag cutouts for around $3. You could also just use sheets of cardstock or recycle some other white cardboard that you have on hand. Then I printed out a clip art sheet with some national flags on it. I chose 12 flags for the boys to color making sure to include the U.S.A and the U.K. {because they are the host country}. I mostly just picked the ones that I thought would be easiest for the boys to color.
 I gave each kiddo a blank flag, a box of crayons, and a small clip art picture of the flag they were going to make. I let Henry and Grant figure their flags out on their own, but I gave Eli a little guidance by drawing a couple lines or the shape {like the circle on the Japanese flag} and then let him color the flag in.
 After the boys were finished coloring, we hung the flags up in our living room. We happen to have these two {still unpainted going on two years} canvases hanging in our living room that were the perfect spot for our flags, but you could hang them on your fireplace or string them together to make a banner to hang on an entertainment center.
We worked on learning which country goes with which flag, and Henry already has all 10 of our flags memorized! Knowing the nation's flags is going to make watching the Olympics so much more fun and educational for the boys. I think we are going to take our Olympic craft one step further once the games start and keep track of the medal count on our canvases as well! I guess we need to get busy making some gold, silver, and bronze medals:)

Linking up here..
Pin It!

Tuesday, December 13, 2011

2011 Reading Fair Projects

Last week Henry and Grant both participated in their school's Reading Fair. We ended up deciding on two Eric Carle books, The Mixed-up Chameleon for Grant and A House for Hermit Crab for Henry. Before the boys started their projects, I did a little research online and found some really great slideshows on the Eric Carl website that show how he illustrates his books. After watching the slideshows, we decided to let the boys make part of their boards like Eric Carle makes his books! I don't have any pictures of the process mostly because Henry and Grant did most of the work in the afternoons and it was too dark for good pics...but also because I was too busy trying to keep Eli from running through all the wet paint to take pictures:)
 To make the Chameleon and the Hermit Crab, Jason fashioned a homemade projector out of a work light and a few cardboard boxes. I traced the cover of the book onto a piece of plastic and put it on the projector, then the boys traced the Chameleon and the Hermit Crab onto some white paper using the projector to make them just the right size for their project boards. After they finished tracing, Henry and Grant cut each section of their animal out and made a sort of stencil to use on the colored paper that they had painted. Henry also got to do some splatter painting to make the sand for his board...I think that may have been his favorite part because of how messy it was:)
The boys didn't win anything at the Reading Fair, but they had a ton of fun reading some great books and learning to illustrate like Eric Carle! I think we may have a few more Eric Carle books in our reading fair future!
Pin It!

Friday, September 9, 2011

Griddle Crayon Art

 I sure I'm not the only mom who stocks up school supplies when back to school season rolls around. As soon as I see the .25 and .40 cent crayons, I go a little crazy and start throwing tons of boxes in my cart....because who doesn't love getting 24 of something for so cheap! So when I get home with all my pretty boxes of nice, new, unbroken crayons, I have to figure out what to do with the old broken ones.I just can't throw them away, even though I only paid .40 cents for them and surely got my money's worth out of them last year! If you are looking for something to do with your old crayons, this is the perfect craft to make with your kiddos to keep those crayons out of the trash and add a little bit of fun decor to your fridge {or art clothesline/wall}!
 Start by peeling the paper off of your old crayons. This is a great task for the kiddos to do while you get everything else set up:)
 Next get out your griddle {or a hot plate would work too} and a box a aluminum foil.

Tear off a couple pieces of foil big enough to cover your griddle. This is to protect your griddle from stray/runaway crayons:) I used three pieces just to be safe, but if you are using heavy duty foil one piece is probably enough. After the griddle is covered with foil, turn your griddle on low to warm up. When you get started, you may need to adjust the heat up some just be sure to not make it too hot!
To make things easier, cut your paper to the same size as your griddle. The sides of the griddle will help keep the paper in place. You could also use a small piece of tape to keep the paper in place just be careful not to tear your foil when you remove the tape.
 Hand your kiddo the crayons...
 ...warn them not to touch the HOT griddle {and supervise them closely}...
 ...then let them create!
Eli had a blast gliding the crayons over the warm paper and we even managed to come away with a pretty cute work of art. We added a few stems and leaves, and turned his orange 'scribbles' into a pumpkin family perfect for fall decorating!
Weekend Bloggy ReadingJoin  us Saturdays at tatertotsandjello.com for the weekend wrap 
 up           party!
Pin It!

Friday, August 5, 2011

Eli's Art Class

Henry and Grant have only been in school for two days, but I can already tell that Eli is missing them and getting bored quickly. That means I'm going to have to break the arts and crafts supplies and start working on some fun stuff to keep him busy!
Yesterday we used big paper and crayons to make an Eli.
I love how he was concentrating so hard just to make some circles and scribbles!
Looks just like him, doesn't it:)
What kind of things do you do to keep your preschool entertained when the big kids go back to school?
Pin It!

Thursday, May 19, 2011

Sidewalk Chalk Paint!

This SUPER fun project {Sidewalk Chalk Paint}was orginally posted over at Postively Splendid as part of Amy's Summer Survival Guide. I am reposting just in case you missed it, but please go over and check out all the other awesome summer ideas that have been {and will be} posted throughout the month of May!
Positively Splendid


We love regular chalk at our house. It's relatively cheap, not too messy, and it is the perfect outdoor activity! Basically the kids love chalk because it's fun and I love chalk because they are making a mess outside and not inside:) What I don't love about chalk are all the little broken pieces that pile up after a few weeks of use. I hate to throw them away, but they are just too small to use without scraping your fingers on the concrete!
Instead of throwing them out, we are going to turn those broken piece of chalk into paint! Start by sorting your chalk by color. This is a great teaching activity for any kiddo who is working on learning their colors.
Put each individual color into a zippered bag.
Seal up the bag and then break up the chalk using a small hammer. This should be done by an adult or a {very} well supervised child. Try and break the chalk into a fine powder to make you paint as smooth as possible.
One you have your powdered chalk, pour each color into small plastic cups.
Add a little water.
And stir around with a paint brush to dissolve the chalk powder. We used some inexpensive art brushes that are now our chalk paint brushes:) All of the chalk powder may not dissolve, but your paint should still work fine. Use a different brush for each color and then let the kiddos get busy making art on your sidewalk. The colors may be hard to see at first, but as soon as they start to dry the individual colors will show up well!

The best part about chalk paint is that if someones spills it, it isn't a big deal because all you need is a water hose to clean up the mess!
And that is how you turn broken chalk pieces into a ton of summer fun!
Visit thecsiproject.com
Pin It!

Thursday, April 21, 2011

Pen and Pencil Caddy: Kids Recycling Project

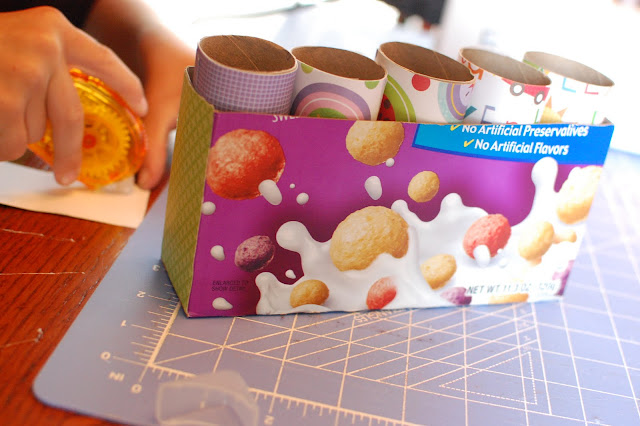
In celebration of Earth Day tomorrow, Henry had to make a recycling project for school. We thought of a bunch of ideas from a soda bottle bird feeder to a fold up race track made from a big box, but in the end we made a cute Pen and Pencil caddy out of an old cereal box and some toilet paper tubes.
 We started by cutting the bottom of the cereal box off just a little bit shorter than the toilet paper tubes. Then Henry got busy measuring, cutting, and then gluing decorative paper to the box and 5 toilet paper tubes.
 I used an X-acto knife to straighten up the top edge of the box.
 When all of the toilet paper tubes were covered, we placed them inside the box.
 I printed out a Pens & Pencils label for the front just to make sure his teacher knew what he had made:)
 And that is how you make a really cute, easy, and RECYCLED Pen and Pencil Caddy!
Have you recycled anything today?
{For more fun Earth Day ideas, check out this fun post from last year when we made upcycled sand toys!}
What kind of fun treats are you making for your kiddos this summer?
Visit thecsiproject.com
Pin It!
Related Posts Plugin for WordPress, Blogger...