Home AboutMe Crafts Food
Showing posts with label Crafty Shirts. Show all posts

Friday, March 15, 2013

St. Patrick's Day Reverse Applique Shamrock Initial Tee

If you've been around my blog long, you know that crafty shirts are one of my favorite things to make for my boys! I have made them for almost every holiday, birthday, and special occasion for the past few years. This year I decided to some cute shirts for St. Patrick's Day...but they needed to be church friendly since St. Paddy's day falls on Sunday this year. So I picked up a couple green polo shirts from Target and added a cute, but subtle shamrock to each of them using a reverse applique technique.
The first step is to decided what kind of design you want. I decided to go with a smallish clover with each of the boys' initials placed inside the clover. I found a clip art clover, opened it up in photoshop, added the letters on top of the clover, and then printed out the page. 

To get the shirt ready, decided where you want your design to be. Then pin your fabric of choice to the inside of the shirt with the right side of the fabric facing the shirt. Sounds kind of confusing, but the picture on the left should help a little. Then turn your shirt right side out and pin your design to the shirt making sure that all of the design fits where you pinned the fabric inside. 


The next step is to sew around the edges of your design. For my shirts, I sewed around the clover and also around the outside of each letter. 
Once you finish sewing, simply pull up the paper to reveal your design. 
Now, comes the fun part! Using a small pair of scissors, carefully cut out the inside of your design as close to the stitching as you can get without cutting it and without cutting through the layer of fabric underneath. I usually start in the center of the design because it is easiest to separate the shirt from the fabric. For my shirts I had to go around the inside of the clover and also around the outside edge of the boys' initials. 

And this is what the finished project looks like! You can also start out easy with just a solid shape so you don't have to deal with cutting around the initial. I think they turned out pretty cute for a basic polo, a scrap of fabric, and a little bit of time!

Linking up here..
Pin It!

Friday, November 9, 2012

DIY Disney Shirts for Girls

As soon as I finished making Halloween costumes last week, I got started on these cute {and oh so girly} diy Disney shirts for a friend's little girl who is going to Disney World for the first time! If you've been around here long, you know that I don't often have the opportunity to make cute/pink/girly things since I live in a house full of boys....so I may have gone a little overboard with the pink! I don't think Taylor will be complaining though, specially since this trip to Disney is a surprise and she isn't going to find out until they are getting ready to head to Orlando! Anyway, I had a ton of fun coming up with some fun color combos and different girly things to make for her. I probably could have gone a lot girlier with more ribbon and ruffles, but that just doesn't seem to come natural to me after 8 years of nothing but boy stuff!
This first shirt is just a plain pink shirt with a Mickey head appliqued from some cute fabric left over from a Valentine's craft a few years ago.
This shirt is my favorite for sure! It is a pink felt Mickey head with a gray and white chevron Mickey head on top with a lower case pink felt "t" appliqued on top of that.
The color on this one didn't show up great in the picture, but it is a black shirt with Taylor's name appliqued on from some cute red and white heart fabric {again left over from a Valentine craft}. My favorite part of this shirt is the Mickey head instead of the "O" in her name:)
And you just can't make girly Disney shirts without including Tinkerbell. I made this one with some Silhouette heat transfer material. I found the Tinkerbell shape online and used my Silhouette to cut out Tink. I also cut Taylor's name using the font Waltograph. Then all I did was iron it all onto the shirt! 
This was my last shirt to make, because I really wanted to include a Minnie in the mix but for some reason none of the other shirts seemed very Minnie-ish to me. The black and white chevron on this shirt is from a dishtowel that I picked up at Target a few months ago and I bet you can't guess where the pink and white polka dot fabric is from {yep, it's leftover Valentine's material}:)
All of these shirts were really easy to make. For the most part I printed out my template, cut the fabric out, and then used a zigzag stitch to applique the fabric to the shirts. I didn't include any step by step instructions because I've done that quite a few times {and I was kind of in a hurry to make these before their big trip}, but if you need help shoot me an email {kellibwilson@gmail.com} and I'll be happy to help out any way I can. You can also click HERE to see all the other crafty shirts I've made...I'm pretty sure there are a few step by step posts in the mix somewhere!

Linking up here..
Pin It!

Monday, October 29, 2012

Monster Initial T-shirt for Halloween

I love making crafty shirts for my boys for the holidays. The only problem is that when I make their crafty shirts they're usually very holiday specific, which means once Halloween {or Valentine/St. Patrick's Day/Thanksgiving/Christmas} is over, they really don't wear their shirts again. So this year for Halloween I decided to try and make a shirt that was a little more generic so the boys could wear them longer...but the shirts still needed to be a little scary with some fun fall colors just to make use it really looked like a Halloween shirt too:)
I came up with these fun Monster Initial T-shirts and I think they are the perfect Halloween {but works the rest of the year} shirts...
 ...and I think Eli agrees:)
 Here is a close up of the shirt so you can kind of see what all I did to make it:
I started by printing out a big E in a bold font. Then I use it as a pattern to cut out a piece of black felt. After I had my felt E, I used the paper E to cut out the {SUPER cute} chevron fabric...but I made sure to cut the chevron E a little smaller so you can see the black felt E underneath it {I was going for a layered look}. Then I cut out some fun monster features {teeth, horns, spikes, and eyes|} using felt and other fun fabrics. I attached each feature to the big felt E with spray adhesive, then I sewed on the chevron E, then I finally attached the whole thing to the t-shirt with a little spray adhesive and a stitch around the outside edge.

And just in case you think that I forgot about my bigger monsters, here are Henry and Grant's Monster Initial T-shirts too:)


Pin It!

Monday, May 21, 2012

Roadtrip Ready: Make Roadtrip T-shirts

Today's Roadtrip idea is one that is SUPER fun and really easy to personalized for your trip: Roadtrip T-shirts! I've made vacation shirts for my boys before, and we always get so many complements on their shirts. Plus having a cute personalized shirt for the trip makes it that much more fun for the kiddos, and saves you a little money because you won't have to buy those expensive and not very cute touristy t-shirts!
You can really make almost anything into a cute shirt for almost any kind of roadtrip:
Mickey {here's my version} or Minnie {here's Amanda's cute version} for a trip to Disney
a silhouette of the Statue of Liberty for a visit to New York City
a surfboard with waves for a trip to the beach
your kid's favorite animal for a trip to the zoo
******
I decided to make camper {aka Airstream} shirts for my boys since that is going to be our mode of transportation for this roadtrip, and I think they turned out SUPER cute. I especially love the silhouette of the Airstream on the tie dye shirts...kind of has a hippie feel:) You can also make a girly version of this shirt, but since I don't have any girls to make shirts for you'll have to check out my friend Liz's cute camper shirt.
I didn't do a step by step for this shirt {mostly because I have a million things on my to do list and I didn't have time to stop and take pictures at every step} so you can check out my other crafty T-SHIRT tutorials to get more detail on how to make cute Roadtrip T-shirts for your next trip!
Pin It!

Tuesday, December 20, 2011

Christmas Initial Tee's

We have a lot of Christmas traditions.
Christmas Eve breakfast and then ornament shopping, getting three gifts from Santa like the three gifts that Baby Jesus received from the Wise Men, making Gingerbread Houses and Cookie Cutter Men {that's what Eli calls gingerbread men}, new Christmas PJ's....and the list goes on and on! 

One tradition I started a few years ago was making the boys a cute new Christmas shirt to wear during all the fun holiday festivities. You can see some of their shirts from years past here, here, and here

This year I decided to go a little bit funky/non-traditional with their shirts, and I think they turned out SUPER cute {though I don't think Jason was very fond of the yellow chevron fabric I used because he said it wasn't really Christmas-y.} Oh well, the boys got a ton of compliments on their shirts when they wore them for pajama day at school last week! Even thought Eli's not in the picture, he has a shirt too...he just didn't want to wear his new pajamas the day that Henry and Grant wore theirs to school:)
I started with some green long sleeve tee's that picked up at Target for around $4. I dug through my fabric stash and found some cute fabrics that would match the boys new Christmas pajama pants. I ended up with yellow & white chevron fabric, red felt, and just a little bit of green & white polka dot fabric. I grabbed a few bowls from the kitchen and used them to trace circle on the chevron fabric and the felt. Then I printed out each of the boys' initials and used spray adhesive to attach them to the polka dot fabric. I layered the circles, added the initial on top, and sewed everything into place. I used spray adhesive to attach the whole thing to the shirts, then I sewed the biggest circle to the shirts. 

 Oh and did I mention I procrastinated these until the night before the boys needed to wear them, so I whipped up three of these in about an hour...yep that's how simple they are to make, and what a huge procrastinator I am! SUPER simple and SUPER cute Christmas Initial Tee's! 
Pin It!

Thursday, November 17, 2011

Pilgrim and Indian Initial Tees

I have shared countless times about my slight obsession love of crafty kids' holiday shirts. I'm actually starting to think that maybe I should start a support group, but I might be the only crazy member! Anyway, with Thanksgiving only a week away, I decided to take advantage of our little sick day yesterday and get some sewing done on the boys' shirts for this year. I knew I wanted to attempt a cute turkey face shirt for Eli {I'll share his shirt later after I figure out how to add the eyes without making the turkey look crazy}, but I wasn't quite sure about what to do for Henry and Grant. I stumbled across a Pilgrim initial tee on Etsy earlier this week and as soon as I saw it I knew my boys were getting Pilgrim and Indian shirts this year:)
I won't bore you with all the details{and a million pictures} of how I made these shirts...you can go back and check out one of my other step by step tutorials if you like. But just so this isn't a single picture with a ton of rambling, I will share a quick rundown of how I made these.

**Print out each kiddos initial {mirrored} and attach it to orange and white gingham.**
**Cut out the letters and attach them to some orange felt.**
**Sew the letters to the felt with a zig-zag stitch and then cut around each letter leaving an orange border.**
**Use spray adhesive to hold the letter to the shirt, then stitch around the letter to attach it.**
**Make the pilgrim hat and indian headband out of scraps of felt. **
**Use spray adhesive to hold them in place and then sew them onto the shirts.** 

Really the hardest parts of this project are deciding which font to use for the letters and getting the proportions of the hat right so that it looks like a Pilgrim's hat and not a crazy top hat:) For those of you that don't sew, you could also make this no sew with some ultra hold iron on adhesive! Except for the new white long sleeve shirts, I used all materials that were in my craft stash making these shirts cost around $5 each. Not too bad for two SUPER cute Thanksgiving shirts!
Weekend Bloggy Reading
Pin It!

Friday, November 11, 2011

Friday Flashback: Craft Edition

**This is a re-post from last year. I have been looking for some great Thanksgiving shirt inspiration for this year, so I figured I would share one of my Thanksgiving shirts for last year in case anyone wants to attempt it for their kiddo!**

I have seen a ton of cute turkey shirts for Thanksgiving floating around the internet lately. I had intentions of making my boys a cute turkey shirt, but was really wishing I could make something a little different and a little more fun instead.

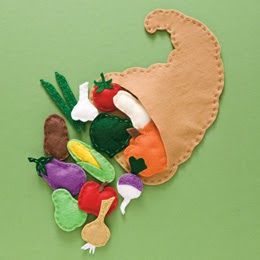
The Shirt of Plenty is what I ended up with after a TON of inspiration {and a template} from Family Fun magazine.
This is the original craft shared in the November issue of Family Fun...SUPER cute Thanksgiving themed felt food. I simply decided to turn my felt food into a shirt instead of making a toy:)
The first step in making this SUPER cute shirt is to print the templates and cut them out. Sometimes the template calls for two of each shape, but you usually only need one.
Use spray adhesive and stick the cut out shapes to different colors of felt. You can mix and match however you want, or follow the suggestions on the templates.
Then add iron-on adhesive to the backside of the felt following the directions on the package.
Cut out the shapes following the template, then remove the paper and the iron-on adhesive backing.
Lay out your design on the shirt and decide where you want each piece to be. Iron the pieces onto the shirt following the directions on your package of iron on adhesive.
The finally step to making The Shirt of Plenty is the most tedious and time consuming....but it also makes a big difference in the appearance of the shirt. Using coordinating colors of embroidery thread, go around the edges of each piece of felt with a running stitch. Make sure to tie off each end of the embroidery thread well, so that the felt pieces stay securely attached.
And that is how you make a SUPER cute Thanksgiving shirt!
Now if I can only find the time {and energy} to make two more:)
Pin It!

Thursday, October 27, 2011

Trick or Treat, Smell my Feet! Halloween Shirts for a Trio

I love a good holiday shirt! {You've all seen my past 4th of July, Disney, birthdayHalloween, and Thanksgiving shirts:)} And I love a funny set of holiday shirts even more...especially for Halloween! So instead of making my normal initial tees {that my boys have way to many of anyway}, I decided to make some fun "trick or treat, smell my feet" Halloween shirts for my boys this year! I think they are pretty cute...Jason thinks I'm weird! The boys love them and really that is all that matters!
I started with some fabric from Hobby Lobby and a few white t-shirts. I printed out my words{I used the font Smiley Monster which is one of my new favs} in mirror image.
I used spray adhesive to attach the words to the backside of my fabric with the printed side of the word facing out. A little complicated, but it makes cutting the letters a lot easier.
I cut out the letters, squaring off any of the edges that seemed like they might be hard to sew....I've been sewing for a while, but curves and circles still give me trouble:)
My original plan was to just sew the letters onto the shirts, but when I laid them out on the white shirts they were really hard to read.
I pulled a little bit of black felt from my fabric stash and decided that they looked 100 times better against the black fabric. I simple cut the felt big enough for the letters, sewed the letters onto the felt, then sewed around the edges of the felt to attach it to the shirt. I also used my monogram machine and some orange thread to add the words "smell my" to Eli's shirt.


Now I just need to find the time to finish making their Halloween costumes!

Pin It!
Related Posts Plugin for WordPress, Blogger...