Home AboutMe Crafts Food
Showing posts with label Crafty Shirts. Show all posts

Monday, June 27, 2011

Monogrammed Flag Tees

If you have been reading my blog for long, you already know that I have a love of homemade holiday shirts. Check out the evidence here, here, here, here, and here:) The 4th of July is actually one of my favorite holidays to make shirts for because after the 4th the shirts can still be worn without looking silly {like you would if you wore a Christmas shirt in the middle of March}! Last year my boys had cute {but sort of plain} gingham flag shirts, so this year I decided to make their shirts a little more interesting!
I started by using my Silhouette to cut out the first letter of each kiddos name in a wide letter as similar to the shape of the US flag as I could.
I picked up 1/4 yard of red striped fabric and 1/4 yard of solid blue fabric at the store {this was more than enough for me to make 3 kids' shirts}. I used the outline of the letter that I cut out with my Silhouette to help me line up the fabrics to look like a flag. The red and white striped should cover most of the letter and the solid blue should be in the top left corner of the letter.
You could simply cut out your letter by hand using the outline as a guide, but I decided to try out the fabric interfacing that I bought when I got my Silhouette. I ironed on the interfacing according to the directions, lined my material up on my cutting mat using my paper letter as a guide, and then I let my Silhouette do the work of cutting out the letter. Can I just say the fact that this machine can easily cut fabric makes it work it's weight in gold to me:)
Now that the hard part is over, the last step in making your monogrammed flag tees is to iron on your letter and then sew it in place. If you don't sew, you could easily buy the heavy duty iron on and skip the sewing step altogether.
Two of my models are going to VBS this week, so my littlest photography assistant helped me out with my photo shoot:)

Do you show your patriotism by wearing a red, white, and blue on the 4th of July?
Pin It!

Friday, December 24, 2010

Merry Christmas!


I wanted to share one of my *most* favorite Christmas song with you....an awesome song with an even more awesome message! I hope you all have a very MERRY CHRISTMAS!
 
Pin It!

Tuesday, November 23, 2010

Two More Thanksgiving Shirts...and a Christmas Guest Post

After I made Eli's Shirt of Plenty last week, I knew I had to make Henry and Grant a SUPER cute shirt to wear on Thanksgiving....but I didn't want them all to have the same shirt this time. So here are two new shirts...the Pumpkin Pie shirt for Grant, and the I Love Turkey shirt for Henry.
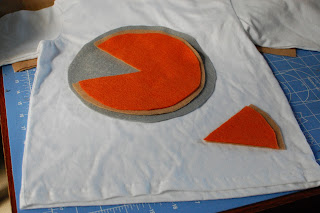
This shirt was really easy to make! I used gray, brown, white, and orange felt to make my pumpkin pie, and I used an empty ice cream bucket as my template.
I used the ice cream bucket to make three circles. The gray for the pie pan was the largest, the brown for the crust was a little smaller, and the orange for the pumpkin was the smallest. After I layered the circles, I cut out a "slice of pie" by cutting a triangle out of the brown and orange but leaving the gray in a whole circle.
I attached the felt to the shirt with iron-on adhesive and then stitched around the edges with embroidery floss just like I did with the Shirt of Plenty. To add a little bit of whimsy and to make sure that everybody knew that Grant's shirt was in fact pumpkin pie, I added a little bit of whipped cream to the top:) I simply cut a circle out of white felt, then I pinched the felt in the middle of the circle and made the ends gather up. Then I sewed the whipped topping on with some heavy duty thread.
I originally saw the idea for the I Love Turkey shirt at Positively Splendid. Amy makes some really cute stuff...and this shirt is one of her cutest yet! I loved the idea, but I didn't have all the materials. What I did have was felt, so I made my own version of her shirt using felt and a little bit of color just for fun!
Here's a picture of all three shirts:) Can you tell that they were all three saying "The sun's in my eyes!" Hopefully we will manage to get a better picture on Turkey Day!
*********************
I'm guest posting over at Under the Table and Dreaming today. Hop over and check out my SUPER cute Glittered Snowman Ornaments and all the other really great homemade ornament ideas!
UndertheTableandDreaming

Pin It!

Monday, November 15, 2010

Shirt of Plenty

I have seen a ton of cute turkey shirts for Thanksgiving floating around the internet lately. I had intentions of making my boys a cute turkey shirt, but was really wishing I could make something a little different and a little more fun instead.

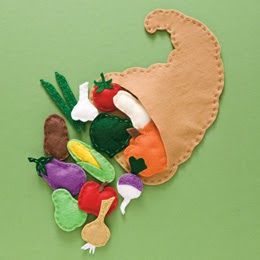
The Shirt of Plenty is what I ended up with after a TON of inspiration {and a template} from Family Fun magazine.
This is the original craft shared in the November issue of Family Fun...SUPER cute Thanksgiving themed felt food. I simply decided to turn my felt food into a shirt instead of making a toy:)
The first step in making this SUPER cute shirt is to print the templates and cut them out. Sometimes the template calls for two of each shape, but you usually only need one.
Use spray adhesive and stick the cut out shapes to different colors of felt. You can mix and match however you want, or follow the suggestions on the templates.
Then add iron-on adhesive to the backside of the felt following the directions on the package.
Cut out the shapes following the template, then remove the paper and the iron-on adhesive backing.
Lay out your design on the shirt and decide where you want each piece to be. Iron the pieces onto the shirt following the directions on your package of iron on adhesive.
The finally step to making The Shirt of Plenty is the most tedious and time consuming....but it also makes a big difference in the appearance of the shirt. Using coordinating colors of embroidery thread, go around the edges of each piece of felt with a running stitch. Make sure to tie off each end of the embroidery thread well, so that the felt pieces stay securely attached.
And that is how you make a SUPER cute Thanksgiving shirt!
Now if I can only find the time {and energy} to make two more:)

Pin It!

Monday, October 25, 2010

Candy Corn Tshirts

A few weeks ago, I made the boys some really cute and really simple Candy Corn Tshirts.
I started with some plain white broadcloth, plain yellow broadcloth, and some cute black and orange polka dot material. I decided how big each color should be and then cut strips of each material. I lined them up like a candy corn: white on top, orange in the middle, and yellow on the bottom.
I printed out a clip art candy corn to use as a template. I traced the shape onto some iron on adhesive. {You could just freehand the shape if you wanted to.}
Then I attached the candy corn shaped iron on adhesive to the back side of my strips of material following the directions on the package. After it cooled off, I trimmed the extra material away and then ironed the candy corn to the shirt.
I used my sewing machine and went around the edges of the candy corn with a straight stitch. I also did a zig-zag stitch between the different colors of material.
And that is how you make a SUPER cute and SUPER easy Candy Corn Tshirt for fall!
Join  us Saturdays at tatertotsandjello.com for the weekend  wrap    up           party!
Pin It!

Monday, August 30, 2010

One Fish, Two Fish...

Well, really two birthdays in one!
This weekend we celebrated both Grant's 5th birthday and Eli's 2nd birthday with a party at a local gymnastics facility!
*************


*****************
I took one of the party favor bags to the bakery and they matched the cakes to the bag....I thought they turned out really cute!

I picked up these SUPER cute bags in the dollar section of Target a few weeks ago. Each kiddo got a bag with a few Dr. Seuss goodies inside. Grant proudly wearing his #5 birthday shirt. I whipped up these birthday shirts for Grant and Eli on Friday night before the party.
Eli having a blast on the trampoline track!
Waiting patiently to blow out the candles.

Visit thecsiproject.com
Pin It!

Tuesday, December 1, 2009

The Shirt Off My Back: GIVEAWAY

THIS GIVEAWAY IS NOW CLOSED!
Lately, I have been


{just a little} obsessed
with making SUPER cute shirts
for my boys!

And now I am going to make a SUPER cute shirt just for one of you!

You get to pick the size, the color, the fabric, and the design.

But first you have to enter and win!

So here is how to enter:

For your first entry leave a comment...any comment will do!

For one extra entry, follow me and leave a comment telling me that you do.

For another entry, put my button on your blog and leave a comment telling me you did.

For one more entry, follow me on twitter and leave a comment telling that you do.

For three extra entries, blog about my giveaway linking back to this post, then leave three comments telling me you blogged.

This contest will end on Wednesday, December 9th. That way I can get the shirt made and hopefully to the winner before Christmas...just in case someone wants a Christmas shirt like this:
Pin It!
Related Posts Plugin for WordPress, Blogger...