Home AboutMe Crafts Food
Showing posts with label Decorating. Show all posts

Friday, December 10, 2010

Empty Frame Wall

My third craft using all those old, dusty frames isn't exactly a craft, but I did manage to find another use for them! They are now decorating the ones very plain wall in our half bath. I love the look of a big wall of empty frames, but I really had to sell it to my hubby before he would help be hang them up:)
 Not too bad for free! All I did was pop the back and the glass out of the frames, Jason pulled off the metal tabs in the back, and they are simply hanging on a small nail.
And because we actually redid the entire bathroom, I figured I would share pictures of the finished project. Let me just preface these pics with: It is REALLY difficult to take good pictures in a tiny bathroom that has no natural light!!
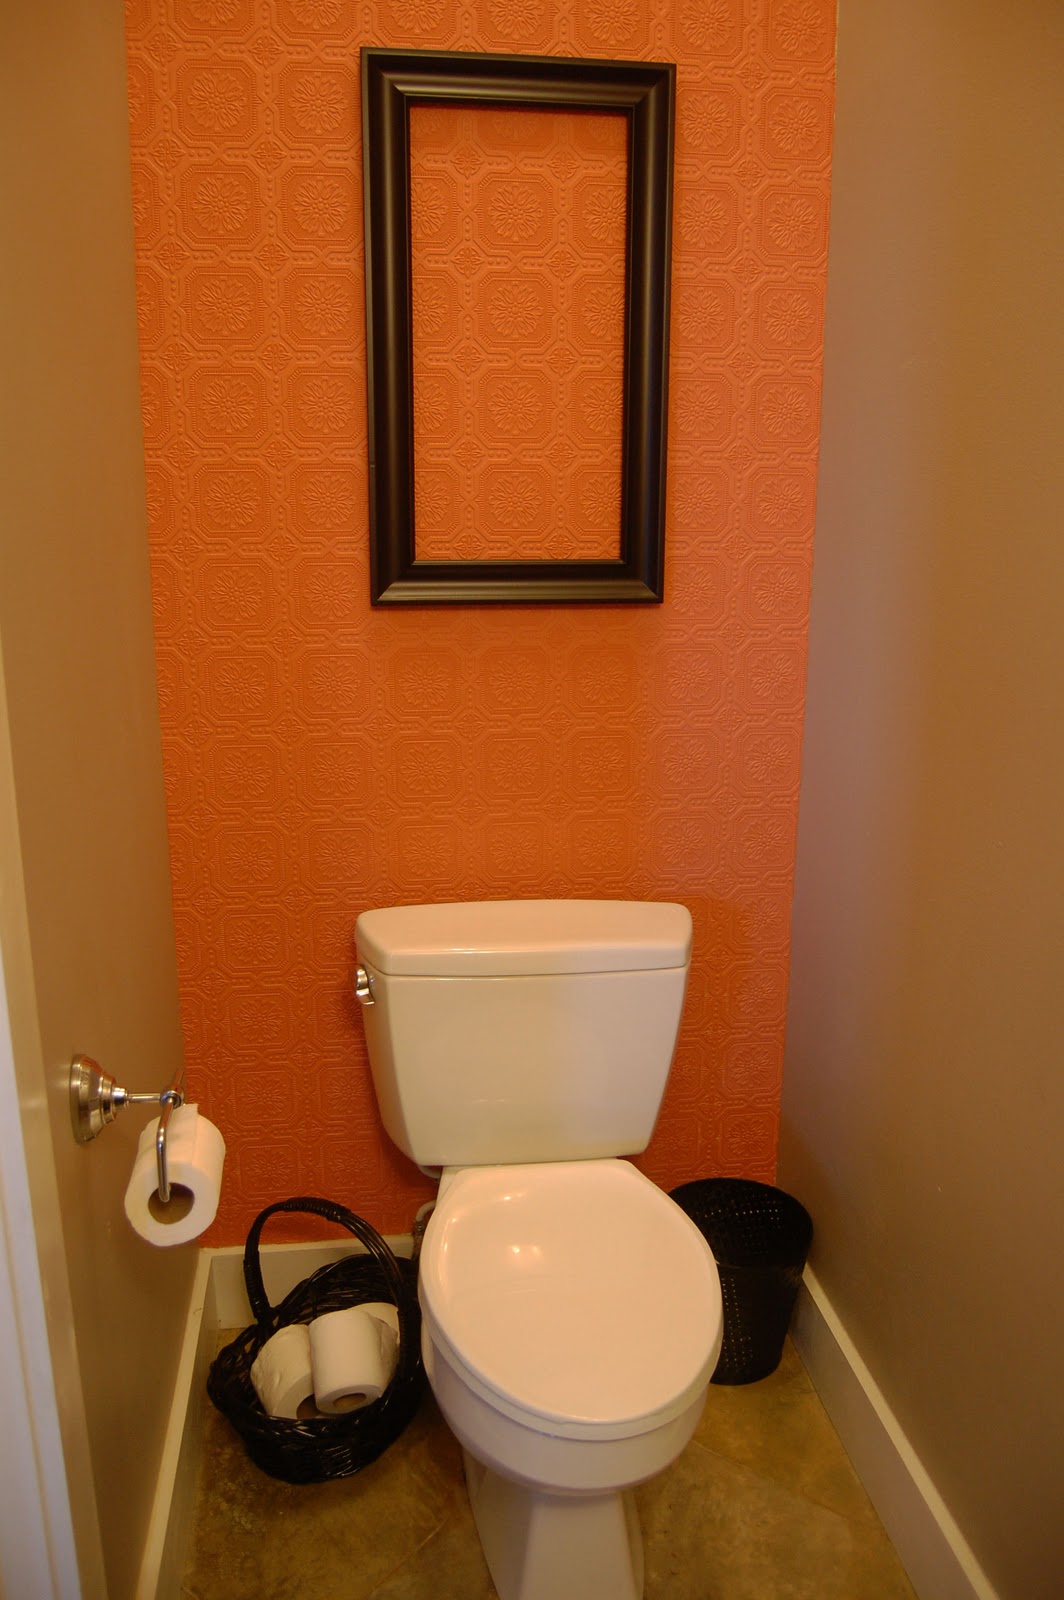
 Jason put up some great textured paintable wallpaper that I found at Lowe's. One roll cost $18 and I think he only used half a roll to cover the one wall in our bathroom. We used paint from our living room....mainly because that color is hard to coordinate with and the half bath is right by the living room. It was also a nice perk that I didn't have to spend money to buy paint!
 I picked up a big frame at Hobby Lobby for 50% off, and spray painted the garbage can and basket with black spray paint.
 Jason hung up this new mirror that I ordered from CSNstores.com. I love it! It was such a great price, and the mirror is really great quality! I painted a few extra pieces of the wallpaper and framed them, and we added a new towel rack.
Our half bath went from boring beige walls, to chic and colorful with a few days work and not a whole lot of money.
Pin It!

Thursday, September 30, 2010

Candy Corn!

I love decorating with stuff that can be used for multiple seasons and holidays. I love that instead of sitting in the attic for 11 months out of the year, that I can change some of my decor up and use it year round. So when I started working on new decorations for Halloween/fall I knew I could figure out a way to makes something that would work for Christmas, Valentine's Day, and maybe even Easter.

I started with some clear glass bottles that I have been saving for three years. I knew at some point I would find a good use for them:)
 I used my Cricut and cut out some vinyl letters.
 I used some transfer paper to attach the letters to the clear glass bottles.
 I lined the bottles up to make sure that the letters were even...the "d" is a little high, but not enough to worry about.
 I spray painted the lids white so they would match almost any holiday decor.
 Then I filled the bottles up with CANDY CORN...
 ...and lined them up on my kitchen counter.
This was a SUPER inexpensive project...all I really bought was the candy corn. Now when fall is over and Christmas decorations start going up, all I will have to do is empty out the candy corn and add in some red, green, and white M & M's!
Serenity Now Crafty Cutter Party
Pin It!

Tuesday, September 28, 2010

Easy Halloween Decor

After making my SUPER easy Halloween frame, I decided I really needed to add a few more fall decorations to my house. I started with my SUPER easy sign that I change out depending on what holiday or season it is. It has been THIS for Valentine's Day and THIS for Easter...plus a few others too!
Now, my sign is all dressed up for Halloween!
I cut out the letters BOO with my Cricut and used spray adhesive to attach them to some black paper. I added a cute fuzzy spider that I got at The Dollar Tree...and now I am ready to pull out all my fall decorations and get busy decorating my house!
Pin It!

Thursday, September 2, 2010

Simple Lamp Redo

I finally {after 3 months of looking} decided on a new lamp for the end table in my living room. I found this beauty on clearance at TJ Maxx for $20. Not bad considering I had seen the exact same lamp {except the base was lime green} a few months back for $35. I love the square shade and the geometric pattern on the base....but I was not really in love with the color. So, I grabbed a roll of tape and masked off the areas I didn't want painted...mainly the hardware and the cord.
Then I got busy with my black glossy spray paint.
I even remembered to paint the finial that goes on top of the lamp:)
Half a can of spray paint and ten minutes later, I have a pretty awesome lamp that matches my living room wonderfully!
Have you spray painted anything lately?


Pin It!

Tuesday, July 13, 2010

Pillow and Art Wall Questions.

After I posted pictures of my Entertainment Center turned Bench , I had a ton of people email and comment asking about my pillows.


I picked up my pillows at TJ Maxx, and I found similar ones for my couch at Marshalls. I also just recently discovered that another blogger actually bought the exact same fabric online to make some very pretty curtains.
Judith at Creating Balance did a whole post on finding the fabric {Wilmington-Covington-Multi}and where she bought it.
***********************
I also had a few people ask about the Kid's Art Wall Clothes Line that I have hanging in my hallway for the boys' art.


Jason actually did all the work associated with hanging the clothes line, but I don't mind sharing what he did. Here is a close up of the end of the clothes line.

I think this is called an eye bolt. We decided how big we wanted the clothes line to be, and Jason screwed in two eye bolts on either end. Then he cut some picture hanging wire to the length that we wanted and twisted each end of the wire onto the eye bolts. Super easy to do...at least it looked easy while I was watching him do it!
*****************
P.S. Those were blueberries all over my kitchen floor in the picture from yesterdays post. Fresh blueberries from my parents' yard that Henry and my mom picked. I was just a little sad to have to throw them away.
Pin It!

Friday, July 9, 2010

SUPER Easy Covered Books

This craft project is quick, easy, and cheap...3 of my favorite things for a craft project to be! It is also a really great way to introduce a little bit of color into a room without making a big commitment. You can always change out the paper and/or books if you decide you don't like the color. To get started, gather your supplies.
*A few old books*
{I suggest using old books from college. You know the ones you kept because they cost you a fortune, even though you have no intention of ever reading them again}
*scrapbook paper*
*hot glue gun*
Lay your book onto the paper and measure where it needs to be cut. Cut the paper to the correct length. If the paper isn't quite big enough to cover the whole book, make sure that the back cover of the book is what you leave uncovered.
Line up the edge of the paper with the front cover of the book. Hot glue the paper into place. Make sure to crease the edges around the spine of the book and glue the spine down well.
You can do any combination of colors or patterns. I also covered one book with the spine of the book covered with a patterned paper and the front cover with a solid colored coordinating paper.
Covered books are great just sitting on a table, or they can be used to add height to smaller objects on a table or shelf.


Join  us Saturdays at tatertotsandjello.com for the weekend wrap up    party!
Pin It!

Thursday, July 1, 2010

Art in the Hall

This project has been on my to do list for a few months now. While the boys were at VBS last week, I finally got out my supplies and started working on it.
********
The clothes line for the boys' art has been hanging in the hallway for a few years now, but it always seemed kind of boring...you know, except for all the cute art hanging on it. So after I got my Cricut in January, I knew that I had to find the perfect quote to hang above the boys' art.

What do you think?!?
I decided on this Pablo Picasso quote a while back when I did a blog post using the quote. I printed it out just to make sure that I got all the letters cut correctly. Then I went to work {or really the Cricut did} cutting out the letters on black vinyl.
I laid out all my letters and then worked out the spacing. I used transfer tape to line up the words and then attach them to the wall. I also drew a pencil line on the wall to help keep the quote as straight as possible.
Now the hallway seems much more complete!
I love what a little bit of vinyl and a little bit of time can do for a space!
Do you have any vinyl words or decorations in your house?

{For those of you that have asked, you can click here to see a little bit more detail on how to make the art clothesline.}
Serenity Now Crafty Cutter Party
Pin It!

Monday, June 28, 2010

Breakfast Nook Ideas

A few months ago, we moved Eli out of a high chair and into a booster seat. So, for the past few months we have been stuffing 5 chairs around a table that is only big enough for 4. We have officially outgrown our table!
We decided to swap out our current 4 seater table for our bigger dining room table, but something still isn't just right about the space. I have been trying to think of the best way to use our breakfast room, and I keep coming back to something kind of like these pictures:
{all photos from the Better Homes and Gardens website}

I love the look of the built in bench under the windows. It makes the space so cozy, plus adds a ton of storage. I'm thinking this would be a great place for the boys' school and art supplies. Now, I just have to decide what style to go with and get Jason busy with his saw, nail gun, and paint brush:)


Pin It!

Thursday, June 24, 2010

Entertainment Center Turned Bench...Finally!

About two months ago, we decided to buy a new couch.
Buying a new couch meant rearranging furniture.
Rearranging furniture meant this piece that was once used as an entertainment center now needed a new purpose. I decided it was the perfect piece to turn into a bench. It was the just the right height for sitting, plus there is a ton of room in the two side cabinets to store toys! The first thing I did was use Gorilla Glue to attach some thin pieces of wood to the doors...
..and sides of the entertainment center. I wanted to add a little bit of interest to the otherwise plain boring sides. Jason already had these thin pieces of wood left over from a previous project, so all I had to do was cut them to the correct length and glue them on.
After the Gorilla Glue was dry {technically like two weeks after}, I primed the entire piece with Zinsser Oil Based Primer...the same primer that I used to redo my end table. After the primer was dry, I added a coat of glossy white paint...the primer was so good that it only need one coat of the glossy paint to look pretty great! I reattached the original hinges {which were black}, and picked up two new decorative black knobs to replace the small silver ones.
I bought a piece of foam and cut it to the correct size for the top of the bench. FYI: Foam is expensive....if you have any old cushions that you aren't using, save them!
I also picked up a tablecloth at Target to make a cover for the foam. I got a great textured material for less than $10...if I had bought something similar at the fabric store it would have cost a fortune! I wrapped the material around the foam, pinned it in place, and sewed up the edges. I left the back open, so that I can remove the cover and wash it if it ever gets dirty or stained {which is going to happen in my house full of boys}! Throw in a couple of rattan baskets and two decorative pillows that match the throw pillows on the couch, and now I have an awesome bench and even better toy storage piece!


Visit thecsiproject.com
Pin It!
Related Posts Plugin for WordPress, Blogger...