Home AboutMe Crafts Food
Showing posts with label Decorating. Show all posts

Tuesday, January 10, 2012

January Un-decorating & Redecorating

We took down all of our Christmas decorations last week. The tree had been down for a few days, but all the garland, wreaths, and pretty sparkly stuff was still hanging...and since it was almost two weeks after Christmas, it was time for it to come down. But for some reason the house seems so bare once all the pretty Christmas stuff comes down. Our front door is empty...no pretty wintery wreaths here {when the temps have been in the 70's it hard to put something that says "Let it Snow" up!}.

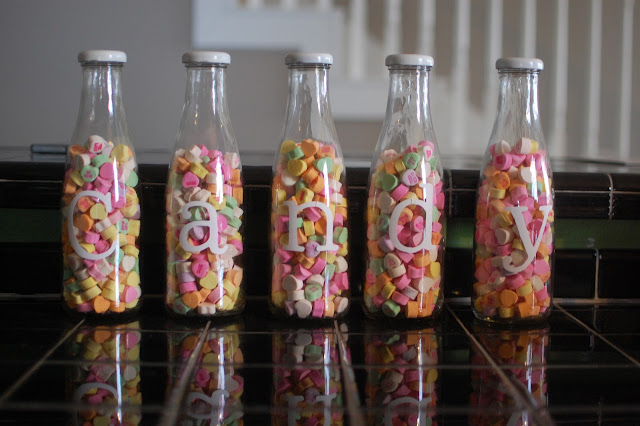
So since we aren't really into celebrating winter when we don't get to experience one...I decided to just jump right into Valentine's Day decorating! The first thing I did was dump out all the peppermints from my Candy Jars and add in the Conversation Hearts that I saved from last year:) No sense in buying new candy every year when all it is used for is decorations! After Valentine's Day last year I poured all five jars of Conversation Hearts into a Ziploc bag and stored them in the back of the pantry. And now they are SUPER cute back in my jars again this year for Valentine's Day!

Since I'm in the mood to get ready for Valentine's Day I figured I would share a few of my favorite past project just in case anyone out there is looking for some V-Day inspiration! 


Now I'm off to find my Hula Hoop Wreaths from last year so my front doors don't look so bare. Then I may start working on a yummy Valentine's Day snack to share with you {after I work on getting the three mountains of laundry put away first}!
Pin It!

Friday, December 2, 2011

Making a List...

I sat down earlier this week and made a list of all the craft/snack/decorating projects that I want to do before Christmas....my list has more than 25 things on it! That means I have to finish at least one project {maybe even 2} every day between now and the 25th for me to get everything crossed off my list! I don't think it's going to happen!

You would think with a list that long I would get busy trying to cross things off...NOPE! I did get our Advent Calendar on the wall. It looks really cute, but it is completely empty:) I also managed to get the boys' stockings hung even though we don't have a tree or even a plan to go get a tree yet! And instead of tackling my list, I worked on something that wasn't even on my list: my front porch that still had pumpkins and footballs all over it!

I took down all the pumpkins and the footballs and added some red and green in their place! I hung up a cute wooden sign that I bought at a craft fair. Then I whipped up a wreath with some red burlap and leftover Christmas fabric. It's not much, but at least it's not still fall decor!
Even though our front door looks SUPER cute now, my list is not any shorter! Plus there is still a ton of other decorating and light hanging to be done! Please tell my I'm not the only slacker who still has a ton of stuff to go to get ready for Christmas!
Pin It!

Monday, November 7, 2011

Thankful Photo Decor

I finally got around to changing out the three frames in my kitchen that I use for holiday decorations. I'm kind of embarrassed to admit that the same finger-painted Christmas pictures stayed in the frames for a year or two before I changed it out a few weeks before Christmas last year for THIS. Then I put THIS Easter decor in the frames and it stayed there until now....yep, I had Easter decor in my house all the way through October. But I am making up for it now with this cute Thankful Photo Decor.
 I started out by opening up a file in Photoshop Elements. I made my page 8x10 so that it would fit in the frame {and also so I could print it out as at a photo center if I wanted to}. I chose the picture of each kid that I wanted to use and placed it on the right side of the 8 X10 page. Then I added in the words "I am thankful for:" using a mix of fun fonts that I downloaded from kevinandamanda.com
 I printed out the page at home {because I really didn't want to go to the store}, and I was pretty impressed with the quality of the picture that printed from my HP home printer.
 I test fit each page into the frame to make sure it fit well, then I gave the kiddos a Sharpie and a few instructions.
****
Henry made a list along with a few numbered pictures....very analytic! You can tell he is the oldest for sure!
Grant was thankful for two things: his frend and toys....typical 6 year old boy I guess:)
Jason helped Eli who is apparently most thankful for pizza...I guess that explains why he wants to eat it 6 times a week!
I love seeing their cute faces along with the things that they are thankful for, but the best part of this project is that when Thanksgiving is over I will have something great to add to their memory books!
Pin It!

Friday, October 28, 2011

Friday Flashback: Candy Corn Edition

I love decorating with stuff that can be used for multiple seasons and holidays. I love that instead of sitting in the attic for 11 months out of the year, that I can change some of my decor up and use it year round. So when I started working on new decorations for Halloween/fall I knew I could figure out a way to makes something that would work for Christmas, Valentine's Day, and maybe even Easter.

I started with some clear glass bottles that I have been saving for three years. I knew at some point I would find a good use for them:)
 I used my Cricut and cut out some vinyl letters.
 I used some transfer paper to attach the letters to the clear glass bottles.
 I lined the bottles up to make sure that the letters were even...the "d" is a little high, but not enough to worry about.
 I spray painted the lids white so they would match almost any holiday decor.
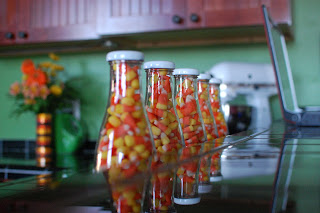
 Then I filled the bottles up with CANDY CORN...
 ...and lined them up on my kitchen counter.

This was a SUPER inexpensive project...all I really bought was the candy corn. Now when fall is over and Christmas decorations start going up, all I will have to do is empty out the candy corn and add in some red, green, and white M &M's!

**This is a post from last year that has been one of my most popular through the year. I actually have the same jars sitting on my counter right now...they just aren't filled with candy!**
Pin It!

Thursday, October 6, 2011

I Gave Into the Missoni Hype...A Little Late!

I know I am way behind the curve here considering most people were storming the doors of Target more than 3 weeks ago, but after quite a few trips past the {very small selection} of Missoni merchandise at my local Target I finally gave in. I bought a candle and a journal. I know big spender, right?!? 
 Honestly I just wasn't really a big fan of the majority of the stuff that I saw. A lot of the pieces seemed either way too retro or way too Southwestern for my taste. I will say that I LOVE the zig-zag {aka chevron}, but some of the the color combos just don't fit my style....except for the black and white {which is what I ended up buying}. 
 I did LOVE this bike, and these fun boots that my friend Carrie bought are SUPER cute too. There were a few other pieces that probably would have considered buying {like a scarf, a pair of flats, or some cute socks}, but when I finally decided that I desperately needed to have a least one Missoni piece to buy something, the pickin' were slim and the black and white things were all I could talk myself into buying. I do think that a lot of the little girl's stuff was cute....but little girl's clothes are never on my shopping list for some reason:)
For now, I am SUPER happy with my cute zig-zag candle that blends pretty well into my living room decor. It is black and white so it pretty much matches anything:) 
What do you think of the Missoni for Target line...like it or loathe it?
Pin It!

Tuesday, July 12, 2011

Ugly Patio Box to Cute Outdoor Seating

We bought a patio box a few years ago to store all the boys outside toys. At the time it was really functional for keeping all their toddler riding toys, sand buckets, and their Fisher Price Bubble Mower in one place instead of all over the yard. We even used it as a seat sometimes, but over the years our patio box took a beating. It even had a hole in the top that I'm pretty sure came from a baseball bat. So when I started our patio makeover I knew something had to be done to our old neglected patio box.
The first thing I had to tackle was the big hole in the top of the lid....and it was duct tape to the rescue! I simply used stripes of duct tape on the outside and inside of the lid to seal up the hole.
 I bought a piece of foam and cut it to size with a bread knife...I've also heard an electric knife works well for cutting foam, but I was too lazy to dig ours out of the back of the kitchen cabinet:) After removing the lid from the box, I sprayed the lid with spray adhesive and stuck my cut to size piece of foam on it. Then I sprayed the top of the foam with spray adhesive. I placed the fabric upside down on the ground and carefully positioned the foam/lid onto the fabric.
 Using screws and my hubby handy drill, we attached the fabric to the lid after wrapping the fabric around the outside edge of the lid. I wasn't sure how a screw would work on the plastic lid, but after we found the right kind of screw it was no problem at all. I have no idea what kind of screw we used, just that some of the ones that we had wouldn't work:)
 This is what the inside of the lid looked like after I finished attaching the fabric and foam. If you try this make sure that you pay attention to where the hinges are so that you don't cover them up with fabric. My hinges where on the right side in the picture below which is why it looks different than the other three sides.
I impatiently waited for Jason to get home from work so he could reattach the lid for me. I tried a few times but couldn't figure it out:) Once the lid was in place, we had a great new seating area on our patio!
You can check out the rest of our patio makeover here!
Pin It!

Monday, July 11, 2011

Patio Makeover Reveal

After more than a month of work, I'm finally sharing our patio makeover with you {even though I still have two more projects to do for this to be complete}! I don't have a before picture mostly because our before patio was really sad...no shade, a rusty old table, and way too many toys crammed in one place! Now it is this bright and cheery space that I love!
This whole project started because I wanted to add a little more shade to our backyard so the boys would be a little cooler playing in the backyard during the SUPER hot summer! We added the pergola a few years ago, but it never really gave us the shade that we were hoping for. So I hit the fabric store during an awesome outdoor fabric sale and bought a ton of fabric. I cut the fabric into strips {and hemmed each edge to keep it from fraying} then Jason weaved the fabric in and out of the braces of the pergola attaching it to the pergola with staples along the top edge.
Not only did the fabric add a ton of color to the space, but it created just the right amount of shade over the back patio without seeming like a full roof over it. We also added some outdoor lighting to the pergola so we can use it more at night too.
After all that color was added to the pergola, I decided we needed a new table with a little color too. We traded out our old rusty table for a new picnic table that is much more functional for little kids. The table came unfinished {we got it at Lowe's for less than $100} and I painted it with a coat of primer and then a coat of {Honeypot from Valspar I think} exterior paint.
To add just a little more color to the patio area, I also painted out white back door with the same yellow color.
Two of our old chairs got a new coat of black spray paint and I recovered the cushions with some of the scraps of outdoor fabric that I used on the pergola.
I've already shared out Outdoor Toy Organizer...
...and my old window turned outdoor wall art.
I also gave our old {and half way broken} patio box a makeover as well. It went from this:
to this:
{I'll share the step by step on how I turned this old patio box into a really cute bench tomorrow.}
We picked up a new light fixture for over the back door and I am still working on a chandelier creation to hang over the picnic table, but for now I am really pleased with how our new patio looks!


Best DIY Project of 2011 Contest - Not JUST A Simple Housewife
Pin It!

Tuesday, June 28, 2011

Outdoor Toy Organization

We have been working on a patio makeover for the last few weeks. One thing that I knew needed to be worked into the new design was better storage of the kids' outside toys. We have a big plastic patio box that previously held all their toys, and while it is convenient to just toss everything into the box, all of the smaller toys seem to constantly get lost at the bottom. So when my mom gave me this {used to be ugly and brown} shelf, I set out to find some kind of container that could withstand the outside elements and three boys!
 After three separate shopping trips to about 10 different stores, I finally found exactly what I was looking for at a small hardware store about 20 miles north of me. I bought 6 galvanized steel buckets at $6 each, then came home and got busy with my Silhouette. I cut out some fun oval shaped labels to correspond with all the little toys that were in the boys' outside toy collection. Now instead of digging in the big patio box for their sand toys, they can take the sand toys bucket off the shelf and head over to the sand box to play:)
 For a decorative touch above the shelf, I added an old window that I embellished with some bright and cheery yellow chevron fabric. I still think it needs a little something, and I really want to add a vinyl quote or saying....I just don't know what just yet!
I am in the process of turning the old plastic patio box into an outdoor bench, and when that is complete the patio will finally be finished and I will share it with you. In the mean time, if anybody has any ideas or suggestions of what I can add to the old window please share them!

Go HERE to see the completed patio makeover.
Visit thecsiproject.com
Pin It!

Friday, June 10, 2011

A Litte About OCD and a Sewing Tip

Hi my name is Kelli and I have OCD:) Well it is actually self diagnosed, first born, rule follower, lover of straight lines OCD, but I'm sure a lot of you understand. And let me just say that the need for perfection and crafting don't always go very well together. I have learned that crafts {or at least my crafts} are far from perfect in most cases....and that is something that can be hard for my straight line loving self to accept.
Sewing has been a crafting Achilles heel for me, mostly because I'm not very good at it and that leads to small imperfections that drive me a little bonkers. I have issues with cutting and sewing straight lines...and lets not even talk about trying to sew in a circle:) As I was working on a project that required me to cut really long straight lines I had an idea...a genius idea that made my straight line loving OCD self very happy!
 I borrowed my hubby's chalk line popper thing that you use for making lines on wood. He assisted me in popping a few lines onto the back side of my fabric...
 ....and look what I ended up with! Perfectly straight lines! I couldn't have been happier wth how straight those lines turned out...or how easy they were to achieve! Now if I could just manage to sew these pieces together in a straight line I will be doing good:)
 And just because he is too cute, here is Eli showing off a little bit of what we have been working on in the back yard for the last few weeks. I'm hoping to finish up this weekend and maybe have a full post about our new patio to share with you next week.


Have a great day and paint something bright yellow this weekend:)
Weekend Bloggy Reading
Pin It!
Related Posts Plugin for WordPress, Blogger...