Today, all I have the energy for is a random post of basically nothing. So here it goes.
We had a good Easter weekend. We stayed SUPER busy and ate way too much junk food and candy. Jason got a ton of stuff done around the house and in the yard. And I spent most of the day Saturday working on Eli's Easter suit. It turned out really cute, and my sewing skills have gotten so much better than the first time I made Henry a suit 5 years ago:) We went to the early church service, came home, and took a few pictures:


Then we ate breakfast, went to visit Jason's family, went to visit my family, and finally back home to take a nap. After a few hours on the couch, I got up and started cleaning my TOTAL wreck of a house. It is sort of cleaned up now...but I still have a lot to do. Mainly, fold the laundry from last week that is still living on the couch!
I did finish up a few other crafty things this weekend. I will post more about this really fun project tomorrow, when I have more energy:) Here is a little hint until then:

My bloggy friend Amanda is having a SUPER giveaway gala all this week, and today she is giving away one of my SUPER cute personalized towels! Go check out her blog and enter to win one of my towels today, and ton of other cute stuff the rest of the week!
I shared this on twitter one day last week, but I won an iPOD Shuffle this week!?! I was so excited! I have won some great stuff from blogs lately, but this is by far my biggest win! I have thought about getting an iPOD before, but just couldn't make myself spend the money on it because it wasn't something I just had to have! But now I am going to have one! YAY! Winning stuff always makes me want to give stuff away too, so be watching for a possible giveaway on my blog soon...maybe when I get to 300 followers:)

I also wanted to link up to this fun meme...just because I have some great pictures to go with her optional prompt of "Your kiddo's first big owie"!
This is Henry when he was almost one year old. I don't really remember exactly what happened, but I think it involved him running on the concrete and then falling head first. It was a huge raw spot on his head, so we coated it with Neosporin and covered it with a bandage.

This picture was taken a week after he first hurt his head, and there is still a pretty big mark {and a bunch of chocolate on his face from his Easter bunny}!

********************************
Okay, I think I have been random enough for one day! Tomorrow I will be back to my normal stick to the subject blogging....I hope I didn't bore you too badly with my whole bunch of not much:)

 So, I made my own magnet board for the kitchen {with a little
  First, we had to decide how big we wanted our magnet board to be. Ours was only going to be a little bit smaller than the precut pieces of metal at Lowes, so Jason brought it home and trimmed it down. I'm pretty sure that they will also cut it to size for you at the store.
 We used some spray adhesive to attach the metal to the side of the kitchen cabinet, and then we attached the frame to the metal piece using the same adhesive. You could also use screws or nails to hold the metal and frame into place depending on where you put it.
  Now the boys have a fun place to play with magnets, and because it is in the kitchen {but not close to the stove} they can play in the kitchen more while I am cooking dinner. Now maybe I can get my tupperware cabinet organized:)


 Then we ate breakfast, went to visit Jason's family, went to visit my family, and finally back home to take a nap. After a few hours on the couch, I got up and started cleaning my TOTAL wreck of a house. It is sort of cleaned up now...but I still have a lot to do. Mainly, fold the laundry from last week that is still living on the couch!
 This picture was taken a week after he first hurt his head, and there is still a pretty big mark {and a bunch of chocolate on his face from his Easter bunny}!


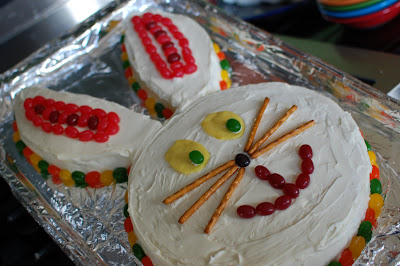
 A simple and easy Bunny Cake perfect for an Easter party!


