Home AboutMe Crafts Food

Tuesday, December 20, 2011

Christmas Initial Tee's

We have a lot of Christmas traditions.
Christmas Eve breakfast and then ornament shopping, getting three gifts from Santa like the three gifts that Baby Jesus received from the Wise Men, making Gingerbread Houses and Cookie Cutter Men {that's what Eli calls gingerbread men}, new Christmas PJ's....and the list goes on and on! 

One tradition I started a few years ago was making the boys a cute new Christmas shirt to wear during all the fun holiday festivities. You can see some of their shirts from years past here, here, and here

This year I decided to go a little bit funky/non-traditional with their shirts, and I think they turned out SUPER cute {though I don't think Jason was very fond of the yellow chevron fabric I used because he said it wasn't really Christmas-y.} Oh well, the boys got a ton of compliments on their shirts when they wore them for pajama day at school last week! Even thought Eli's not in the picture, he has a shirt too...he just didn't want to wear his new pajamas the day that Henry and Grant wore theirs to school:)
I started with some green long sleeve tee's that picked up at Target for around $4. I dug through my fabric stash and found some cute fabrics that would match the boys new Christmas pajama pants. I ended up with yellow & white chevron fabric, red felt, and just a little bit of green & white polka dot fabric. I grabbed a few bowls from the kitchen and used them to trace circle on the chevron fabric and the felt. Then I printed out each of the boys' initials and used spray adhesive to attach them to the polka dot fabric. I layered the circles, added the initial on top, and sewed everything into place. I used spray adhesive to attach the whole thing to the shirts, then I sewed the biggest circle to the shirts. 

 Oh and did I mention I procrastinated these until the night before the boys needed to wear them, so I whipped up three of these in about an hour...yep that's how simple they are to make, and what a huge procrastinator I am! SUPER simple and SUPER cute Christmas Initial Tee's! 
Pin It!

Monday, December 19, 2011

Candy Cane Cupcakes

I signed up to bring cupcakes to Henry's class party last week...mostly because I wanted to try this fun Christmas twist on Rainbow Cupcakes, and I didn't really have any other reason to make cupcakes:) These cupcakes are SUPER easy to make, but can be a little bit tedious...though not as bad the Rainbow ones that have 6 different colors. Food coloring and a little bit of colored sugar sure do make for some cute cupcakes!
Start by mixing up a white cake mix according to the directions and then dividing it into two bowls. I used two boxes of cake mix because I needed a ton of cupcakes}
Use red and white {YES they make white food coloring! I picked mine up at Hobby Lobby for less than $2 a bottle, and the white really does work...though I did end up just pouring the whole bottle into mine!} food coloring to make your batter the color of candy canes:)
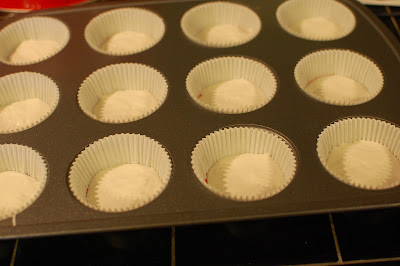
Start with white cupcake wrappers. Add just enough red colored batter to cover the bottom of the cupcake wrapper. 
Then add a layer of the white batter being sure to make the batter completely cover the color underneath.
Continue layering the batter as much as you can until the cupcake is about 2/3 full. I ended up with four layers {red,white,red,white}.
After the cupcakes cooled I iced them with white icing and coated them with red sugar sprinkles...you could also do red icing and even add some crushed candy canes to the top!
When you bite into them, this is what you get:
Not really striped like a candy cane, but still pretty and SUPER impressive to the kiddos:)
Do you make any candy cane themed treats for Christmas!
Pin It!

Thursday, December 15, 2011

Snowman Juice Boxes

Last week when I opened up Grant's backpack there was nice little note from his teacher. It had information about their class Christmas party, and at the bottom it had a little line that said "Can you please send..." You all know that I am kind of an over-achiever when it comes to school treats, so when I saw juice boxes on that little line I was kind of disappointed....until I remembered these cute Mummy and Turkey juice boxes that I had seen earlier in the year! I decided that I wasn't going to just send boring old juice boxes, I was going to rock the juice boxes for Grant's class! I did a little search on Pinterest and surprisingly there were very few {actually I don't think I found any} Christmas themed juice boxes...I'm guessing because most people do the milk and cookies thing! So I brainstormed a few ideas and decided on Snowman Juice Boxes!
 I started by wrapping the front and two sides of the juice box with white cardstock. I decided to leave the back of the juice box uncovered so it would be easy to remove the straw. I measured my juice box, cut the paper to size, applied a few lines of glue dot runner, and then folded the paper onto the juice box. 
 I used my Silhouette to cut out a ton of black circle onto some {Oh My Crafts} vinyl. If you don't have a craft cutter, you could use a circle punch or even a hole punch. I also cut out some cute snowman noses onto some orange paper...I would have used vinyl for that too but I didn't have any orange:) 
 I put the black vinyl circles on the front of the juice box for eyes and a smile and I added the orange noses with a little bit of glue. To finish them off I added a cute scarf to each juice box made out of ribbon and ric rac.
I'm hoping these Snowman Juice Boxes are a hit at Grant's class party tomorrow:)
Pin It!
Related Posts Plugin for WordPress, Blogger...