Home AboutMe Crafts Food

Friday, January 27, 2012

Chocolate-Covered Strawberry Waffles

A few weeks ago, I starting thinking about making some yummy Valentine-ish waffles...fun waffles have kind of become an obsession of mine and I knew I couldn't leave Valentine's out of the mix! The only problem was that I just couldn't figure out a clever way to use my round waffle maker to make anything heart shaped. So I figured instead of making something fun shaped, I would do a combo of ingredients that are classic Valentine flavors. 
Nothing says romantic Valentine's like a yummy chocolate covered strawberry! But lets be honest here, strawberries really aren't in season right now so you will probably either end up with small not so sweet strawberries or you will have to pay a ton of money to order fancy chocolate covered ones that end up not being nearly worth the $40 you spent to have them shipped all the way from California {I don't know this from experience or anything}!
Enter the Chocolate-Covered Strawberry Waffle:
This yummy waffle concoction is made with a strawberry cake mix, so you are guaranteed that yummy strawberry flavor without having to get it shipped from California. You could also make a homemade strawberry cake mix, but then you still run into the problem of strawberries not being in season...so I would just stick to the boxed cake! The only other thing you need is a bag of milk chocolate chips.
Start by mixing up your cake mix according to the directions on the box. Then add in half of your chocolate chips and give them a good stir.
Put the other half of your chocolate chips in a microwave safe bowl and heat them until melted.
Warm up your waffle iron, spray it down with non stick cooking spray, then add your batter to the waffle iron. I use a large cookie scoop {the same one I use to portion out cupcakes}, and it takes a little more than three scoops to fill my waffle iron. Just play around with it until you get the right amount.
Once the waffles are finished cooking, carefully remove them from the waffle iron. They will be a lot softer than a regular waffle because they don't really crisp up...which you don't want anyway because you want a soft fluffy cupcake feel. Let them cool slightly, then drizzle them generously with the chocolate that you melted earlier. You can do that simple with a spoon, or you can put the melted chocolate in a little baggie, cut off the corner and drizzle away. 
I don't really recommend having these waffles for breakfast...they're a little too sweet for breakfast. But they are the perfect dessert to end your romantic Valentine's meal, or maybe a sweet treat to surprise you kids with when they get home from school on February 14th!

Linking up here..
Tatertots and Jello
Serenity Now
Decor Chic
Someday Crafts
Skip to my Lou


Pin It!

Thursday, January 26, 2012

Play-Doh Valentines with Printable Labels

I love Valentine's Day.
Not the cheesy cards or the really expensive roses...but the fact that we have a whole day just to celebrate love! I remember Valentine's Day as a kid being so much fun, especially all the great goodies that we got during our class Valentine's Day party. The first few years that my boys were little, I would pick up a box of generic Valentines and let them give them to a few of their friends. But I soon realized that you could do so much more for Valentine's Day if you think outside the box! Last year I turned some clearance Tootsie Roll banks into a Sweet and Simple Valentine Favor. They turned out really cute, so this year the bar was set kind of high! I started thinking of  Valentine's ideas as soon as the Christmas decorations came down. I toyed with a few different ideas and ended up going with this cute Play-Doh Valentine after I found the 24 pack on sale last week:)
 I picked up two boxes {one for Henry's class and one for Grant's class} of regular sized Play-Doh at Target on sale for $12.99 each. When you do the math the cans of Play-Doh end up only costing a little over 50 cents each. You could also try this with the smaller party sized cans of Play-Doh, but they weren't really much cheaper than the regular sized ones. I created a fun circle label {just the right size for the regular sized Play-Doh lid} that said "Doh" you want to be my Valentine? using a tutorial I found on pinterest. 

{Disclaimer: This is my first attempt at sharing a printable and I'm not really sure what I am doing.}
Just right click on the image below and save it to your computer. Open it up in any editing software and add your kiddos name beside each of the hearts. You could also let them write their name in if you didn't want to edit it. Test print one on a sheet of regular paper first to make sure the circle are the right size for your paper cutter and the Play-Doh lids, then you simple print out as many copies as you need onto sticker paper. The page is formatted to print out on a regular 8.5 X 11 piece of paper. On my computer I have to select fit to printable area to make sure the circles are just the right size.
{A couple of readers have emailed me saying they can't get the printable to work just right when they right click and save. If you are having trouble with it send me an email  & I can send you a copy, contact me at kellibwilson (at) gmail (dot) com.}


Once you get your labels printed, use a 2 inch circle cutter to cut them out.
 Peel off the back of the stickers and place them on the lids of your Play-Doh.
 Then stack them up a take a ton of pictures because they turned out so cute! 
You could also dress them up a little more by adding some pretty ribbon or tulle...but I figured my boys would be happier without the added decoration! 
This really is a fun Valentine to give, and it worked out  perfect that there are 24 cans of Play-Doh in a box and both of my boys have 24 kids in their class. The fun part of the big box of Play-Doh is that their are ton of different colors so the boys can go home with a can of blue or green and the girls can have all the pink ones:)


Linking up here..
Tatertots and Jello
Serenity Now
Decor Chic
Someday Crafts
Skip to my Lou

Pin It!

Tuesday, January 24, 2012

Valentine Chalkboard Candy Boxes

I love a good holiday tradition, and if it involves candy then it's even better:) For Christmas one of my greatest candy memories is getting those cute Lifesaver Books in my stocking, and for Valentine's day nothing says tradition like a little heart shaped box full of chocolates. I remember every year my dad would come home from work with three of those little heart shaped boxes in tow...and even though my sisters and I had been eating candy all day at school, those candy boxes just seemed special. 

But let's be honest here....those store bought heart shaped candy boxes really aren't the cutest thing ever. I mean I took my time and picked out a few of the better looking ones at Target, and they still just really aren't my style. The great thing is, it's easy to make these candy boxes SUPER cute and all it took was a little chalkboard paint to get these:
from these:
 I started with three candy boxes that I picked up at Target for $1 each, chalkboard paint, and a foam brush...easy, peasy!
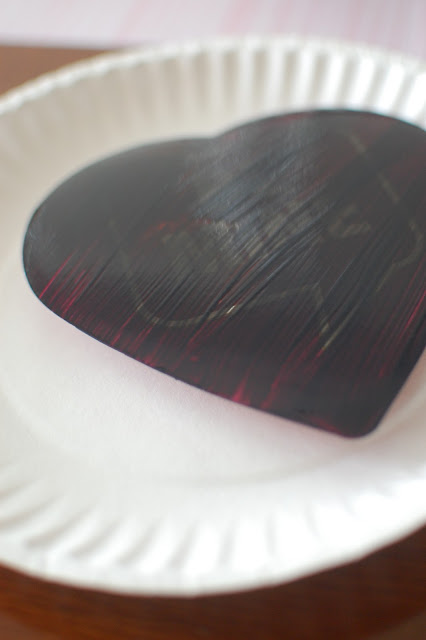
 Take the plastic off your candy box then start painting. I painted a few thin layers of the chalkboard paint with my foam brush. The paint won't adhere great the first couple of coats because more than likely your box will be made of shiny cardboard. Be patient and let each coat dry and then add another. I ended up doing four coats. Here's a picture after the first coat:
 You may have a little bit of warping because of the moisture of the paint, but it's not a big deal just lay the heart flat upside down after it dries to straighten it out. After your paint is completely dry, prime the surface by rubbing chalk all over it and then wiping it off.
 Then grab some chalk and have fun. You can decorate your Valentine Chalkboard Candy Box anyway you like. Add that special someone's name, put a fun Valentine's Day saying, or just draw a bunch of hearts. If you don't like your first design, just erase it and start over:)
I am planning on adding the boys names to a few candy boxes to give them for Valentine's Day. This would also be an adorable teacher's gift with a special message or picture added by your kiddo!


Linking up here..
Tatertots and Jello
Serenity Now
Decor Chic
Someday Crafts
Skip to my Lou

Pin It!
Related Posts Plugin for WordPress, Blogger...