Home AboutMe Crafts Food

Monday, November 12, 2012

Gobble, Gobble: Turkey Waffles (Again)

I truly can't believe that Thanksgiving is only a little more than a week away! It feels like we just got through Halloween, and I really haven't had much time to think about Thanksgiving...so I'm re-posting these fun Thanksgiving waffles that I made for my boys last year!
*******************
I have been brainstorming Thanksgiving ideas for a while now. It's amazing how hard it is to come up with a good waffle idea for a holiday based around food:) I tried to make Cornucopia Waffles with an abundance of M&M's, but all that did was make a huge mess of the waffle iron. So I decided to give Turkey Waffles a try instead. Now I know the name makes them sound kind of gross because seriously who wants savory turkey hiding in their waffles! Don't let the name scare you off...there is not a trace of real turkey in these fun and colorful Thanksgiving waffles:)
I started with the usual suspects...and my usual helper:) 
**waffle mix, food coloring, and Eli**
 Mix up your waffles according to the directions. You will need four waffles total to make two turkeys. By the way, these are sharing waffles...two people per turkey:)
*Start by making one plain waffle.*
*While that waffle is cooking divide your remaining batter into three bowls.*
*Add green, yellow, and orange food coloring each into one of the bowls and stir to combine.* 
*Cook the three colored waffles and then get ready to assemble.*

Start by cutting the plain waffle in half and the colored waffles into quarters.
Lay out the colored waffles in a turkey tail pattern starting with the outside ones{green here} and working your way in. Lay the half plain waffle on top of the turkey tail and adjust as needed. Use one of the leftover yellow quarter waffles to make a beak for your waffle. I simply cut off the pointed edge and added it on top of the plain waffle. 
What kind of fun foods are you making to celebrate Thanksgiving this year?
Pin It!

Friday, November 9, 2012

DIY Disney Shirts for Girls

As soon as I finished making Halloween costumes last week, I got started on these cute {and oh so girly} diy Disney shirts for a friend's little girl who is going to Disney World for the first time! If you've been around here long, you know that I don't often have the opportunity to make cute/pink/girly things since I live in a house full of boys....so I may have gone a little overboard with the pink! I don't think Taylor will be complaining though, specially since this trip to Disney is a surprise and she isn't going to find out until they are getting ready to head to Orlando! Anyway, I had a ton of fun coming up with some fun color combos and different girly things to make for her. I probably could have gone a lot girlier with more ribbon and ruffles, but that just doesn't seem to come natural to me after 8 years of nothing but boy stuff!
This first shirt is just a plain pink shirt with a Mickey head appliqued from some cute fabric left over from a Valentine's craft a few years ago.
This shirt is my favorite for sure! It is a pink felt Mickey head with a gray and white chevron Mickey head on top with a lower case pink felt "t" appliqued on top of that.
The color on this one didn't show up great in the picture, but it is a black shirt with Taylor's name appliqued on from some cute red and white heart fabric {again left over from a Valentine craft}. My favorite part of this shirt is the Mickey head instead of the "O" in her name:)
And you just can't make girly Disney shirts without including Tinkerbell. I made this one with some Silhouette heat transfer material. I found the Tinkerbell shape online and used my Silhouette to cut out Tink. I also cut Taylor's name using the font Waltograph. Then all I did was iron it all onto the shirt! 
This was my last shirt to make, because I really wanted to include a Minnie in the mix but for some reason none of the other shirts seemed very Minnie-ish to me. The black and white chevron on this shirt is from a dishtowel that I picked up at Target a few months ago and I bet you can't guess where the pink and white polka dot fabric is from {yep, it's leftover Valentine's material}:)
All of these shirts were really easy to make. For the most part I printed out my template, cut the fabric out, and then used a zigzag stitch to applique the fabric to the shirts. I didn't include any step by step instructions because I've done that quite a few times {and I was kind of in a hurry to make these before their big trip}, but if you need help shoot me an email {kellibwilson@gmail.com} and I'll be happy to help out any way I can. You can also click HERE to see all the other crafty shirts I've made...I'm pretty sure there are a few step by step posts in the mix somewhere!

Linking up here..
Pin It!

Tuesday, November 6, 2012

Charlotte's Web Spider Web Snack

I saw these really cute spider web snacks {from Sara at Mom Endeavors} around Halloween last year when they were making the rounds on Pinterest. I thought they were absolutely adorable, but with all the stuff that we had going on for Halloween {last year and this year} I never got around to making them. So when I got a note saying Henry's class was having a County Fair to celebrate reading the book Charlotte's Web, I knew this would be the perfect snack to make! They fit in perfectly with their celebration, and they were a big hit with the teachers and the kids!
One of the best things about my version of this snack is that it only takes two ingredients:
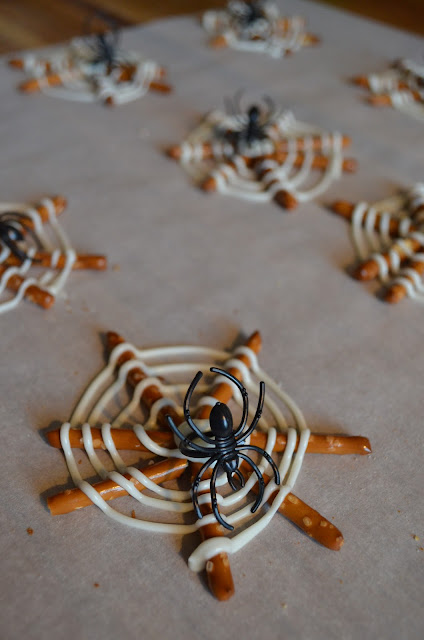
pretzels sticks and white chocolate/vanilla almond bark.
Start by melting your almond bark according to the directions on the package. Then add the melted mixture into a plastic squeeze bottle. I get mine at Walmart. They are Wilton brand and they usually run around $3 for 2 bottles.
Lay out a big sheet of parchment paper and put your pretzels down in a sort of snowflake design. My pretzel sticks were abnormally long so I broke mine in half to make the spider webs a more manageable size. I tried to have 7 to 8 pretzel pieces per spider web so there was plenty of pretzel for the almond bark to attach to.
Gather up some of those fun plastic spider rings.
Use your squeeze bottle to make the spider web onto of the pretzel sticks. Start in the middle and add a pretty big blob of the almond bark to make sure that all the pieces stay together, then work you way to the outside edge of the pretzel sticks in a circular motion.When I first got started I thought it was going to take forever, but it actually went pretty fast once I got the hang of it!
Before your almond bark sets too much, stick a spider ring in the middle making sure to get the ring part down in the almond bark so it attaches well. Then let them set up. Mine took about 30 minutes to be completely  set up and ready to be removed from the parchment paper. I found that the easiest way to lift them was to use an offset spatula and slowly slide it under the spider webs and lift.
When I finished making about 40 spider webs {I made some extras just in case they broke because they are kind of fragile and I didn't want any of the kiddos to have to get a broken spider web.} I used the almond bark that was left in my squeeze bottle to spell out a few of the words that Charlotte had written in her web in the story! It added a little bit more fun to the snack:)

Pin It!
Related Posts Plugin for WordPress, Blogger...