Home AboutMe Crafts Food

Monday, March 11, 2013

Pallet Chicken Coop: Part Two

Things have been crazy busy around here. Between our attempts at starting a farm, my attempt at getting healthy, and all the things that the boys have had going on at school, I really haven't had any time to be creative or crafty! I seriously miss it...but sometimes everyday like comes first. Anyway, our chicken coop project is pretty much complete. The chickens are actually already living in it! These are some pics I took of the rest of our construction of the coop...I will try to add another post later this week with the run so that you can see the whole finished project. If you missed the first part you can check it out here: Pallet Chicken Coop: Part One. And I totally messed up on the name, so the first one says Pallet Chicken Coop and the second one says Project Chicken Coop....oops!
We used two glass front kitchen cabinet doors that we found at the Habitat for Humanity ReStore for the front windows of the coop. Jason cut two holes out of the front of the coop to accommodate the windows.
We added some cozy nesting boxes inside for the when the chickens are ready to lay eggs. I read online that the chickens like for it to be private and dark, so I'm thinking about maybe adding some burlap curtains at some point...it just depends on how much poop they get on everything:)
We added a tin roof with some sheets of corrugated metal.
Jason installed the windows using the hinges that were already attached to the windows.

We added some access doors on the back side of the coop behind the nesting boxes so that it would be easy for the boys to gather eggs.
This is what it looks like with the doors closed.
A closer look at the nesting boxes.Jason added a door on the side of the coop so we can clean it out and access the food and water that he put underneath the coop.

After the whole coop was built with the pallets, we went back and filled in all the gapes with pieces of plywood from the inside. It was pretty easy to do and covering the gapes makes sure that the chickens will stay nice and warm. After we were finished assembling we added all the finishing touches.
********
I painted the whole coop with a mixture of lime and water...kind of like a whitewash effect. We added a door for the chickens to use made from a recycled kitchen door.
I painted the windows, doors, and some of the trim a bright yellow color. It was leftover from our patio project from a few years ago. 


I'll try to get one more shot of the finished project and share the other details that we added to the coop to make if really functional and hopefully really easy to maintain. 

Linking up here..
Pin It!

Wednesday, March 6, 2013

February Recap Via Instagram

Jason started working on our garden at the beginning of February. Our neighbor came over and with his tractor and broke up the ground a little for us.
I worked on lots of Valentine's Day crafts.
 I bought new sunglasses that kind of make me look like a bug:)
 We worked on Valentine boxes for school.
We had family pizza night and the boys got to make their own mini pizzas.
 We headed to North Carolina for a little ski trip during Mardi Gras holiday.
 We ate at a fun crepe restaurant in downtown Asheville.
 We hit the tubing slopes...
 ...and had a blast...
 ...even though most of the snow was man-made!
 We ate yummy Mexican food to warm up after tubing.
 We hit the ski slopes early the next morning...and Eli really enjoyed eating the snow that stuck to his gloves:)
 Grant and I cheesing and skiing:)
I worked on a cute dinosaur shirt for Eli to wear on Valentine's Day.
 Jason worked on the garden some more...
 ...and we got baby chicks!
 Eli and I had a quick Monday of coloring...
 ...and laundry.
 I started using a fun new app called runtastic (that I LOVE) to track my time and distance while jogging.
I babysat Eli's friend for the day.
 For a couple of days we had a farm in our front foyer complete with chicks and veggies:)
 Girls Night Out painting pottery was a blast...and then we went for fro-yo:)
I tried out a recipe for pineapple salsa that ended up tasting pretty good!
 I had a cruddy day and just vegged on the couch watching stuff on my dvr.
 Somebody was good at school and got two treats from the treasure box.
 The county came and paved our road...and the boys had a blast watching all the big equipment.
 I spent my day helping at the book fair...this time of year is always so busy at school!

Pin It!

Friday, March 1, 2013

Treat Round Up for Dr Seuss' Birthday

Dr. Seuss' birthday is tomorrow. I'm not sure if it's because my boys are getting older or because March 2 happens to fall on a Saturday this year, but either way I ALMOST forgot about one of my favorite school celebrations. Luckily I didn't forget and I had time to whip up a few treats for Grant's class {I guess 3rd grade is too old for Dr. Seuss because I don't think Henry's class is doing anything} and time to make a fun lunch for the boys today. Nothing new happening around here this year, but I did put together this round up of a couple of my past Dr. Seuss treats just in case anyone is looking for a fun way to celebrate tomorrow.
Enjoy! 
Pin It!

Wednesday, February 13, 2013

Love at 1st Bite Valentines

Valentine's Day is one of my favorite holidays. It is full of pink and kisses and candy and hearts and sparkle. Basically it's a little girl's dream...and a little boy's nightmare! It can be really hard to come up with Valentine ideas that don't leave boys running for the dirt pile, and I have to admit that in the past I've made my boys suck it up and take pink, girly Valentine's to school. But last year after Halloween when I came across these cute Glow in the Dark teeth on clearance, I knew they would make a really fun and very boyish Valentine!

I started with a couple packs of clearance Glow in the Dark teeth, cute chevron bags, sticker paper, washi tape, and mini candy bars. I designed the cute Love at 1st Bite printable on my Silhouette software and then print and cut them out with my Silhouette. I saved the printable without my boys' names too, so if you have a Silhouette and you want the printable file just send me an email {kellibwilson @ gmail.com}.
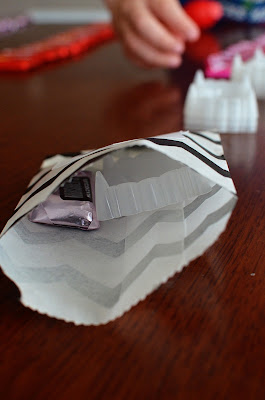
I stuck a sticker onto the cute chevron bags...
...and then stuck in the Glow in the Dark teeth and a mini candy bar. I made the black bags for the boys and the pink ones for the girls.

To close up the bags, I folded over the edge and secured it with a little bit of washi tape.
I think my boys are going to be excited about taking these Valentine's to school tomorrow. They are boyish enough for them, but still really cute and Valentine-like for me {and all the girls in their classes}!
Pin It!

Tuesday, February 12, 2013

In Celebration of Mardi Gras...

{This a re-post from last year.}
Happy Mardi Gras everyone!
Mardi Gras is a fun holiday for us. I know that it's not as big of a deal in other parts of the U.S., but we are right in the middle of  Mardi Gras country! To our east is Mobile, the official birthplace of Mardi Gras, and  to our west is New Orleans, the place best known for it {sometimes} wild Mardi Gras ways! It is such a big holiday were we live, that the kids get three days out of school for it!

We usually celebrate by going to a local {very family friendly} parade. The boys love all the decorated floats, catching beads, listening to the marching bands, and eating yummy Mardi Gras snacks. Besides the traditional King Cake {which must be from the fabulous Paul's Pastry Shop} that we eat every year around Mardi Gras, we also LOVE a Moon Pie. These sweet treats are so yummy, and they are even better if you catch them at a parade! Unfortunately we missed our usual parade because of storms that came through on Saturday...so no parade caught Moon Pies for us! I decided making some homemade ones would be a fun replacement, and I'm sharing the step by step for those of you who can't get your hands on a store bought Moon Pie!
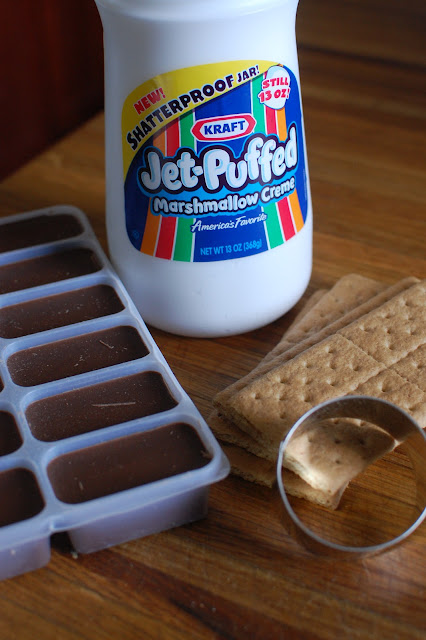
 Start with some really easy ingredients: graham crackers, marshmallow creme, and chocolate. 
 There technically isn't any cooking in this recipe...just melting and assembling:)
Start by using a small round cookie cutter {mine was 2 inches in diameter} to cut your graham crackers into circle. Each cracker should make two rounds.
 Put a good dollop of marshmallow creme on one graham cracker round and then sandwich it together with another cracker. This is easiest to do if you put the marshmallow creme into a ziploc bag and then squeeze it out onto the crackers! Place them in the freezer to chill while you melt the chocolate.
 Toss the graham cracker sandwiches into the melted chocolate and use a fork to turn and coat them. Lift them out of the chocolate and tap off any excess chocolate then place them on foil to harden.
 These aren't exactly the same as a traditional Moon Pie. The crackers are a little bit crunchier, and the chocolate isn't quite the same but they are a pretty close match without a whole lot of effort...and they taste really yummy!
How do you celebrate Mardi Gras?!?
Linking up here..
Tatertots and Jello
Serenity Now
Someday Crafts
Skip to my Lou
Pin It!
Related Posts Plugin for WordPress, Blogger...