Home AboutMe Crafts Food

Monday, April 18, 2011

Adding a Little Spring

I have a love of pretty placemats...but the funny thing is there actually aren't any placemats on the tables in my house. Instead we have placemats on our couch, and now we have placemats on our porch and in our yard!
I saw these really pretty placemats a Target a few weeks ago and knew that they were just the pop of spring color that I was missing in my front yard. I picked up three of them at $2.99 each, and for less than $10 I created a new garden flag and covered two outdoor pillows.  Let me start by saying that these were a little more heavy duty than the placemats I have bought previously, so I have a feeling they were made for outdoor use...and so far so good. 
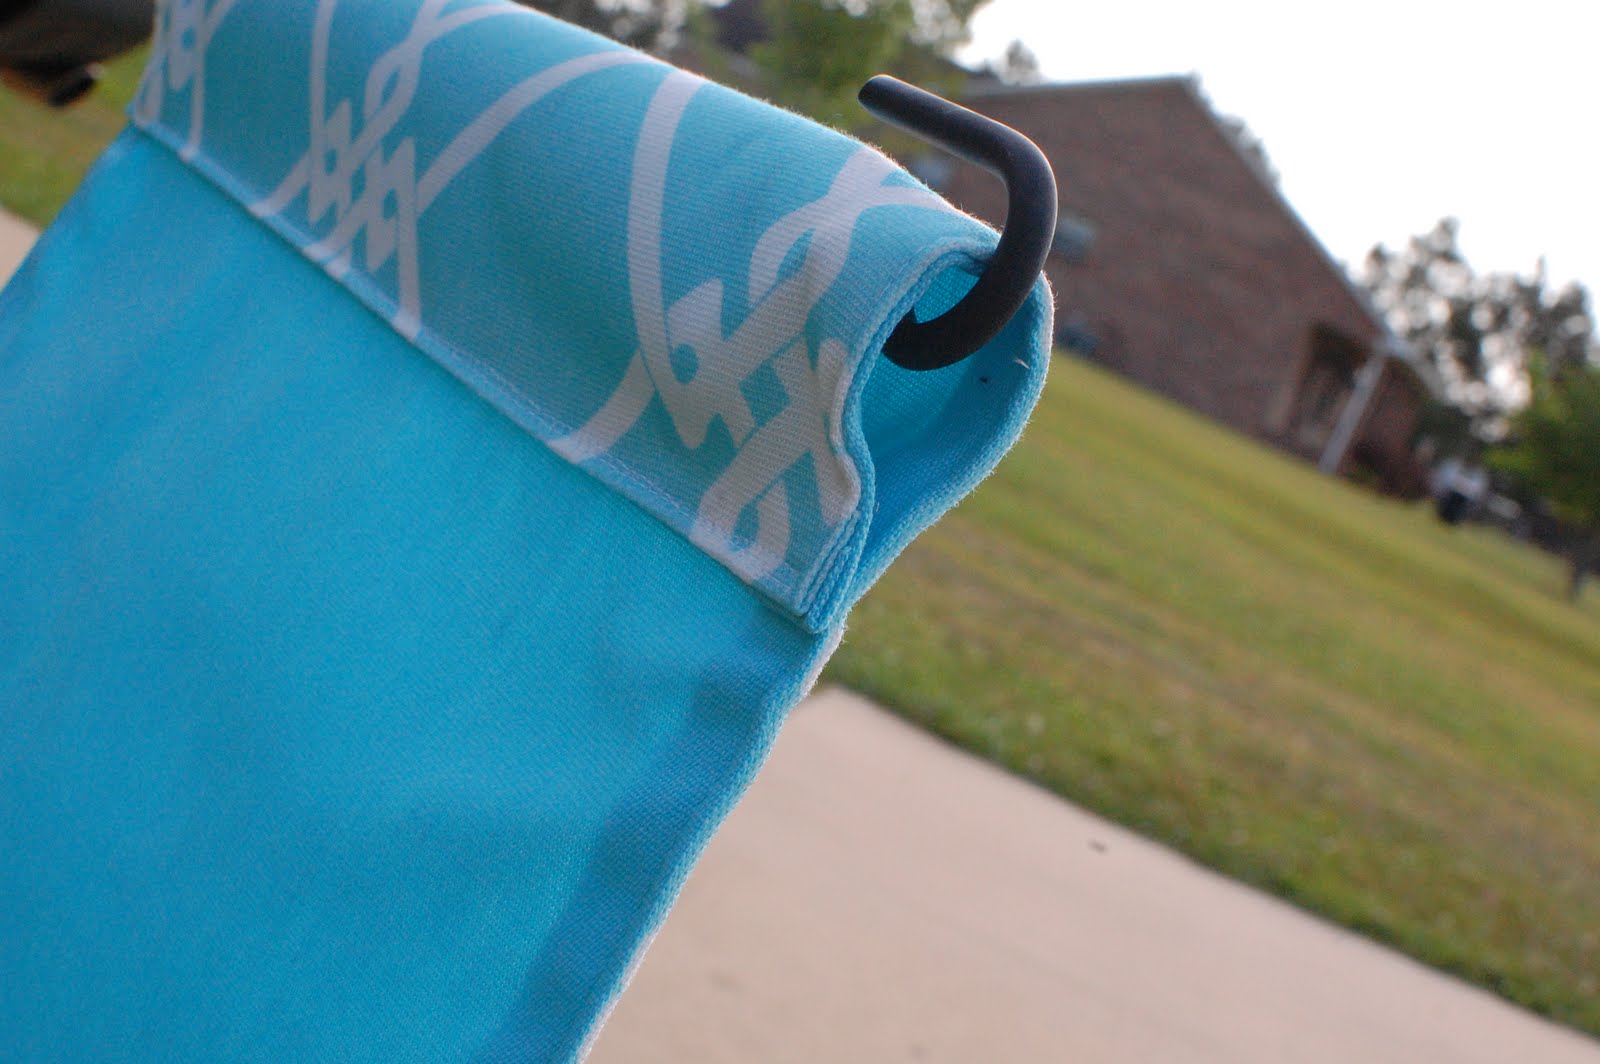
 To make the garden flag, all I did was fold over one of the short ends of the placemat and sew in place making a loop to hang the flag. I didn't add any embellishment to the flag because I love the pattern of the placemat, but you could easily sew or glue on an initial or monogram.
 I also covered my outdoor pillows that sadly still had the black and orange covers on them from fall!
 To cover the pillows, I simply used my seam ripper to take out the seam from on of the short sides of the placemat. Then I slipped the placemat over the pillow and folded down the extra fabric.
I think these were just the thing my front yard needed to get ready for spring!
Pin It!

Friday, April 15, 2011

Dirt Cups

Last week, one of Grant's teacher asked if I would mind bringing Dirt Cups for the kids in his class. I said sure....no problem. The only problem was that I really hadn't ever made Dirt Cups before and I didn't have a recipe! Luckily my lovely blog/twitter friend Angie came to the rescue after I sent out a distress tweet asking for a recipe! She sweetly emailed me a copy of a recipe out of a church cookbook from her childhood! I used her recipe as a base, changed up a few things, and made it times 1 1/2 so that I would have plenty for the almost 30 kiddos in Grant's class!
:Dirt Cups:
2 packages of Oreos
3 8oz. packages of cream cheese
3 cups of powdered sugar
1 large box of instant chocolate pudding
3 cups of milk
12 oz of Cool Whip
gummie worms
::::::::::::::::::::::::::::::::::::::::::::::::::
I started by putting one package of Oreos at a time in my food processor and letting them whirl!
 You want the cookie crumbs to be the texture of real dirt, and that only takes a few seconds in a food processor!
 In my lovely {but oh so old} KitchenAid mixer I added the 3 blocks of cream cheese and the 3 cups of powdered sugar. I slowly incorporated the two so that powdered sugar didn't fly all over my kitchen, then I set it on medium speed and let it go until it was well blended and a little fluffy.
 While that mixture was working, I added my pudding mix and 3 cups of milk into a bowl and whisked them together well to get out any lumps.
 Then I added in my Cool Whip and slowly whisked it in until the mixture was smooth.
 Next I added my pudding/Cool Whip mixture slowly into the cream cheese/powdered sugar mixture. Beat on low until all ingredients are well mixed making sure to scrap the sides of the bowl....the cream cheese mixture likes to hang out on the side of the bowl and not mix in so work it a little!
 The last thing I added to the mixture was about a third of the cookie crumbs from earlier. I didn't really measure, just dumped in enough to give the mixture a little fun texture!
The next part is one of the most important: quality control. Before you serve up this yummy mixture, you really should lick the beater to make sure that it taste just right....or at least that they way we roll at our house:)
 Scoop up the mixture into small clear cups and top the cups with the remaining cookie crumbs and a gummie worm!
 I think the kiddos in Grant's class are learning about insects this week, but this would also be a great snack for Earth Day next week too! It was seriously so yummy that we may be making it again next Friday:)

Visit thecsiproject.com
Pin It!

Thursday, April 14, 2011

$50 Lisa Leonard Designs Giveaway!

This giveaway is now closed. CONGRATS to Michelle!
*************
I am SUPER excited about the giveaway that I have for you today!
Seriously, when I saw the email with Lisa's name on it in my inbox I was SO giddy about gettting to giveaway something...anything from her shop!
Have you seen her shop, Lisa Leonard Designs? If you haven't you should totally stop whatever you are doing right now and go over and check it out {just be prepared to drool over everything}!
***************
Lisa is best know for her gorgeous jewerly which she describes as meaningful, unique, handmade jewelry.
I love her newest piece, the
Molded Heart Necklace...
...and I have been in love with the Family Tree Necklace forever. Maybe if I leave the computer opened to her shop my hubby will catch on and get me something for Mother's Day:)
****************
Lisa not only makes beautiful jewelry, but she also makes home decor like this amazing Keepsake Bowl.
Seriously, who would not want one {or ten} of Lisa's beautiful pieces around their neck or in their homes!
One lucky person is going to win a $50 gift certificate to Lisa Leonard Designs.

 To enter:

Head over to Lisa's shop, look around, then come back and tell me your favorite item.


Follow Random Thougths of a SUPERMOM! and leave a comment telling me that you do.
 
Sign up for Lisa's newsletter and leave a comment telling me you did.

Follow me {@SUPERMOM_Kelli} on twitter and leave a comment telling me that you do.
 
Follow Lisa {@lisaleonard} on twitter and leave a comment telling that you do.

Tweet about this giveaway and include a link to this giveaway in the tweet.
SUPER giveaway from @lisaleonard & @SUPERMOM_Kelli! Check it out at Random Thoughts of a SUPERMOM! !http://tinyurl.com/5rqjqkn


********************
Make sure to leave a comment for each thing that you do. This giveaway is open to U.S. residents only and will end next Friday, April 22nd at midnight CST. I will use random.org to pick a winner! Good Luck and thanks for entering!
Pin It!

Monday, April 11, 2011

Bulldogs, Baseball, Bounce Houses, and a Birthday

To say that we had a busy weekend would be a major understatement! We had a SUPER busy weekend full of lots of fun, and now I am too exhausted to tell you all about it....so instead I'll just share a few pictures!
:bulldogs:

 :baseball:


 :bounce houses:


 :and a birthday:
What kind of fun did you have this weekend?
Pin It!

Friday, April 8, 2011

Featured Friend Friday #4

Hi there, I'm Liz from Sugarplum Creations! When Kelli asked me to be her next Featured Friend I felt honored. And also unworthy. Kelli is a Crafting, Baking, and Bloggy Goddess, wouldn't y'all say?
Anyway, I am a stay at home Mama to three little girls {and another little princess on the way!}. And wife to Jeremy, my childhood sweetheart. We all live waaaay out in the country on twenty acres of land that we share with our dog {a hound}, cat, and some baby chicks and pheasants. We just completed a nearly year-long process of building our dream home, and are so happy to be moved in and semi-settled.

I signed up for a blogger account several years ago, but my poor blog sat neglected until my third daughter was born, two years ago. In all honesty, I wasn't really sure what a blog was for! I quickly found it to be a way to connect with other fabulous ladies for encouragement, support, and wonderful craft and home ideas, as well as a fantastic journal of sorts for my growing family.

In between homeschooling, my girls and I love to find spare moments for photography, shopping {you saw that coming, right? A house full of girls?}, creating snacks in the kitchen:

Crafting:

and jewelry making:

As if our days weren't full enough, I just opened my Etsy shop back up. At one time I had it stocked full of special gifts for babies and children, but have since switched over to photography ~ a passion I've had for years, and have just recently begun to make time for again. I love capturing moments and freezing them in time. I think it's so important to snap pictures daily. An otherwise ordinary grocery shopping trip deserves documentation too! :) Life's everyday moments are so special, yet often overlooked.


Thanks for reading, and please, stop by Sugarplum Creations and Sugarplum Dreams! And Kelli, thanks so much for having me! You're the greatest!!
******************
Liz is an awesome momma with some really cute little girlies! I would love to join them for a mani/pedi day:) Head over to Sugarplum Creations and leave some comment love for Liz and don't forget to check out her Etsy shop too!
Pin It!

Thursday, April 7, 2011

Paper Mache Easter Eggs: Non-Wreath Door Decor

Paper Mache! A bunch of you smart people guessed correctly that we were working on a paper mache project from my Crafty Sneak Peek yesterday!
**************
We started our project with some old newspapers, glue, and a giant plastic Easter egg that I picked up at Hobby Lobby. That was the only thing I could think of to use as a mold for our paper mache eggs, so I used a 40% off coupon and got it and two smaller eggs for around $12. Henry helped me tear up the strips of newspaper, then all three boys got their hands {and the rest of their bodies} dirty helping me cover the giant plastic Easter egg with the strips of newspaper coated in a mixture of water and glue. We put on about three layers of newsprint, then they got bored and ran off:)
After the newsprint layers were dry, I added a layer of torn up white printer paper....that way I could just glitter right over the white paper without painting, but the white paper also makes painting a little easier too.
After drying for two days, Jason carefully cut all the way around the egg with a blade and popped the two paper mache egg halves off the plastic egg. Now it was time to pretty up my eggs:) I got out some Martha Stewart glitter, glue, a foam brush, and a few pieces of wax paper to catch the excess glitter.
I poured the glue onto the egg, spread it around with a foam brush,and then sprinkled on the glitter as evenly as possible. I worked section by section and let each color dry well so that when I was shaking off the excess glitter the colors didn't mix.
After the eggs were pretty well coated with glitter I took them outside and sprayed them down with a clear coat to protect it from moisture and to keep the glitter from getting on everything!
After the clear coat was dry, I used my hot glue gun to add some decorative rick rack between the different colors of glitter.
The last thing I did was poke a small hole through the top of the egg to add a piece of ribbon for hanging. I tied a bow at the top of the ribbon and then tied a double knot at the end of the ribbon inside the egg to keep it in place.
And here they are fun and sparkly hanging on my front door!
I love that they are different than a normal wreath and I love that my kids actually got to help me make them...they just didn't get to help with the glitter part {it was messy enough without them helping}!

How do you decorate for Easter?
Visit thecsiproject.com
Pin It!

Tuesday, April 5, 2011

Master Bedroom Redo: Halfway There

In June of this year, we will have been in our house for 7 years. And for the most part our house has stayed pretty much the same. We have added new pieces of furniture here and there. Jason made a few built-ins to make life with three kiddos a little more organized. Most of the rooms in our house have stayed the same colors that we painted when we first moved in....partly because we love the colors we choose and partly because our ten foot ceilings make repainting a major affair. 

However, as we get closer to the anniversary of our moving in I think I am starting to get the "7 Year Itch"! I have more than a few projects on my mind {including a playroom makeover, under stair storage, and a breakfast nook bench} BUT the major thing that I really want to redo right now is our master bedroom. Maybe it's because we just recently rearranged some furniture and added an armoire to our bedroom, or maybe it' because our old bedding was getting tired...either way, last week I set out to make a few changes in our master bedroom.
Before:
The before is not too terrible. I really like the color of our walls and the bedding was a great match....kind of neutral with just the right shade of turquoise in it. However, you can tell that our bedding has seen better days, and after at least four years of rough and tumble boys who think mommy and daddy's bed is a trampoline....it really needed to go. My dilemma when picking out new bedding was the fact that I knew Jason didn't want to repaint, and I really wanted to change up the color palette a little bit.
After:
After finding this black and white bedding at Target, I decided that maybe adding in a little red was just the right way to change up the color in our room. I also worked on removing as much of the brown and tan colors as possible {like the lampshade}. I think the contrast between the walls and the bedding is too strong, so I still need to find some pillows to help incorporate the wall color onto the bed....and I think I need to add a little bit of red to the wall too. All in all I think I am off to a good start, but I am keeping all my packaging and receipts just in case I change my mind:)
*************
So what do you think?!? Good change, or not so great?
I would love some suggestions on other ways to change up the room or specific fabrics or bedding that you think might look great in this space.
Pin It!
Related Posts Plugin for WordPress, Blogger...