Home AboutMe Crafts Food

Monday, November 14, 2011

Using Actions for Photoshop Elements to Edit Your Photos

I've had a DSLR camera for a few years now, and having a nicer camera {even though mine is the the bottom of the line Nikon D40} really has improved my photos. Besides the fact that the quality of the photo is better, having a DSLR makes me think out the composition and lighting of my photos a lot more than when I simply used a point and shoot digital camera. But having a good camera is only the first step in taking great photos...you also have to know how to edit pictures to get the most out of each shot!

There are more than a few editing programs out there, some are outrageously expensive and some {like the one I have} are more affordable. I use Photoshop Elements for all my editing. I bought it when we got our new laptop a few years ago, and I think it cost somewhere between $80 and $100. The only problem with photo editing programs is you really need to know how to use a them to get the most out of them...and it can be quite complicated to figure out!

My biggest help in using PSE to edit my photos was when I discovered Actions! And even better I found some really awesome FREE Actions! I've downloaded free Actions from two websites {and I'm sure there are lots more out there too} : The CoffeeShop Blog and The Pioneer Woman. Having these actions has really helped me improve my pictures! I love all the different options that both of these websites provide, and I love the different feel you can get just by clicking a few buttons!

Just to show you what Actions can do for your photos, here are a few straight out the camera shots along with some shot that I edited with the free PSE Actions that I downloaded. I am not an expert with these by any means, and I honestly can't remember the names of the Actions that I used for each picture. I usually just click an Action and see how I like it with the photo. If I don't like it, I just click undo and start over. These next three photos were all edited with The Pioneer Woman Actions, but you can see some photos that I edited with The CoffeeShop Blog Actions HERE.

                             SOOC                                                                              Edited with PSE Actions
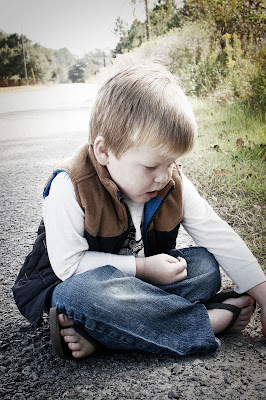


{{Can you tell I like taking pictures in this spot!}}
I'm sure there are a few professional photographers cringing at my overeditednotverygood photos, but I think they look pretty great for a self taught phtotographer with SUPER squirmy kids! IF you are looking for a way to edit your photos without blowing the bank {or blowing your mind}, check out PSE. The abundance of free downloadable Actions totally make Photoshop Elements worth the initial cost.

{FYI I wasn't paid to share any of this with you even thought I know it sounds kind of like a sales pitch:) I really have been having a ton of fun editing my picture {including the photos that I used with my Thankful Photo Decor} with these free Actions lately and I thought you might want to know about them too!}

Pin It!

Friday, November 11, 2011

Friday Flashback: Craft Edition

**This is a re-post from last year. I have been looking for some great Thanksgiving shirt inspiration for this year, so I figured I would share one of my Thanksgiving shirts for last year in case anyone wants to attempt it for their kiddo!**

I have seen a ton of cute turkey shirts for Thanksgiving floating around the internet lately. I had intentions of making my boys a cute turkey shirt, but was really wishing I could make something a little different and a little more fun instead.

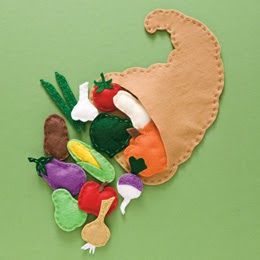
The Shirt of Plenty is what I ended up with after a TON of inspiration {and a template} from Family Fun magazine.
This is the original craft shared in the November issue of Family Fun...SUPER cute Thanksgiving themed felt food. I simply decided to turn my felt food into a shirt instead of making a toy:)
The first step in making this SUPER cute shirt is to print the templates and cut them out. Sometimes the template calls for two of each shape, but you usually only need one.
Use spray adhesive and stick the cut out shapes to different colors of felt. You can mix and match however you want, or follow the suggestions on the templates.
Then add iron-on adhesive to the backside of the felt following the directions on the package.
Cut out the shapes following the template, then remove the paper and the iron-on adhesive backing.
Lay out your design on the shirt and decide where you want each piece to be. Iron the pieces onto the shirt following the directions on your package of iron on adhesive.
The finally step to making The Shirt of Plenty is the most tedious and time consuming....but it also makes a big difference in the appearance of the shirt. Using coordinating colors of embroidery thread, go around the edges of each piece of felt with a running stitch. Make sure to tie off each end of the embroidery thread well, so that the felt pieces stay securely attached.
And that is how you make a SUPER cute Thanksgiving shirt!
Now if I can only find the time {and energy} to make two more:)
Pin It!

Thursday, November 10, 2011

Organizing the Laundry

I know I'm not the only mom who despises laundry. I think between the monotony of folding and the fact that it's a never ending cycle of clean & dirty, most moms would love to have someone else take care of the laundry for their family! But like me, just because you hate to do it doesn't mean you can get way with not doing it! Sure if you're J. Lo or someotheroverpaidfamouspersonwhoneverhastodotheirownlaundry the laundry probably seems like a joy...drop it off and it comes back clean and folded and you didn't have to do any of the work! But in my house laundry is work, and the best way to make work easier is to be organized.

We've had the dirty clothes part organized for a while thanks to this lovely creation that I bought at Walmart a few years ago.
 My organizational issues with laundry start after the clean clothes come out of the dryer. We have spent the last few years with just two laundry baskets. You can do the math and probably figure out that two laundry baskets for five people just doesn't work very well. And most of the time the clean clothes end up piled on the couch {and the chair} kind of like this...except this is a much smaller pile than normal:)
 So I decided it was time to get my clean clothes organized by simply buying a few new laundry baskets. My original intentions were to find some fun colored baskets {ideally in blue, green, and orange to continue our tradition of color coding}, but Walmart and Target didn't seem to get the memo and only had either black or white baskets. I decided on black mostly because they seemed a little more sturdy, but also because they seemed a little more formal too...you know just in case I wanted to leave them sitting around full of laundry when we have guests over!
 Now I had three identical black baskets, and I knew that would be an issue. It is is a lot harder for my kiddos to find their clean {wrinkled} clothes if they don't know which basket is theirs. My simple solution was to cut a few pieces of ribbon {blue, green, and orange} and tie them to the handles of the laundry baskets. Now everyone knows which basket is theirs without digging through a basket for 10 minutes while looking for clean underwear!
Do you have any simple solutions for making the dreaded task of laundry easier? Please share them with me....I need all the help I can get when it comes to the laundry!
Weekend Bloggy Reading
Pin It!
Related Posts Plugin for WordPress, Blogger...