Home AboutMe Crafts Food
Showing posts with label Food. Show all posts

Monday, August 13, 2012

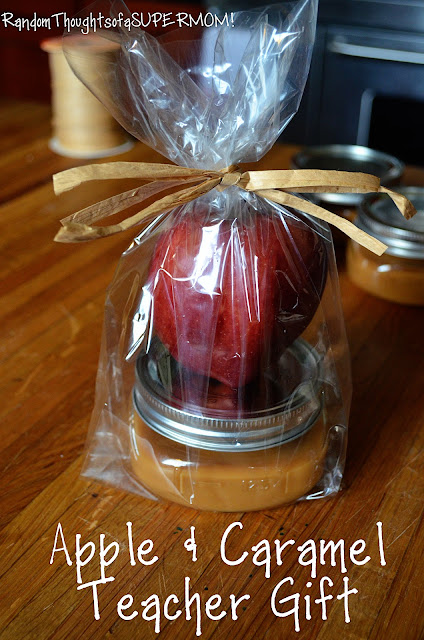
Back to School Apple and Caramel Teacher Gift

My boys have been in school for a full week now. It doesn't seem like the summer should be over yet, but it is and we are slowly getting back into the groove of school and homework and lots of school papers. If you have been around my blog long, you know that I love to send little happies to my boys' teachers throughout the year just to let them know how much we appreciate all they do. So the boys ended their first week of school by taking their teachers these cute and {oh so simple} Back to School Apple and Caramel Teacher Gifts!
I looked all over the internet and Pinterest trying to find a quick and easy recipe for caramel dip. There are a ton of recipes out there, but the best one I found came for the adorable Alisa at The Sweet Life. It is so simple that it only calls for two ingredients: store bought caramels and a can of sweeten condensed milk!
The original recipe called for a bag of caramel bits, but our local grocery store didn't have them so we improvised a little. We used two small bags of caramel squares, and I'm pretty sure one big bag would be fine in this recipe too. I got a little assistance unwrapping all those caramel squares from two very excited helpers:)
Then I opened up this can of deliciousness and tried not to eat the whole thing with a spoon before it made it into my recipe!
I put the two ingredients into a microwave safe bowl, gave them a little stir, and then heated it in one minute intervals until it was melty and combined.
I poured the caramel dip into cute half pint mason jars. One batch of this caramel dip was just enough to fill four of this size jar.
I let the caramel cool a little, then I placed it in the bottom of a clear gift bag. I topped it off with a pretty red apple and tied the whole thing off with a little bit of raffia. You could tie on a cute tag, but we were running out of time and I thought it was plenty cute enough even without a tag!
This is a fun way to say thanks to your kiddo's teacher for all their hard work, and it's a great way to give that quintessential apple gift to the teacher without being just a boring old apple!

Linking up here..
Pin It!

Friday, August 10, 2012

Back to School Apple Waffles

August means back to school time around here...and back to school time means I plenty of excuses to make fun foods and crafts for my boys and their classes! Apples are one of the first things I think about when I think about back to school, so I figured what would be a better back to school breakfast than apple waffles?!? The fun thing about these yummy Back to School Apple Waffles is that they not only look like an apple, but they {sort of} taste like on too!
Start with a waffle mix, two apples, red food coloring, and a handful of gummy worms. I also ended up using a pretzel for the stem but it didn't make it into the first picture:)
First peel and grate your apples. I used two Granny Smith apples because that is what we had, but you can use any kind and any amount that you would like.
Mix your waffle batter according to the directions on the box, then toss in the grated apple pieces.
Add in a pretty good amount of red food coloring and stir.
{I totally forget to take a picture after I added the red food coloring, so just pretend this is just a picture of waffle batter with red food coloring instead of being a picture of red and green batter from when I made Watermelon Waffles last year!}
After your waffle is cooked and cooled a little, you can add the fun embellishments to make it look like an apple. I added a broken piece of pretzel for the stem, a small piece of green gummy worm for the leaf, and then best part: a yummy gummy worm coming out of one of the waffle holes:)
So if you are looking for a fun and sort of healthy {remember all that grated apple we added} breakfast to whip up for your kiddos on the first day of school {or maybe the fourth day like us}, try out these yummy Back to School Apple Waffles!
Linking up here..
Pin It!

Tuesday, July 24, 2012

Olympic Ring Waffles

The 2012 Summer Olympics start this Friday, and we are getting excited about it at our house! We started working on learning a few different flags from the Olympic nations, we've set our dvr to record our favorite events, and we picked up exotic snacks from different countries to enjoy while we watch some of the world's best athletes compete. AND to get us even more in the Olympic spirit, I had to try my hand as some Olympic themed waffles to celebrate the games this year! I ended up with these fun and easy Olympic Ring Waffles that would be the perfect "breakfast for dinner" while watching the Opening Ceremonies this Friday!
Start with waffle batter divided into five bowls. I usually make my waffles from a box mix, but I decided to try out a homemade recipe {that was way more than five servings} so I just measured about 3/4 cup into each bowl.
Then color each bowl one of the colors from the Olympic Rings symbol. I used green, yellow, red, and blue food coloring for those colored rings, but I used cocoa powder for the black ring just because I didn't think a black waffle would be very appetizing:)
Stir the batter up well to make sure the color is incorporated good, then cook your waffles according to the directions on your recipe/package of waffle mix.
Remove your waffles from the waffle iron and let them cool slightly. Use a 3 inch circle cookie cutter to cut out the center of each waffle. If you don't have a circle cookie cutter you could use the lid to a mason jar or even a small cup or bowl. 
After you get all the centers cut out, line up your colorful waffles like the Olympic Rings and see if anyone in your family can tell what you made:) Henry figured it out pretty quickly, but I that was because he saw the webpage I had opened to make sure that I lined the waffles up correctly:)
Pin It!

Monday, July 16, 2012

Candy Bar Ice Cream Pie

We love ice cream any time of the year, but we REALLY love ice cream in the summer when it's hot outside! We've been thought quite a few ice cream containers this summer making sundaes, banana splits, and root beer floats. This weekend I decided to try something a little different with our ice cream, and I ended up with a SUPER yummy and SUPER simple to make Candy Bar Ice Cream Pie!
 Start with a regular pie crust baked according to the directions on the package. You could also use a graham cracker crust or other kind of crust...an Oreo one would be really yummy with this.
 Scoop some ice cream into a bowl. We used plain old vanilla, but you could mix it up and try chocolate or maybe even coffee. Just estimate about how much you think you need to fill up your crust.
 Unwrap a variety of candy bars. I used the little snack sized Snickers, Reese's Cups, and Kit Kat.
 Chop up your candy and add it to the bowl of ice cream. You can also add in some mini M&M's just to make things more colorful and interesting:)
 Give your ice cream a good stir....
 ...then add it to your crust. I topped mine with a whole Reese's Cup. You could also add sprinkles or even a drizzle of chocolate syrup.
Place your candy bar ice cream pie in the freezer for a few hours or until it has hardened enough to cut into slices. Serve and enjoy on a hot summer day!

Linking up here..
Pin It!

Wednesday, June 27, 2012

Star Spangled Waffle

The 4th of July is in one week! I seriously can't believe that June is almost over and we are moving on to July! I am still working on recovering from our big roadtrip {I'm just now getting around to washing the sheets & blankets from the Airstream!}, so life has kind of just been floating by. We did do a little to celebrate Father's Day, but I completely skipped over my birthday except for Jason making me a peach cobbler. I haven't even thought about getting out all my fun 4th of July decorations. But I did decided to break out the waffle maker and work on some patriotic waffles this week. The colors didn't end up quite like I wanted and the star isn't as prominent as I was hoping, but they still kind of worked. I usually end up cutting the boys' waffles so their plates are always a jumbled mess of colored waffles anyway:)
 Start with the usual suspects: waffle mix and food coloring...you will also need a metal star shaped cookie cutter.
 Mix your batter according to the directions on the box.
 Divide the batter into two bowls. Make one bowl of batter blue and the other red.
 Pour on your first color and let it set up for a few seconds. Then place your cookie cutter in the center of the waffle iron and fill it up with the second color. Make sure all the way to the edge and inside all the points of the star. I made some waffles that were blue with red stars...


...and some that were red with blue stars.

Carefully pick up the cookie cutter. 

 I wish that the colors would have turned out a little better...and that the star was a little more noticeable. Maybe I'll try them again with a white star so that you can see it better! Even though these weren't as successful as I would have liked, the concept of using a cookie cutter to make a shape in your waffles is kind of fun and I think we will be doing it again soon!
Pin It!

Tuesday, May 1, 2012

Roadtrip Ready: Travel Snack Boxes


Welcome to day one of my new series Roadtrip Ready! I am so excited to share all of my fun roadtrip ideas, and few of my friends' great ideas as well. Today I am sharing a fun idea inspired by a project I saw on Pinterest. The idea behind these travel snack boxes is that each kid gets a box full of snacks at the beginning of the your trip. They get to eat the snacks any way they want...all at once or spread out through the day...but when it's gone, it's gone! It's a great idea, but I took it one step further by adding a fun chalkboard to the top. Now it's entertainment and snack in one!
I started with these divided boxes that I picked up at Ikea for about $4 each. You can find similar boxes at the hardware store or the craft store. 
I added a piece of chalkboard vinyl to the top of the boxes. I was careful not to cover up the places on top where the boxes stack on top of each other...that way they are easier to store when not in use.
Then I cut the boys' names out with  my Silhouette and added the names to the top of the boxes.
Henry got blue, Grant got green, but Eli ended up with yellow because I didn't have any orange vinyl. 
The great thing about these boxes is that you can fill them up with anything you want. That means they can be way more healthy {and a lot cheaper} than all those gas station snacks! I added a bottle of water and a yogurt in the large compartment. To keep things cool longer, you can freeze both of these. Then I filled up the boys' boxes with a variety of snacks: blueberries, carrots, almonds, Oreos, animal crackers, and pretzels. The possibilities are endless!
And when the kiddos start chanting "I'm bored" all you have to do is hand them a piece of chalk! That should keep them busy for about ten minutes a while:)
What kind of snacks do you like to take on roadtrips?

Linking up here..
Pin It!

Friday, April 27, 2012

Strawberry Tallcake

Jason's birthday was last week. We really don't make a big deal about our birthdays anymore. It seems like once you have kids, their birthdays are fun and your birthdays just mean you are getting older:) Even though we don't do much, I do always make some kind of special cake for my hubby. I've made some fun cakes for my hubby over the years, like a Krispy Kreme donut cake and an Oreo cake {which I apparently didn't blog about}. But this year he wanted something different...something from our past that we both loved: Strawberry Tallcake! Do any of you remember this SUPER delicious treat that they had on the menu at Ruby Tuesdays a few years ago. It must have been really popular when Jason and I were dating and in college, because I remember a ton of times that we went and order just a Strawberry Tallcake with two spoons as a special treat. 
The recipe to make this Strawberry Tallcake is a little complicated. It was kind of a lot of work, but it was so worth it! Basically it's sponge cake layered with a strawberry mouse then topped with strawberry syrup, ice cream, and whipped cream. Getting to the assembling and layering part takes quite a few steps....BUT this cake seriously tasted just like the Strawberry Tallcakes that Ruby Tuesday used to bring to our table in a huge glass goblet.
I found the recipe HERE.
Sponge cake:
5 eggs, separated
1 1/2 cups sugar
1/2 cup cold water
2 tsp vanilla
1 1/2 cups AP flour
1/2 tsp baking powder
1/2 tsp salt
1/2 tsp cream of tartar


1. Preheat oven to 350 degrees
2. Beat the egg yolks until they are creamy and lighter yellow. Add in the sugar and blend well. Add water and vanilla mix until combined.
3. Sift together flour, baking powder, and salt and add it to the yolk mixture. Mix well until the batter is smooth. In a separate bowl, beat the egg white until smooth, then add the cream of tartar. Continue beating until the egg whites are stiff and form peaks. Fold the egg whites into the batter and mix slowly until well combined. 
4. Pour the batter into an ungreased 17X11 cookie sheet and bake for 25 to 30 minutes or until the top of the cake is a light brown color. 

Strawberry Mousse and Syrup:
10 oz package of frozen strawberries in syrup
1 3/4 cups of water
3 oz. package of strawberry Jell-O
1 cup of heavy cream

    1. Defrost the frozen strawberries and pour the entire package, including syrup, into a blender and puree for 10 to 15 seconds until smooth. Combine  puree with 1 1/2 cups of the water in a small saucepan over medium heat. When the strawberry mixture comes to a boil, add the entire package of Jell-O, stir to dissolve, and remove the pan from the heat to cool. When the strawberry mixture has cooled to room temperature, divide it in half into two medium bowls.
    2. Beat the whipping cream until it is thick and forms peaks. Fold the cream into one of the bowls of the strawberry mixture until well combined. This is your strawberry mousse. Cover and chill. To the other bowl, add the remaining 1/4 cup of water. This is the strawberry syrup. Cover and chill this mixture as well.
After the cake has cooled and the mousse and syrup have been chilled, you are ready to started assembling your Strawberry Tallcake. Divide the cake into three even pieces. Put down the first cake section, cover it with half of the mousse mixture. Add another cake section and cover it with the rest of the mousse mixture. Top the whole thing off with the last section of cake. {You could also make these individual sized by cutting small circles of cake and layering them with the mousse.} The layered cake can be refrigerated for a few days until you are ready to serve the cake. To serve, cut a piece of cake and place it in a bowl or large goblet. Top it with a couple of scoops of vanilla ice cream, a drizzle of the strawberry syrup, and a good squirt of whipped cream.
{Recipe adapted from recipecircus.com}
Pin It!

Wednesday, April 18, 2012

Earth Day Waffles

Earth Day is this Sunday, and I thought it would be fun to whip up some waffles to celebrate. I have to admit though that other than the fact that these waffles look {a little bit} like the earth, there isn't anything really "earthy" about them. As I was mixing in the food coloring to make the blue and green batter, I realized that it would have been much more "earthy" for me to use fruits and veggies to dye the batter. So if you really want to celebrate Earth Day the right way with these waffles break out the blueberries and spinach...or you can be like me and just add in a little dye and enjoy the pretty colors:)
 I started by mixing up some store bought waffle mix according to the package directions. Again if you want to be extra "earthy" make your own homemade waffle mix...and I guess you could even grind your own flour too if you REALLY want to be "earthy"!
 Divide the batter into two bowls pretty evenly...even though there is way more water than land on our planet it is a lot easier just to put equal amounts of both colors onto the waffle iron:) Then add a little bit of green {either food coloring or pureed spinach} to one bowl and a little bit of blue {either food coloring or pureed blueberries} to the other bowl. Let your little assistant give each bowl a good stir with a whisk until you get the color that you want.


Spray your preheated waffle iron with non-stick spray and add the batter onto the waffle iron. You can just pour it on and spread it around or you can really try to make it look like a view of the Earth. I tried to make mine look like the Earth...can you see North & South American on the left, a little bit of Europe on the top right, and Australia on the bottom right?!? After you've added your batter cook your waffles on a pretty low setting to prevent it from browning too much. 
Our waffles ended up getting a little more brown than I wanted, but I just called it dirt and took a few pictures to share with you:) They tasted the same even if we had to pretend that the brown parts were dirt!
I think these is going to be my boys' after school snack today and then maybe we will work on a recycling project to really get us in the Earth Day mood!

Do you do anything to celebrate Earth Day?
Linking up here..
Pin It!
Related Posts Plugin for WordPress, Blogger...