Home AboutMe Crafts Food
Showing posts with label Friday Flashback. Show all posts

Friday, November 11, 2011

Friday Flashback: Craft Edition

**This is a re-post from last year. I have been looking for some great Thanksgiving shirt inspiration for this year, so I figured I would share one of my Thanksgiving shirts for last year in case anyone wants to attempt it for their kiddo!**

I have seen a ton of cute turkey shirts for Thanksgiving floating around the internet lately. I had intentions of making my boys a cute turkey shirt, but was really wishing I could make something a little different and a little more fun instead.

The Shirt of Plenty is what I ended up with after a TON of inspiration {and a template} from Family Fun magazine.
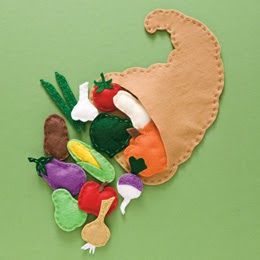
This is the original craft shared in the November issue of Family Fun...SUPER cute Thanksgiving themed felt food. I simply decided to turn my felt food into a shirt instead of making a toy:)
The first step in making this SUPER cute shirt is to print the templates and cut them out. Sometimes the template calls for two of each shape, but you usually only need one.
Use spray adhesive and stick the cut out shapes to different colors of felt. You can mix and match however you want, or follow the suggestions on the templates.
Then add iron-on adhesive to the backside of the felt following the directions on the package.
Cut out the shapes following the template, then remove the paper and the iron-on adhesive backing.
Lay out your design on the shirt and decide where you want each piece to be. Iron the pieces onto the shirt following the directions on your package of iron on adhesive.
The finally step to making The Shirt of Plenty is the most tedious and time consuming....but it also makes a big difference in the appearance of the shirt. Using coordinating colors of embroidery thread, go around the edges of each piece of felt with a running stitch. Make sure to tie off each end of the embroidery thread well, so that the felt pieces stay securely attached.
And that is how you make a SUPER cute Thanksgiving shirt!
Now if I can only find the time {and energy} to make two more:)
Pin It!

Friday, October 28, 2011

Friday Flashback: Candy Corn Edition

I love decorating with stuff that can be used for multiple seasons and holidays. I love that instead of sitting in the attic for 11 months out of the year, that I can change some of my decor up and use it year round. So when I started working on new decorations for Halloween/fall I knew I could figure out a way to makes something that would work for Christmas, Valentine's Day, and maybe even Easter.

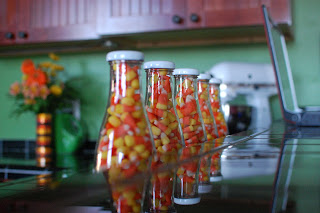
I started with some clear glass bottles that I have been saving for three years. I knew at some point I would find a good use for them:)
 I used my Cricut and cut out some vinyl letters.
 I used some transfer paper to attach the letters to the clear glass bottles.
 I lined the bottles up to make sure that the letters were even...the "d" is a little high, but not enough to worry about.
 I spray painted the lids white so they would match almost any holiday decor.
 Then I filled the bottles up with CANDY CORN...
 ...and lined them up on my kitchen counter.

This was a SUPER inexpensive project...all I really bought was the candy corn. Now when fall is over and Christmas decorations start going up, all I will have to do is empty out the candy corn and add in some red, green, and white M &M's!

**This is a post from last year that has been one of my most popular through the year. I actually have the same jars sitting on my counter right now...they just aren't filled with candy!**
Pin It!

Friday, October 7, 2011

Friday Flashback: Food Edition

PUMPKIN JIGGLERS
**It's another Flashback Post! This is a fun recipe that I shared last year. We are definitely going to be making these again this year because they were a huge hit with my boys! Enjoy**


Jello Jigglers
& pumpkin cookie cutters
 make SUPER easy
and SUPER fun
fall treats
for everyone to eat!

What kind of fun Halloween/fall snacks have you been making?!?
Pin It!

Friday, September 23, 2011

Friday Flashback: Craft Edition

**I haven't been very crafty latley, so I'm sharing a little flashback craft. This fun Mod Podge project was originally posted back in November of 2009.**
*******
Fall Mod Podge Pumpkins
This is how our project ended:
Despite the major mess and the {now} dry and scratchy carpet, our Thanksgiving/fall pumpkins turned out SUPER cute!

Just in case you want to make a HUGE mess and some SUPER cute pumpkins...here is the list of supplies and steps we followed to make them.
*******************************
Plastic pumpkins {mine were $1 at Walmart}
Scrapbook Paper {8 sheets for $1 at Target}
Mod Podge
Paint Brushes
*********************************
Tear scrapbook paper into small pieces
Attach the paper to the pumpkin and continue to coat it with Mod Podge until all the paper is wet and stuck to the pumpkin really well. This is the messy part, because the only way to make the paper stick really well is to work it with your hands! Eli and I worked on some painting while Henry and Grant were finishing up their pumpkins. These SUPER cute and oh so chubby handprints are going to be turkeys and leaves once I get my paintpens after them! Just a little hint....be careful when painting with brown paint, because your kiddo might think it is chocolate and try to lick it off his hand! :)


Then use a foam paintbrush to apply a coat of Mod Podge all over the pumpkins and let them dry. 


Our pumpkins {coated with Mod Podge} drying on the table...picture taken by Henry {because I still had a two inch layer of MP on my hands}!

Our finished Thanksgiving/Fall Pumpkins!
Pin It!
Related Posts Plugin for WordPress, Blogger...