Home AboutMe Crafts Food

Friday, October 28, 2011

Friday Flashback: Candy Corn Edition

I love decorating with stuff that can be used for multiple seasons and holidays. I love that instead of sitting in the attic for 11 months out of the year, that I can change some of my decor up and use it year round. So when I started working on new decorations for Halloween/fall I knew I could figure out a way to makes something that would work for Christmas, Valentine's Day, and maybe even Easter.

I started with some clear glass bottles that I have been saving for three years. I knew at some point I would find a good use for them:)
 I used my Cricut and cut out some vinyl letters.
 I used some transfer paper to attach the letters to the clear glass bottles.
 I lined the bottles up to make sure that the letters were even...the "d" is a little high, but not enough to worry about.
 I spray painted the lids white so they would match almost any holiday decor.
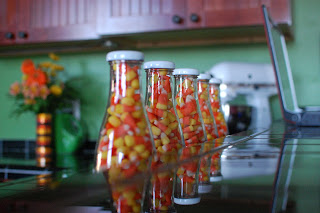
 Then I filled the bottles up with CANDY CORN...
 ...and lined them up on my kitchen counter.

This was a SUPER inexpensive project...all I really bought was the candy corn. Now when fall is over and Christmas decorations start going up, all I will have to do is empty out the candy corn and add in some red, green, and white M &M's!

**This is a post from last year that has been one of my most popular through the year. I actually have the same jars sitting on my counter right now...they just aren't filled with candy!**
Pin It!

Thursday, October 27, 2011

Trick or Treat, Smell my Feet! Halloween Shirts for a Trio

I love a good holiday shirt! {You've all seen my past 4th of July, Disney, birthdayHalloween, and Thanksgiving shirts:)} And I love a funny set of holiday shirts even more...especially for Halloween! So instead of making my normal initial tees {that my boys have way to many of anyway}, I decided to make some fun "trick or treat, smell my feet" Halloween shirts for my boys this year! I think they are pretty cute...Jason thinks I'm weird! The boys love them and really that is all that matters!
I started with some fabric from Hobby Lobby and a few white t-shirts. I printed out my words{I used the font Smiley Monster which is one of my new favs} in mirror image.
I used spray adhesive to attach the words to the backside of my fabric with the printed side of the word facing out. A little complicated, but it makes cutting the letters a lot easier.
I cut out the letters, squaring off any of the edges that seemed like they might be hard to sew....I've been sewing for a while, but curves and circles still give me trouble:)
My original plan was to just sew the letters onto the shirts, but when I laid them out on the white shirts they were really hard to read.
I pulled a little bit of black felt from my fabric stash and decided that they looked 100 times better against the black fabric. I simple cut the felt big enough for the letters, sewed the letters onto the felt, then sewed around the edges of the felt to attach it to the shirt. I also used my monogram machine and some orange thread to add the words "smell my" to Eli's shirt.


Now I just need to find the time to finish making their Halloween costumes!

Pin It!
Related Posts Plugin for WordPress, Blogger...