Home AboutMe Crafts Food

Thursday, April 7, 2011

Paper Mache Easter Eggs: Non-Wreath Door Decor

Paper Mache! A bunch of you smart people guessed correctly that we were working on a paper mache project from my Crafty Sneak Peek yesterday!
**************
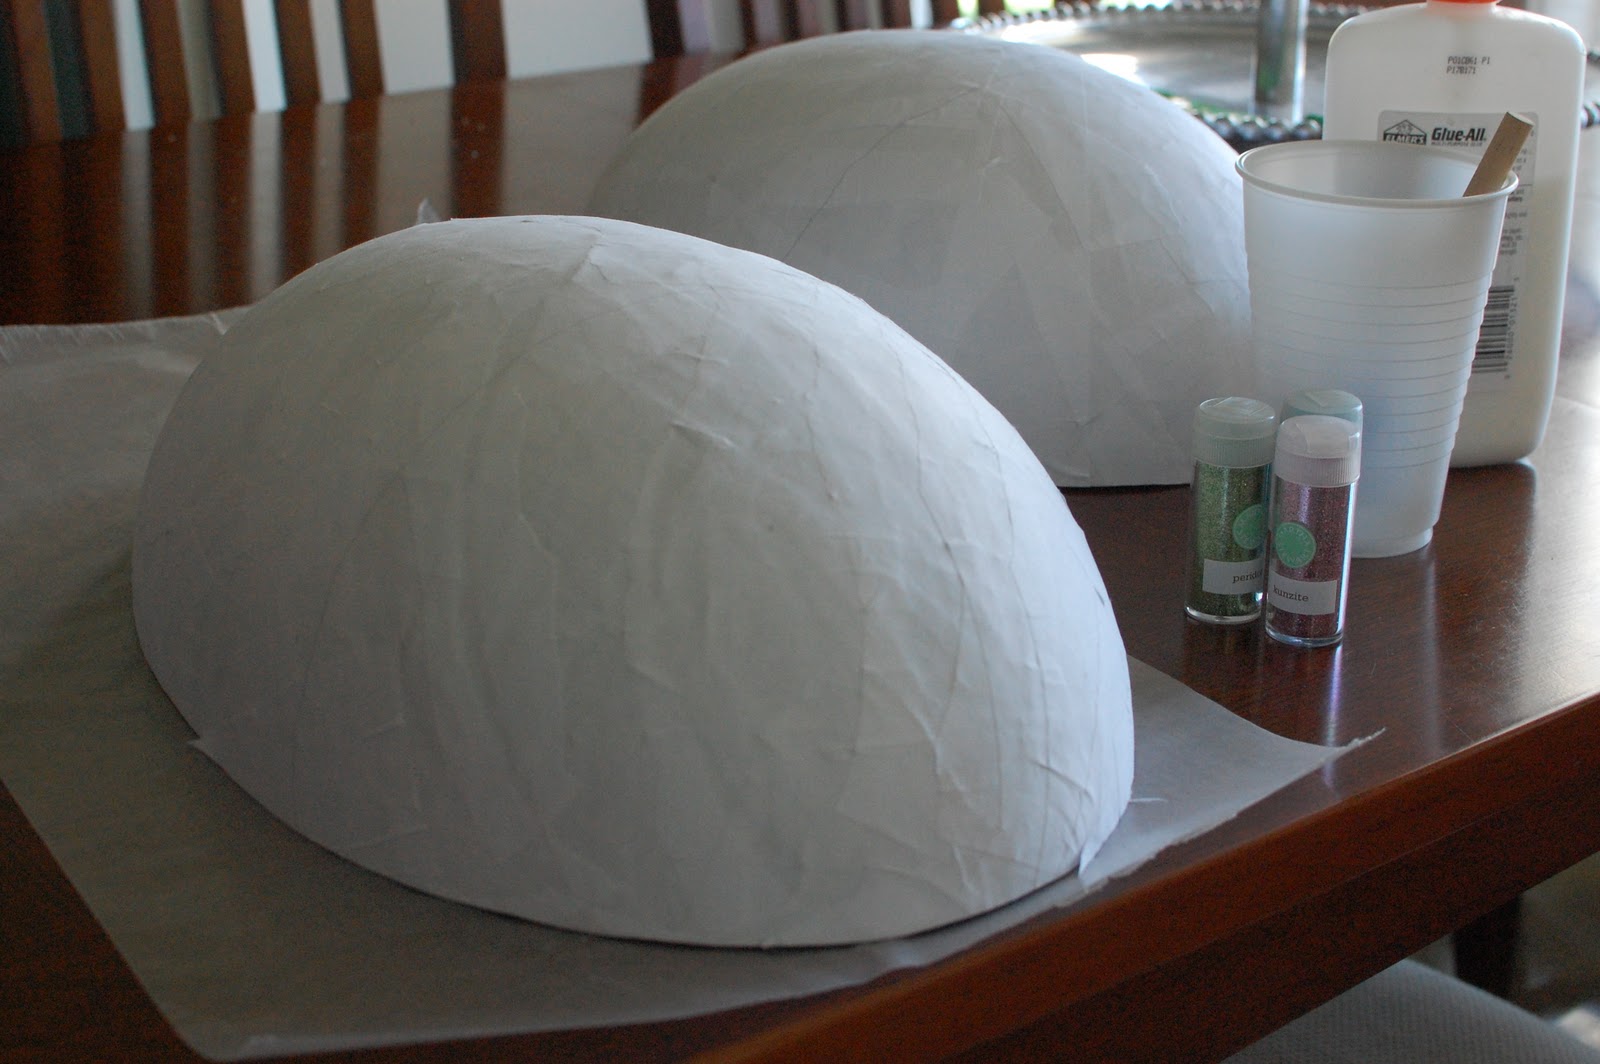
We started our project with some old newspapers, glue, and a giant plastic Easter egg that I picked up at Hobby Lobby. That was the only thing I could think of to use as a mold for our paper mache eggs, so I used a 40% off coupon and got it and two smaller eggs for around $12. Henry helped me tear up the strips of newspaper, then all three boys got their hands {and the rest of their bodies} dirty helping me cover the giant plastic Easter egg with the strips of newspaper coated in a mixture of water and glue. We put on about three layers of newsprint, then they got bored and ran off:)
After the newsprint layers were dry, I added a layer of torn up white printer paper....that way I could just glitter right over the white paper without painting, but the white paper also makes painting a little easier too.
After drying for two days, Jason carefully cut all the way around the egg with a blade and popped the two paper mache egg halves off the plastic egg. Now it was time to pretty up my eggs:) I got out some Martha Stewart glitter, glue, a foam brush, and a few pieces of wax paper to catch the excess glitter.
I poured the glue onto the egg, spread it around with a foam brush,and then sprinkled on the glitter as evenly as possible. I worked section by section and let each color dry well so that when I was shaking off the excess glitter the colors didn't mix.
After the eggs were pretty well coated with glitter I took them outside and sprayed them down with a clear coat to protect it from moisture and to keep the glitter from getting on everything!
After the clear coat was dry, I used my hot glue gun to add some decorative rick rack between the different colors of glitter.
The last thing I did was poke a small hole through the top of the egg to add a piece of ribbon for hanging. I tied a bow at the top of the ribbon and then tied a double knot at the end of the ribbon inside the egg to keep it in place.
And here they are fun and sparkly hanging on my front door!
I love that they are different than a normal wreath and I love that my kids actually got to help me make them...they just didn't get to help with the glitter part {it was messy enough without them helping}!

How do you decorate for Easter?
Visit thecsiproject.com
Pin It!

Tuesday, April 5, 2011

Master Bedroom Redo: Halfway There

In June of this year, we will have been in our house for 7 years. And for the most part our house has stayed pretty much the same. We have added new pieces of furniture here and there. Jason made a few built-ins to make life with three kiddos a little more organized. Most of the rooms in our house have stayed the same colors that we painted when we first moved in....partly because we love the colors we choose and partly because our ten foot ceilings make repainting a major affair. 

However, as we get closer to the anniversary of our moving in I think I am starting to get the "7 Year Itch"! I have more than a few projects on my mind {including a playroom makeover, under stair storage, and a breakfast nook bench} BUT the major thing that I really want to redo right now is our master bedroom. Maybe it's because we just recently rearranged some furniture and added an armoire to our bedroom, or maybe it' because our old bedding was getting tired...either way, last week I set out to make a few changes in our master bedroom.
Before:
The before is not too terrible. I really like the color of our walls and the bedding was a great match....kind of neutral with just the right shade of turquoise in it. However, you can tell that our bedding has seen better days, and after at least four years of rough and tumble boys who think mommy and daddy's bed is a trampoline....it really needed to go. My dilemma when picking out new bedding was the fact that I knew Jason didn't want to repaint, and I really wanted to change up the color palette a little bit.
After:
After finding this black and white bedding at Target, I decided that maybe adding in a little red was just the right way to change up the color in our room. I also worked on removing as much of the brown and tan colors as possible {like the lampshade}. I think the contrast between the walls and the bedding is too strong, so I still need to find some pillows to help incorporate the wall color onto the bed....and I think I need to add a little bit of red to the wall too. All in all I think I am off to a good start, but I am keeping all my packaging and receipts just in case I change my mind:)
*************
So what do you think?!? Good change, or not so great?
I would love some suggestions on other ways to change up the room or specific fabrics or bedding that you think might look great in this space.
Pin It!

Monday, April 4, 2011

A Very Boy Spring Break

Henry and Grant were on Spring Break last week. We have a big family vacation planned for August, so we didn't do a big trip for Spring Break....but we did spend two days of fun exploring not far from home. If I wasn't sure before, this trip definitely confirmed that I am majorly outnumbered by boys! Lets just say that the only girly part of our whole trip was the hour I got to spend in Pottery Barn and Williams-Sonoma!
************************
We started our trip with a short drive to Mobile, Alabama to explore downtown. While I attempted to take some cute shots of the boys, they ran around chasing the poor squirrels.
 After seeing Bienville Square and the fountain, we headed to A&M Peanut Shop. This place has been around forever and I remember going to get fresh roasted peanuts when I was little. We let the boys look around and pick out a few sweets and we got a big bag of peanuts to share.
 We walked a little bit further through downtown and sat down to eat our warm peanuts...and feed a few to the birds and squirrels too:)
 We explore the recreated Fort Conde and the boys had a blast pretending to be trapped in the fort prison.
 We left downtown and went to a Five Rivers, a Delta Resource Center. We saw a ton of {gross and slimy} animals that live in the local wetland areas, and we even got to pet a skunk! Did you know that a skunks 'sprayer' can be removed?!? It's a good think because I don't think I would have been touch a skunk if not:)
****************
After the nature preserve we went to Historic Blakely State Park. Inside the park is a preserved Civil War battlefield complete with Union and Confederate trenches and fortifications. The boys had a blast running around the old barracks while Jason and I read the history about the area.

 After exploring the battlefield, we went down to the waterfront and walked along a boardwalk over the marsh.
 The next day we got up bright and early and headed to the USS Alabama. We spent about three hours looking in every nook and cranny of the battleship from the engine room to the steering room. We climbed up and down at least 100 flights of steps and we even got to go inside of a submarine!
We had a great trip, but I'm pretty sure I earned myself a girl's day of pampering...and maybe even a pedicure:)
Pin It!

Friday, April 1, 2011

Featured Friend Friday #3

Kelli asked if I would like to be featured at her Featured Friend Friday!!  
What? Who? Me?
 I was thrilled and honored immediately nervous about talking about myself :)
I love blabbing about others 
(totally not in the 'gossipy' way)
but I have a hard time yakking about myself.
BUT, in the event that someone cares to know.....here ya go!


I'm a (late) 30-something mama of 2 little ones.

The lizard (soon to be 5) and the ladybug (soon to be 3).

I started blogging last year.

Mainly it was my way to keep track of all the great ideas I see.

A way to organize all of the projects I wanted to try.

I'm a big fan of DIY'ing and I hope I inspire others to try diy'ing too.


A short list random facts:

I LOVE planning parties.

I hate letting people help me.

I eat candy in 2s.  (if there's one left, I won't eat it)

I run to old school rap music.

I am trying to teach myself graphic design

_________________________


Most of my projects/crafts/messes are centered 
around the lizard & ladybug.  
Simple, easy and practical are my main requirements!  


cupcakestogo

The lizard started preschool this year

so I've had a good time with classroom treats and teacher's gifts.  
These treats were super easy.
(and basically free)


DSCN2184

I am currently planning a combo Pirate Birthday Party.

(the lizard & ladybug have birthdays 4 days apart)
Here is the latest 'big' party we had.

(we ended up with 25 kids, I think).  
I love sending people home with goodies from a party!

DSCN2143


Thanks for reading all about me.
(I hope it wasn't too much)
Come over to lizard & ladybug and follow along.  
I'd love to have you!

**********************
Staci thanks so much for sharing your creativity with us today! I've actually featured one of Staci's cute projects on my blog before HERE....she is just that creative! Be sure to hop over and give Staci a little comment love:)
**********************
Have a great weekend and don't forget to enter the Shabby Apple giveaway and the Kari Machal Designs giveaway.
Pin It!

Thursday, March 31, 2011

$20 Credit to Kari Machal Designs

This giveaway is now closed. Congrats to Liz from Sugarplum Creations!
I am SUPER excited about the giveaway that I have for you today! Kari from Kari Machal Designs, an Etsy store full of amazing prints, contacted me about offering a giveaway to my readers. As soon as I clicked over to her Etsy shop I knew there was no way I could turn her down:) Seriously her work is amazing and modern....I could find a spot in my house for almost every single one of her prints.

This You Are My Sunshine print is so fun and would be awesome in my yellow guest room.
 I think the Chandelier Silhouette Series would be amazing in dining room or in a master bedroom.
 I am reallly in love with the Family Tree with Birds print! It is so graphic and fun, but still personal...LOVE!
{Kari sweetly offered a print to me and this is the one I chose...I can't wait to get it!}

One lucky person is going to win a $20 credit to Kari Machal Designs.

 To enter:

"Like" Kari Machal Designs on Facebook and leave a comment telling me that you did.


Follow Random Thougths of a  SUPERMOM! and leave a comment telling me that you do.
 
Favorite Kari Machal Designs on Etsy and leave a comment telling me you did.

Follow me {@SUPERMOM_Kelli} on twitter and leave a comment telling me that you do.

Tweet about this giveaway and include @SUPERMOM_Kelli and a link to this giveaway in the tweet.
Win a beautiful print from Kari Machal Designs  and @SUPERMOM_Kelli!
********************
Make sure to leave a comment for each thing that you do. This giveaway is open to U.S. residents only and will end next Friday, April 8th at 10:00 am. I will use random.org to pick a winner! Good Luck and thanks for entering!
********************
Kari is also offering free shipping to all Random Thoughts of a SUPERMOM! readers. Simply enter SPRING1 in the comment box when you place an order from her etsy shop.

Pin It!

Tuesday, March 29, 2011

Water Your Garden in Style

Spring has sprung in Mississippi which means the grass is turning green and if you want to plant anything, now is the time. We were pretty successful with our grapevines last year, so this year we decided to try out a little gardening. When I say little, I mean little...we started with four strawberry plants and two tomato plants. Spring is Jason's busy time at work and I have the exact opposite of a green thumb so we didn't want to plant too much our first time around. Jason made a raised bed out of landscape timbers, added in some soil, and planted our garden:)
 I knew I wanted the kiddos to be involved too, so we set out to find some cute watering cans for them. We found some at the dollar store, but there was just one problem. If you have been a reader of my blog for long, you know my love of color coding things for my kiddos and you also know that Henry's color is blue, Grant's color is green, and Eli's color is orange. We got Henry and Grant taken care of, but all that was left for Eli was a pink watering can!
 That wasn't a problem that a simple coat of spray paint couldn't take care of though:) I used an old can of orange spray paint and {halfway} covered up the pink.
 I also used a paint pen to personalize the water cans for the boys:) Then they got busy watering the garden!

Do you plant a spring garden?
Pin It!

Monday, March 28, 2011

Kind of Blue

Eli was feeling
 kind of blue {and sticky}
 after finding a blue candy cane
 that had been hiding since Christmas!
**On a more serious note**
My heart is blue today as I head to the funeral for my friend Tonya's mother who passed away Friday after a 3 month battle with Meningitis. Please remember that family in your prayers today as they say goodbye to their mother, grandmother, sister, and friend.
Pin It!

Friday, March 25, 2011

Spring Break and Shabby Apple

This giveaway is closed. Congrats to Lyndee at A Recovering Craft Hoader!
Spring Break officially starts at the end of the school day today...and while I wish we had big plans of travel, leisure, and excitement this year we are just going to lay low and do a little bit of stay-cationing! But just because I'm not actually going anywhere for spring break doesn't mean I can't live vicariously through the Internet:) I have to tell you that a European vacation would be a dream one day, but just looking at all the great dresses on the Shabby Apple website makes me feel like I am halfway there already!

The newest collection of Shabby Apple Women's Dresses is called Roamin' Holiday and man does it make me want to load up the kiddos, max out a credit card, and fly all the way to Rome! These dresses are so fun and flirty. They also look SUPER chic while still looking so comfortable.
***************
How comforable does this dress {Da Vinci} look...that front pocket is adorable!
And the color combo on this one {Gondola} is so fun!
 This pretty purple dress {La Vita e' Bella} is one of my favorites...I love the sleeve length!
 Seriously who wouldn't want to wear these cute dresses and feel like they were on a Roman Holiday every day of the week!
**************
Because the people at Shabby Apple are so awesome, one of you lucky ladies is going to win the oh-so-adorable Spanish Steps dress! Check out the details on this dress....amazing!

 To enter:


"Like" Shabby Apple on Facebook and leave a comment telling me that you did.
 
Follow my blog and leave a comment telling me that you do.
 
Follow @shabbyapple on twiter and leave a comment telling me you do

Follow me {@SUPERMOM_Kelli} on twitter and leave a comment telling me that you do.

Tweet about this giveaway and include @SUPERMOM_Kelli and a link to this giveaway in the tweet.
Spring Break & A Shabby Apple Giveaway....such a great combo! Win a dress from @ & @!
 
********************
Make sure to leave a comment for each thing that you do. This giveaway is open to U.S. residents only and will end next Friday, April 1st at 10:00 pm. I will use random.org to pick a winner! Good Luck and thanks for entering!
Pin It!

Thursday, March 24, 2011

Five Minute Monogrammed Doormat

I bought a new doormat for our side door last week. It was a nice sisal mat with a great herringbone pattern...but it was kind of boring. I decided the best way to dress it up {quickly and easily} would be to add a monogram to it.
I used my computer to find just the right W...not too plain but not too frilly either.
I printed it out.
Then I used spray adhesive to attach the printed W to the backside of a piece of contact paper. I had to make sure that the letter was facing the right directions so I didn't end up with a stencil for a backwards W:)
I used a blade to cut out the W basically  making a stencil out of the contact paper. You could also just cut the letter out of paper or cardstock and the spray it with adhesive to get it to stick to the mat.
I placed the stencil on the doormat and decided where I wanted the monogram to be. I decided on the bottom right hand corner, but I think it would have been great in the center too. Make sure to press the contact paper down really well....I learned the hard way that not much sticks to sisal but as long as it is sort of stuck down it will still do a pretty good job.
I covered the rest of the doormat with old newspaper and then enlisted the help of a few {dirty} little feet to help keep the paper in place. FYI spray painting on a windy day is not fun:)
I used an old can of black spray paint, and quickly sprayed a light coat over the stencil being sure to spray straight down so that the paint didn't get under the edges of the stencil. Let the paint dry for about a minute then remove your stencil.
And in just about five minutes I had a great monogrammed doormat!
Weekend Bloggy Reading
Pin It!
Related Posts Plugin for WordPress, Blogger...