Home AboutMe Crafts Food

Friday, March 16, 2012

St. Patrick's Day Knee Patch

Last year, I shared about how difficult it can be to come up with cute holiday stuff for boys...so I got creative and made these fun Lucky Shoe Charms. This year I decided to upcycle an old pair of jeans into a cute pair of St. Patrick's Day Pants with a fun shamrock knee patch.
I don't know about your kiddos, but my kids are rough on their clothes. We have lots and lots of blue jeans with holes and rips in them. I know that the worn out, ragged look is in now, but I just can't let my kiddos walk around in clothes with holes everywhere! I think it has something to do with my OCD:)
So instead of donating these well loved pants, I decided to upcycle them into holiday pants! I started by printing out a shamrock just a little bigger than the hole. 
I cut out the shamrock on some cute green and white polka dot fabric.
And then used some spray adhesive to attach the polka dot shamrock to a small piece of green felt.
I used my pinking shears to cut the felt into a circle and then stitched the whole thing on with some green embroidery thread.
I think they look awfully cute paired with Eli's St. Patty's Day Tie from last year:) 
And the best part about this SUPER easy holiday craft is that I can simple clip the embroidery thread after St. Patrick's Day and turn them into Easter pants with a fun egg shaped patch!
Do you wear green on St. Patrick's Day?
Linking up here..
Tatertots and Jello
Serenity Now
Someday Crafts
Skip to my Lou
Pin It!

Thursday, March 15, 2012

Rainbow Ice Cream

St. Patrick's Day is a perfect excuse to make multicolored foods using all the colors of the rainbow! Two years ago we had Rainbow Cupcakes, and last year we had Rainbow Waffles. This year for St. Patty's Day, I decided to try something a little colder...ice cream! It's actually perfect  for this year because we have had an unseasonably warm winter, and this week the temps have been in the upper 70's and lower 80's! I would say a March that warm calls for ice cream:) The really fun part about this ice cream is that it isn't just rainbow colored {like most of my other fun foods}, but it is rainbow flavored too...thanks to a little bit of jello!
 Start with a small box of jello in each color {red, orange, yellow, green, blue, and purple} of the rainbow and a big tub of vanilla ice cream.
 I tried to take step by step pics, but my ice cream was getting too melty every time I stopped to take pics {thank you warm March weather}. Luckily making Rainbow Ice Cream is an easy process. Simple scoop out a little {or a lot depending on how much you want to make} ice cream into a bowl. Add in a few teaspoons of the jello powder, and give it a good stir. I used about 3 big scoop of ice cream and 3 or 4 teaspoons of the jello mix for each of my colors. You can increase the jello to make the colors more vibrant, but just be aware that the jello does give the ice cream a bit of a grainy texture so don't add too much!
Layer the colored ice cream into a freezer safe container. I used a glass loaf pan because I thought it would be a great shape to cut off a slice of the rainbow:) Starting with the red, add each colored layer, then let it set up in the freezer for a while before adding the next layer. Or you can do it the quick way and add the layers one after the other...just be careful not to mix the layers if you do it this way!
 Place the dish in the freezer to harden. I think the addition of the jello made the ice cream take longer to harden. Be patient or you may end up with a melty mess:) I was actually very patient and let mine set up for a few hours, but I was worried about it getting stuck in the dish so I dipped the glass into warm water to loosen it up...except I warmed mine just a little too long! I was kind of sad when this drippy, melty, red mess came out of my pan....
 ...and when I tried to slice into it, I made an even bigger {though very pretty} mess!
But a quick {okay a couple of hours} trip back into the freezer made things all better, and I was able to cut off a pretty slice of Rainbow Ice Cream! This was such a fun and {relatively} easy rainbow treat to make. The hardest part was all the waiting...and now my toughest challenge is going to be making the boys wait another two days to enjoy this yummy treat on St. Patrick's Day:)

Linking up here..
Tatertots and Jello
Serenity Now
Someday Crafts
Skip to my Lou
Pin It!

Thursday, March 8, 2012

Corndog Pancakes

Last week {I think maybe Tuesday} was National Pancake Day. I can thank twitter for that knowledge... unfortunately I didn't see it until after the boys had eaten cereal for breakfast and headed off to school. If you've been around my blog long, then you know that a food holiday is the perfect excuse for me to make something fun and yummy. But I didn't want to just do plain old pancakes for dinner on National Pancake Day. No, we needed something new, something fun, something not sweet for dinner. I saw Rachael Ray make Corndog Waffles a few weeks ago...and I thought, why not turn my pancakes into corndogs {or my corndogs into pancakes}! And so the Corndog Pancake was born:) Now I know it sounds kind of gross, but I promise they are AWESOME!
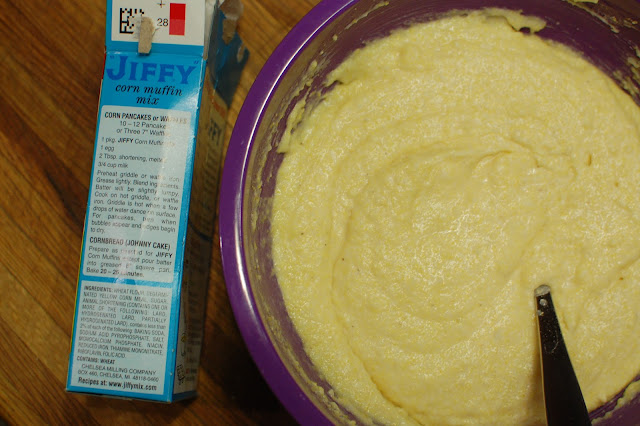
I started with a box of corn muffin mix. Any brand will do, but I love Jiffy brand because it's a sweet cornbread. There is a recipe on the side of the box for corn pancakes. Follow the recipe on the box Basically you add more milk than the normal recipe plus a little bit of melted shortening along with one egg, {I had to tweak mine a little because we were out of eggs, but they still turned out great} then mix up your corndog batter.
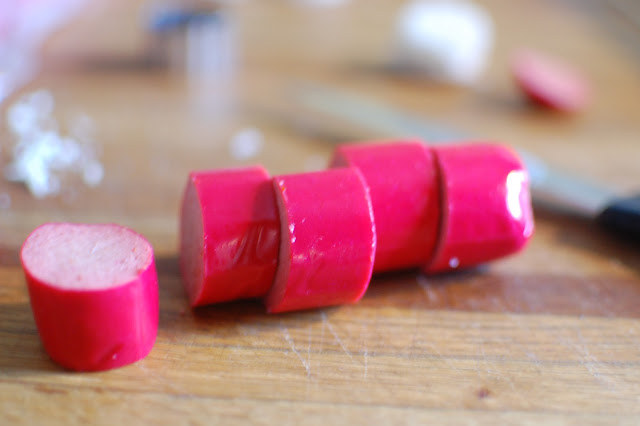
Next, cut up a couple of hot dog wieners. Any brand will do...whatever your family likes. Little rounds would be fun in this, but I am still paranoid about my kiddos choking on hot dogs so I cut my little rounds into halves.
Toss the cut up hot dog pieces into the batter and give them a good stir.
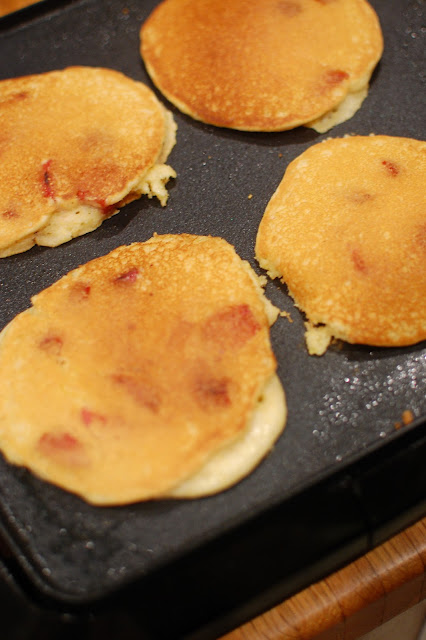
Heat up your griddle, spray it with non-stick spray, and then ladle on the batter. Watch for bubbles to form around the edges of the pancake. This batter is a little thicker than normal pancakes so it can take a little longer to cook, and it can be hard to tell when they are ready to flip. I just watched the edges and lifted up the side a little to see if they were ready to flip.
The corndog pancakes will turn a golden color and some of the hot dog pieces may get a little brown...that's okay it will make them taste even better:)
Plate them up and drizzle on a little bit of ketchup, mustard, or both.
These were so fun to make and seriously really yummy! I think the sweetness of the corn muffin mix is what made them so good! We are planning on doing a lot of cooking on the griddle when we are camping in the Airstream, and these will be added to the camping dinner schedule for sure:)
Linking up here..
Tatertots and Jello
Serenity Now
Someday Crafts
Skip to my Lou
Pin It!

Tuesday, March 6, 2012

St. Patty's Day Roundup

Today I'm over at Amanda's sharing a fun St. Patty's Day tutorial. Hop over, check it out, and leave a little bit of comment love:) Since we have less than two weeks until the fun day of green and rainbows and gold, I thought I would share a little round up of my past projects for St. Patty's Day. 


I am working on another cute rainbow treat for next week, and I'm hoping to get some cute green shirts made for the boys this year since St. Patrick's Day is on a Saturday this year:)
What kinds of fun things do you do to celebrate St. Patty's Day?
Leave a link to some of your posts or ideas and I may feature them next week! And don't forget to click over and say HI at Amanda's place today:) 

Linking up here..
Tatertots and Jello
Serenity Now
Someday Crafts
Skip to my Lou
Pin It!

Friday, March 2, 2012

More Dr. Seuss Snacks

I'm running short on time today so you  are just getting a picture tutorial...no time for words:) If you have any questions send me an email! Hopefully I can update the post later today with a few more details!
HAPPY BIRTHDAY DR. SEUSS!


Linking up here..
Tatertots and Jello
Serenity Now
Someday Crafts
Skip to my Lou
Pin It!

Thursday, March 1, 2012

Updated Sweet Dr. Seuss Snack: aka Candy Green Eggs

For the last few weeks, my post {Sweet Dr. Seuss Snack} has been SUPER popular. I'm guessing that everyone is getting ready to celebrate Dr. Seuss' birthday tomorrow and they are looking for ideas. Honestly that treat was one of the easier and cutest things that I've ever made for the boys to take to school. And as cute as they were, I have to admit that it kind of bugged me that the little green M&M wasn't really proportionate to the white of the egg....still cute, but not really perfect {I have confessed my slight OCD here before haven't I}. Anyway, this year I decided to give those cute Sweet Dr. Seuss Snacks a retry before I sent them {all 50 of them!} off to school with the boys. Here's what I came up with....basically the same technique with just a little something extra:)
Start with white candy melts, green candy melts, and regular sized marshmallows.
Use your {very clean} kitchen scissors to cut each marshmallow in half. Actually you could probably get away with cutting them into thirds and it still looking great, but I did halves here.
Dip each marshmallow piece into your melted green candy melts then tap off any excess.
Place them on foil to harden.
While you wait, heat up your white candy melts and pour it into a squeeze bottle. You can draw your egg shapes free hand or print out a shape to trace. I printed the same one I used last year....click over here for a step by step if you need it.
Draw out your egg shapes, then place one of the green marshmallows on top before the white starts to harden.
I think they turned out really cute and I am much happier with the proportion of the green to the white this year:) I also got the best seal of approval ever from this little guy who got to sample the first one...and quickly devoured the whole thing in 2.4 seconds!
Check back tomorrow for two more fun treat to celebrate Dr. Seuss!
Linking up here..
Tatertots and Jello
Serenity Now
Someday Crafts
Skip to my Lou
Pin It!
Related Posts Plugin for WordPress, Blogger...