Home AboutMe Crafts Food

Thursday, October 27, 2011

Trick or Treat, Smell my Feet! Halloween Shirts for a Trio

I love a good holiday shirt! {You've all seen my past 4th of July, Disney, birthdayHalloween, and Thanksgiving shirts:)} And I love a funny set of holiday shirts even more...especially for Halloween! So instead of making my normal initial tees {that my boys have way to many of anyway}, I decided to make some fun "trick or treat, smell my feet" Halloween shirts for my boys this year! I think they are pretty cute...Jason thinks I'm weird! The boys love them and really that is all that matters!
I started with some fabric from Hobby Lobby and a few white t-shirts. I printed out my words{I used the font Smiley Monster which is one of my new favs} in mirror image.
I used spray adhesive to attach the words to the backside of my fabric with the printed side of the word facing out. A little complicated, but it makes cutting the letters a lot easier.
I cut out the letters, squaring off any of the edges that seemed like they might be hard to sew....I've been sewing for a while, but curves and circles still give me trouble:)
My original plan was to just sew the letters onto the shirts, but when I laid them out on the white shirts they were really hard to read.
I pulled a little bit of black felt from my fabric stash and decided that they looked 100 times better against the black fabric. I simple cut the felt big enough for the letters, sewed the letters onto the felt, then sewed around the edges of the felt to attach it to the shirt. I also used my monogram machine and some orange thread to add the words "smell my" to Eli's shirt.


Now I just need to find the time to finish making their Halloween costumes!

Pin It!

Tuesday, October 25, 2011

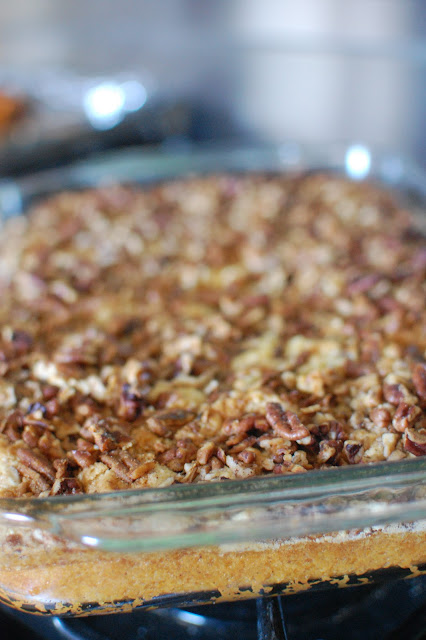
Sweet Potato Pecan Dessert

Last week, I shared a picture of my abundant supply of sweet potatoes and I asked for your suggestions on what to make with them. I got a ton of great ideas {like sweet potato fries} that I am planning on trying...but first I had to make this yummy dessert that I found on Pinterest. The original recipe is called Pumpkin Pecan Dessert and it is from a scrumptious blog called Glorious Treats! I know that pumpkins and sweet potatoes aren't the same thing, but they are pretty much interchangeable in  recipes...at least they are for me. So I took the original recipe and simply switched out the pumpkin for my sweet potatoes, and I came up with Sweet Potato Pecan Dessert!


Ingredients:
4-5 medium sweet potatoes, baked
1 can (12 oz) evaporated milk
3 eggs
3/4 cup sugar
pumpkin pie spice or cinnamon to taste

1 boxed yellow cake mix
1 1/2 cups chopped pecans
3/4 cup butter, melted

Directions:

1. Bake your sweet potatoes at 350 until tender. Scoop out the insides. You will need about 15 oz of sweet potato for this recipe. 
2.  In a large bowl add the first 5 ingredients, and stir to combine.
3.  Pour sweet potato mixture into 9" x 13" dish that has been sprayed with cooking spray.
4.  Sprinkle dry cake mix evenly over the sweet potato layer.
5.  Add chopped pecans.
6.  Pour melted butter over top.
7.  Bake 50-60 minutes on 350. 
Top with whipped topping or ice cream before serving.
Adapted from Glorious Treats who got the recipe from the Betty Crocker Holiday Recipes booklet
Pin It!

Friday, October 21, 2011

Homemade Halloween Costume Ideas for Boys

I love Halloween!
The weather, the candy, the fall festivals, the decorations, but most of all I love a great homemade Halloween costume! I know that some people just don't have the time or the skill to make homemade costumes, but I love the challenge of it...even though it really isn't as challenging as some people think. I have made homemade costumes for my boys every year since Henry's first Halloween in 2004...that's a total of 15 Halloween costumes! They have been everything from a scarecrow to a caveman, and they have all been homemade! For the most part I use inexpensive fabrics {like felt} and most of the costumes are held together with hot glue.

I decided to share a few pictures of some of our past homemade Halloween costumes {and a few details about how to make the costumes} with the hope that it will encourage a few of you to try and make some homemade costumes this year. They will save you a ton of money and create a ton of great memories too!

*KNIGHTS*
Last year the boys were knights. I used white & grey felt, blue cotton material, and some silver sparkly trim to make the costumes...and it was all put together with hot glue. I basically cut out a rectangle big enough for each boy and then cut out a neck hole. The side were held together with ties {look closely at Eli's} that went through a hole on each side of the costume. The boys worn grey thermal underwear underneath and the the helmets came from the dollar section at Target!

*CAVEMEN AND A DINOSAUR*
The dinosaur costume was a hand me down that Grant had worn a few years ago. This was sewn using a Simplicity sewing pattern {see below for more details about the pattern}. It was one of my first big sewing projects, so I was glad it was worn more than once:) Henry and Grant's Cavemen costumes were made out of {really cheap} fake fur. I cut a basic rectangle out and then sewed up the sides and cut out a neck hole. Henry asked for a one armed costume which was a little more complicated, but still pretty easy. I made boot covers using their shoes as a template...and Jason helped me out with those!
 Their necklaces where made with big wooden beads from the craft section of Hobby Lobby and the boys helped me make them. I tied a little twine around the boys waists and in this picture you can see the fun edge that I cut on the bottom to make their costumes look a little more primitive.

*SUPERHEROES*
I think these were some of the boys most favorite costumes ever...especially since they still play with them sometimes! I made the capes out of felt and {some kind of shiny} silky material. They were sewn together, but you can easily make a no sew cape with material that doesn't fray and some iron on adhesive for the emblem. Their shirts {I used two per costume to make the emblem and their belt} and pants came from Walmart and they were only $3 each. 
 I even made Eli a little superhero costume by sewing a small cape onto the back of a onesie and adding a belt {with an E} to the front of it.

*PIRATES*
These costumes were really simple to make, and they were no sew! I got black sweat pants for the boys and cut the leg holes kind of jagged. I probably spent less than $5 at the fabric store for the yellow fabric and the red and white striped fabric. I simple cut all the pieces to length for each boy and then tied them on! The pirate accessories came from the dollar section at Target, and if you look closely they even had a gold earring {that was clipped onto their headpiece not their ear}.

*DINOSAURS*
This is the one {and only} year that I have sew the boys entire costumes...and it was a lot of work! They were totally worth it though {especially since Eli wore the green dinosaur costume again}! This was made with a Simplicity pattern that was actually pretty easy to follow. Here's a link to the pattern { 2506 }just in case anyone is interested. 

*SCARECROW*
For Henry's first Halloween he was a scarecrow. He was an adorable little scarecrow and this was a really cheap and easy costume to put together. I used a pair of overalls from a thrift store and stitched on a few patches. Then I hot glued some raffia around the leg holes. I braided a few pieces of raffia for a belt and made a cute hat out of some black felt. Add a plaid shirt and a little face paint and you've got a cute homemade scarecrow!
I know that it may be easier to just buy a costume at the store, but think of all the fun memories that you can make by doing something homemade for you kiddos this year...not to mention the money you can save! There is still more than a week left before Halloween, so head to the craft store and start working on some fun homemade Halloween costumes! 
**If you do decide to try one of my costume ideas {or if this post encouraged you to try any homemade costume} send me some pics or a link to your blog...I would love to feature a few homemade costumes here!**
Weekend Bloggy Reading
Pin It!

Thursday, October 20, 2011

Sweet Potatoes

Lots and lots of sweet potatoes!
I bought this bag of sweet potatoes for $6 from a man selling them on the side of the road last week. I'm guessing there are probably close to 50 sweet potatoes in this brown bag that the man called "the small bag"....he was also selling a larger bag that had twice as many sweet potatoes in it! 

I came home with grand plans to make some yummy baked sweet potatoes and maybe some kind of pie, but my bag of sweet potatoes is still sitting untouched on the kitchen counter. We were out of town most of the weekend, and Jason has been working long hours...or at least those are the excuses that I tell myself when I start feeling bad for not cooking any of them yet:) Another reason I haven't cooked them is because it has been so hot here lately and sweet potatoes just seem like a cold weather kind of food to me. 

Luckily our temps dropped almost 40 degrees overnight on Tuesday and Jason is supposed to have normal work hours for the rest of  the week...so no more excuses! I will make something with {at least a few of} my sweet potatoes, I'm just not sure what!?!

Do you have any great sweet potato recipes that your family loves? Please share them with me! I'm hoping to try out a few different recipes and blog about them next week.

Pin It!

Tuesday, October 18, 2011

Jack O Lantern Waffles

What's more fun than colorful waffles? Colorful waffles that smile back at you of course! If you've been around my blog long you know that I have quite an obsession with FUN waffles, and today I'm sharing my newest fall waffle creation: 
To make these smiling waffles, all you need is a waffle mix of you choice, orange food coloring, and mini chocolate chips.
After you mix the batter according to the package directions, add a pretty good amount of orange food coloring {I always use Wilton gels because they make the color a lot more vibrant than liquid food coloring}.
Stir in the food coloring and add more as needed.... You want to make sure your jack o' lantern is a vibrant orange, not a pastel color.
After your batter is mixed up and you've got the perfect shade of orange, get your mini chocolate chips ready. I found it was easiest to pour them in a small bowl. That way I could scoop them up with a spoon and add them to my waffle batter quickly.
Pour the orange waffle batter onto your greased and heated waffle iron. Using a spoon {it gives you a little more control of the those crazy mini chips}, add the mini chocolate chips onto your waffle in the pattern of a jack o' lantern....eyes, nose, and big smiling mouth.
When your jack o' lantern waffle comes out of the waffle iron, it will be smiling back at you!
I had three hungry boys waiting for waffles so I didn't have a ton of time to decorate these after they came off the waffle iron, but you could add some green gummies to the top of the waffle as a stem and leaves to make them even more fun!

Pin It!

Monday, October 17, 2011

Tent Camping, Bulldogs, and Football

Twelve hours is probably the cap on the amount of time that I ever want to spend camping in a tent....and that is exactly what we did this weekend. After deciding {very last minute} to take the Henry and Grant to a Mississippi State football game, I got busy trying to find a hotel room. The only problem was that  there was NOTHING available within 100 miles of Starkville! Lucky for us, my grandparents were staying in their motor home at a campground about 30 minutes south of MS State....so we loaded up our tent and sleeping bags and headed out for a night of tent camping.
 We didn't get to the campground until almost 9 pm Friday night, so I don't have any pictures of the tent going up...but here are few of the boys helping Jason disassemble the tent the next morning:) We had a pretty good night in the tent, but I'm definitely bringing an air mattress if we ever tent camp again!


 After the tent and sleeping bags were loaded up and we had said our goodbyes {and thanks you for the free place to sleep} to my grandparents, we headed to see the Bulldogs. Henry and Grant got their picture taken with a statue of a bulldog...
 ...and a real one too!
 After our walking tour {aka we parked so far from the football field that we saw half the campus on the way to the stadium} of the campus, the boys got to play on some inflatable for a while and get their faces painted.
 Then we headed to our seats {decked out in maroon} to cheer on the MS State Bulldogs. The Bulldogs ended up losing in the last few minutes of the game 14-12...but it was a great game and the boys had a really great time!
We're hoping {okay mostly me because I don't want to sleep in a tent again any time soon} that our Airstream will be ready for football season next year, and maybe Eli will be old enough to join us for the game too:)
Pin It!
Related Posts Plugin for WordPress, Blogger...