Home AboutMe Crafts Food
Showing posts with label Vacations and Holidays. Show all posts

Friday, March 16, 2012

St. Patrick's Day Knee Patch

Last year, I shared about how difficult it can be to come up with cute holiday stuff for boys...so I got creative and made these fun Lucky Shoe Charms. This year I decided to upcycle an old pair of jeans into a cute pair of St. Patrick's Day Pants with a fun shamrock knee patch.
I don't know about your kiddos, but my kids are rough on their clothes. We have lots and lots of blue jeans with holes and rips in them. I know that the worn out, ragged look is in now, but I just can't let my kiddos walk around in clothes with holes everywhere! I think it has something to do with my OCD:)
So instead of donating these well loved pants, I decided to upcycle them into holiday pants! I started by printing out a shamrock just a little bigger than the hole. 
I cut out the shamrock on some cute green and white polka dot fabric.
And then used some spray adhesive to attach the polka dot shamrock to a small piece of green felt.
I used my pinking shears to cut the felt into a circle and then stitched the whole thing on with some green embroidery thread.
I think they look awfully cute paired with Eli's St. Patty's Day Tie from last year:) 
And the best part about this SUPER easy holiday craft is that I can simple clip the embroidery thread after St. Patrick's Day and turn them into Easter pants with a fun egg shaped patch!
Do you wear green on St. Patrick's Day?
Linking up here..
Tatertots and Jello
Serenity Now
Someday Crafts
Skip to my Lou
Pin It!

Thursday, March 15, 2012

Rainbow Ice Cream

St. Patrick's Day is a perfect excuse to make multicolored foods using all the colors of the rainbow! Two years ago we had Rainbow Cupcakes, and last year we had Rainbow Waffles. This year for St. Patty's Day, I decided to try something a little colder...ice cream! It's actually perfect  for this year because we have had an unseasonably warm winter, and this week the temps have been in the upper 70's and lower 80's! I would say a March that warm calls for ice cream:) The really fun part about this ice cream is that it isn't just rainbow colored {like most of my other fun foods}, but it is rainbow flavored too...thanks to a little bit of jello!
 Start with a small box of jello in each color {red, orange, yellow, green, blue, and purple} of the rainbow and a big tub of vanilla ice cream.
 I tried to take step by step pics, but my ice cream was getting too melty every time I stopped to take pics {thank you warm March weather}. Luckily making Rainbow Ice Cream is an easy process. Simple scoop out a little {or a lot depending on how much you want to make} ice cream into a bowl. Add in a few teaspoons of the jello powder, and give it a good stir. I used about 3 big scoop of ice cream and 3 or 4 teaspoons of the jello mix for each of my colors. You can increase the jello to make the colors more vibrant, but just be aware that the jello does give the ice cream a bit of a grainy texture so don't add too much!
Layer the colored ice cream into a freezer safe container. I used a glass loaf pan because I thought it would be a great shape to cut off a slice of the rainbow:) Starting with the red, add each colored layer, then let it set up in the freezer for a while before adding the next layer. Or you can do it the quick way and add the layers one after the other...just be careful not to mix the layers if you do it this way!
 Place the dish in the freezer to harden. I think the addition of the jello made the ice cream take longer to harden. Be patient or you may end up with a melty mess:) I was actually very patient and let mine set up for a few hours, but I was worried about it getting stuck in the dish so I dipped the glass into warm water to loosen it up...except I warmed mine just a little too long! I was kind of sad when this drippy, melty, red mess came out of my pan....
 ...and when I tried to slice into it, I made an even bigger {though very pretty} mess!
But a quick {okay a couple of hours} trip back into the freezer made things all better, and I was able to cut off a pretty slice of Rainbow Ice Cream! This was such a fun and {relatively} easy rainbow treat to make. The hardest part was all the waiting...and now my toughest challenge is going to be making the boys wait another two days to enjoy this yummy treat on St. Patrick's Day:)

Linking up here..
Tatertots and Jello
Serenity Now
Someday Crafts
Skip to my Lou
Pin It!

Tuesday, March 6, 2012

St. Patty's Day Roundup

Today I'm over at Amanda's sharing a fun St. Patty's Day tutorial. Hop over, check it out, and leave a little bit of comment love:) Since we have less than two weeks until the fun day of green and rainbows and gold, I thought I would share a little round up of my past projects for St. Patty's Day. 


I am working on another cute rainbow treat for next week, and I'm hoping to get some cute green shirts made for the boys this year since St. Patrick's Day is on a Saturday this year:)
What kinds of fun things do you do to celebrate St. Patty's Day?
Leave a link to some of your posts or ideas and I may feature them next week! And don't forget to click over and say HI at Amanda's place today:) 

Linking up here..
Tatertots and Jello
Serenity Now
Someday Crafts
Skip to my Lou
Pin It!

Friday, March 2, 2012

More Dr. Seuss Snacks

I'm running short on time today so you  are just getting a picture tutorial...no time for words:) If you have any questions send me an email! Hopefully I can update the post later today with a few more details!
HAPPY BIRTHDAY DR. SEUSS!


Linking up here..
Tatertots and Jello
Serenity Now
Someday Crafts
Skip to my Lou
Pin It!

Thursday, March 1, 2012

Updated Sweet Dr. Seuss Snack: aka Candy Green Eggs

For the last few weeks, my post {Sweet Dr. Seuss Snack} has been SUPER popular. I'm guessing that everyone is getting ready to celebrate Dr. Seuss' birthday tomorrow and they are looking for ideas. Honestly that treat was one of the easier and cutest things that I've ever made for the boys to take to school. And as cute as they were, I have to admit that it kind of bugged me that the little green M&M wasn't really proportionate to the white of the egg....still cute, but not really perfect {I have confessed my slight OCD here before haven't I}. Anyway, this year I decided to give those cute Sweet Dr. Seuss Snacks a retry before I sent them {all 50 of them!} off to school with the boys. Here's what I came up with....basically the same technique with just a little something extra:)
Start with white candy melts, green candy melts, and regular sized marshmallows.
Use your {very clean} kitchen scissors to cut each marshmallow in half. Actually you could probably get away with cutting them into thirds and it still looking great, but I did halves here.
Dip each marshmallow piece into your melted green candy melts then tap off any excess.
Place them on foil to harden.
While you wait, heat up your white candy melts and pour it into a squeeze bottle. You can draw your egg shapes free hand or print out a shape to trace. I printed the same one I used last year....click over here for a step by step if you need it.
Draw out your egg shapes, then place one of the green marshmallows on top before the white starts to harden.
I think they turned out really cute and I am much happier with the proportion of the green to the white this year:) I also got the best seal of approval ever from this little guy who got to sample the first one...and quickly devoured the whole thing in 2.4 seconds!
Check back tomorrow for two more fun treat to celebrate Dr. Seuss!
Linking up here..
Tatertots and Jello
Serenity Now
Someday Crafts
Skip to my Lou
Pin It!

Monday, February 20, 2012

Homemade Mini Moon Pies

Mardi Gras is a fun holiday for us. I know that it's not as big of a deal in other parts of the U.S., but we are right in the middle of  Mardi Gras country! To our east is Mobile, the official birthplace of Mardi Gras, and  to our west is New Orleans, the place best known for it {sometimes} wild Mardi Gras ways! It is such a big holiday were we live, that the kids get three days out of school for it!

We usually celebrate by going to a local {very family friendly} parade. The boys love all the decorated floats, catching beads, listening to the marching bands, and eating yummy Mardi Gras snacks. Besides the traditional King Cake {which must be from the fabulous Paul's Pastry Shop} that we eat every year around Mardi Gras, we also LOVE a Moon Pie. These sweet treats are so yummy, and they are even better if you catch them at a parade! Unfortunately we missed our usual parade because of storms that came through on Saturday...so no parade caught Moon Pies for us! I decided making some homemade ones would be a fun replacement, and I'm sharing the step by step for those of you who can't get your hands on a store bought Moon Pie!
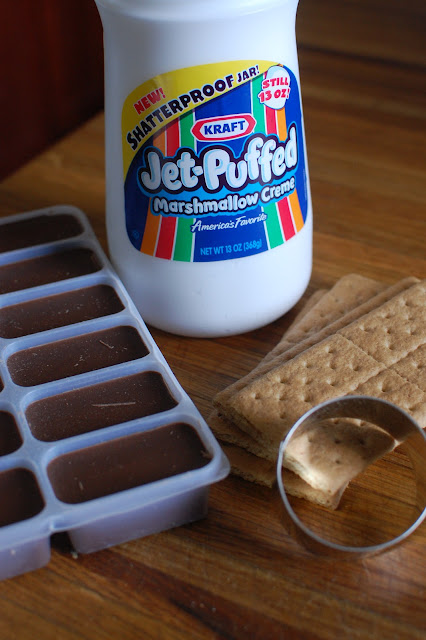
 Start with some really easy ingredients: graham crackers, marshmallow creme, and chocolate. 
 There technically isn't any cooking in this recipe...just melting and assembling:)
Start by using a small round cookie cutter {mine was 2 inches in diameter} to cut your graham crackers into circle. Each cracker should make two rounds.
 Put a good dollop of marshmallow creme on one graham cracker round and then sandwich it together with another cracker. This is easiest to do if you put the marshmallow creme into a ziploc bag and then squeeze it out onto the crackers! Place them in the freezer to chill while you melt the chocolate.
 Toss the graham cracker sandwiches into the melted chocolate and use a fork to turn and coat them. Lift them out of the chocolate and tap off any excess chocolate then place them on foil to harden.
 These aren't exactly the same as a traditional Moon Pie. The crackers are a little bit crunchier, and the chocolate isn't quite the same but they are a pretty close match without a whole lot of effort...and they taste really yummy!
How do you celebrate Mardi Gras?!?
Linking up here..
Tatertots and Jello
Serenity Now
Someday Crafts
Skip to my Lou
Pin It!

Friday, February 17, 2012

Planning is Half the Fun

We are 98 days from our BIG TRIP! It doesn't seem possible that in less than 100 days we will be off on a journey to see parts of the world we've only ever seen in pictures {and on the Brady Bunch}. All kidding aside, we are SUPER excited about our trip! Jason and I sat down and mapped out a tentative course. We've made a few reservations at campsites, but the whole trip isn't set in stone just yet. This is a map that I used to figure out how far we will be going on our trip. In total it will be over 5,000 miles! That is a long way to drive...and a really long way to pull an rv! There are some definite stops on our trip, and I've included most of them on the map below. 

We are still looking for great places to visit along the way, so any and all suggestions or links are welcome! I picked up a few books at the library yesterday so that we could start looking for some "off the beaten path" types of places and make sure that we hit all the "must see" sites too! I would love to take the boys to some fun "kitschy" places along with all the great wilderness & learning things we are planning to see!

We are pretty set in our plan up until we leave the Grand Canyon. We have either made reservations or called about places to stay up to that point, but after the Grand Canyon it gets a little complicated. Apparently Yosemite & Kings Canyon can get a lot of snow in the spring so they don't always make reservations for their campsites until they know they will be able to open. I get that...but I also don't want to drive more than halfway across the country without a plan of where we will be staying {I'm not very spontaneous, can you tell?}. And after we leave Yosemite & Kings Canyon we are moving on to big cities...while pulling an rv. I have to say that is just a little bit scary! But we want to see San Francisco{which btw is totally spelled wrong on my map!} and our plan for heading home is to drive through Los Angeles and hit 1-10 and come all the way back to Mississippi {with a couple of stops on the way}.  
Even though we have a map, some reservations, and sort of a plan, we still have a lot of planning to do....and planning is half the fun:) Oh and we have still have a TON of work to do on the Airstream too!
Pin It!

Wednesday, January 18, 2012

100 Days

Today is Henry and Grant's 100th day of school. Their school always has a fun 100th Day Party with all kinds of fun 100 activities. Earlier this week both boys took baggies with 100 items in them {Henry took toothpicks and Grant took Conversation Hearts} to share with their class. And yesterday the boys and I helped Grant's teachers hang 100 balloons from the ceiling of their classroom.
Yesterday I was also up to my eyeballs in cake and homemade buttercream icing:) Grant's teacher asked last week if I would make a 100 cake for their class, and I was more than happy to help out!

 Honestly making a 100 cake really isn't that hard. It doesn't take a rocket scientist to figure out that all you need is a rectangular piece of cake and two round cakes. I mixed up two store bought box mixes. One I place in a 13X9 pan and the other I divided into two round 9" pans. After the cakes baked and cooled, I stuck them in the freezer to harder up. I've learned the hard way that boxed cakes don't keep their shape well when you cut them unless they are pretty close to frozen. After about an hour in the freezer I pulled out the two round cakes and used a 3" round cookie cutter to cut a hole in the center. To make the one, I lined the almost frozen 13X9 cake up next to the zero and cut it as proportionally as I could {sorry I forgot to measure how big the one was}.
 After I had the cakes cut and ready, I did a crumb coat of buttercream icing. I used the Vanilla Buttercream recipe from Cookies & Cups and it work really well. After I did the crumb coat I stuck them back in the freezer to chill for about 10 minutes. Then I added the final coat of icing. It's not perfect by any means...one of the reasons I don't make cakes often is because I can never get the icing as perfect as I want it. But the pretty M&M's distract you from the imperfections:)

Weekend Bloggy Reading
Pin It!

Tuesday, January 10, 2012

January Un-decorating & Redecorating

We took down all of our Christmas decorations last week. The tree had been down for a few days, but all the garland, wreaths, and pretty sparkly stuff was still hanging...and since it was almost two weeks after Christmas, it was time for it to come down. But for some reason the house seems so bare once all the pretty Christmas stuff comes down. Our front door is empty...no pretty wintery wreaths here {when the temps have been in the 70's it hard to put something that says "Let it Snow" up!}.

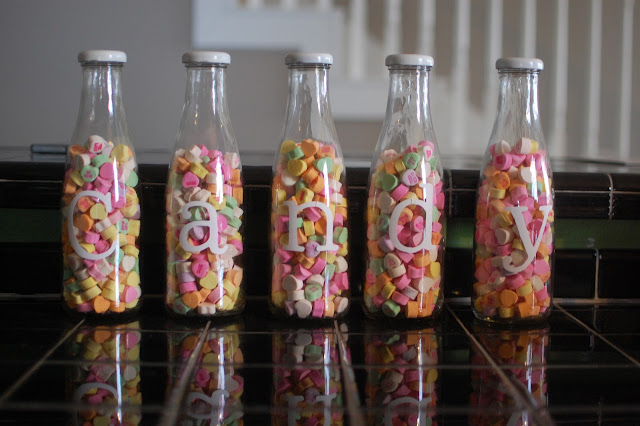
So since we aren't really into celebrating winter when we don't get to experience one...I decided to just jump right into Valentine's Day decorating! The first thing I did was dump out all the peppermints from my Candy Jars and add in the Conversation Hearts that I saved from last year:) No sense in buying new candy every year when all it is used for is decorations! After Valentine's Day last year I poured all five jars of Conversation Hearts into a Ziploc bag and stored them in the back of the pantry. And now they are SUPER cute back in my jars again this year for Valentine's Day!

Since I'm in the mood to get ready for Valentine's Day I figured I would share a few of my favorite past project just in case anyone out there is looking for some V-Day inspiration! 


Now I'm off to find my Hula Hoop Wreaths from last year so my front doors don't look so bare. Then I may start working on a yummy Valentine's Day snack to share with you {after I work on getting the three mountains of laundry put away first}!
Pin It!
Related Posts Plugin for WordPress, Blogger...