Home AboutMe Crafts Food
Showing posts with label Crafts. Show all posts

Monday, November 29, 2010

C is for Appreciation....

...or maybe C is for Cookie!
If you have been around my blog long, you probably know that I like to show my appreciation with cookies:) So a few weeks ago when our church was celebrating Staff Appreciation Week, it was natural that I make cookies for our pastor {plus 3 associate pastors & the children's director}. Lucky for me Hobby Lobby was having an awesome sale...all glassware was 50%. I got some great cookie jars for $2.00 and $2.50 each!
After I filled the jars up with yummy peanut butter or chocolate chip cookies, I prettied them up with some black and white gingham ribbon and a cute red tag {thanks goodness for my Cricut}.
I also added a black vinyl initial to each of the jars just to make them a little more personal.
And hopefully the church staff now knows how much we appreciate all they do for us! 

Serenity Now Crafty Cutter Party
Pin It!

Friday, November 26, 2010

Project in Progress...

Besides eating lots of turkey and staying up all night to shop, I also spent part of the holiday week being productive. You may remember the old school desk that I picked up last year for only $5...I had big plans for all three school desks back in January. Well, it is November and I'm finally getting around to working on them.
They are painted....blue for Henry, green for Grant, and orange for Eli!
I've also added some chalkboard paint to the desk tops and I put the boys' names with on the backs with vinyl. I still want to add a few more fun details to make them a little more special. Hopefully I will use the rest of the weekend {if I'm not too wiped out from shopping all night} to finish these up and I can share them with you next week!

Did you do anything productive this week? Or did you just enjoy the holiday with family while eating lots of good food:) I hope everyone had a great Thanksgiving...and Happy Black Friday!
Pin It!

Tuesday, November 23, 2010

Two More Thanksgiving Shirts...and a Christmas Guest Post

After I made Eli's Shirt of Plenty last week, I knew I had to make Henry and Grant a SUPER cute shirt to wear on Thanksgiving....but I didn't want them all to have the same shirt this time. So here are two new shirts...the Pumpkin Pie shirt for Grant, and the I Love Turkey shirt for Henry.
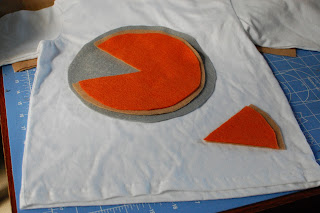
This shirt was really easy to make! I used gray, brown, white, and orange felt to make my pumpkin pie, and I used an empty ice cream bucket as my template.
I used the ice cream bucket to make three circles. The gray for the pie pan was the largest, the brown for the crust was a little smaller, and the orange for the pumpkin was the smallest. After I layered the circles, I cut out a "slice of pie" by cutting a triangle out of the brown and orange but leaving the gray in a whole circle.
I attached the felt to the shirt with iron-on adhesive and then stitched around the edges with embroidery floss just like I did with the Shirt of Plenty. To add a little bit of whimsy and to make sure that everybody knew that Grant's shirt was in fact pumpkin pie, I added a little bit of whipped cream to the top:) I simply cut a circle out of white felt, then I pinched the felt in the middle of the circle and made the ends gather up. Then I sewed the whipped topping on with some heavy duty thread.
I originally saw the idea for the I Love Turkey shirt at Positively Splendid. Amy makes some really cute stuff...and this shirt is one of her cutest yet! I loved the idea, but I didn't have all the materials. What I did have was felt, so I made my own version of her shirt using felt and a little bit of color just for fun!
Here's a picture of all three shirts:) Can you tell that they were all three saying "The sun's in my eyes!" Hopefully we will manage to get a better picture on Turkey Day!
*********************
I'm guest posting over at Under the Table and Dreaming today. Hop over and check out my SUPER cute Glittered Snowman Ornaments and all the other really great homemade ornament ideas!
UndertheTableandDreaming

Pin It!

Friday, November 19, 2010

A Trio of Turkeys

If you haven't seen this amazing Thanksgiving idea yet:
you really must go and check it out now!
After I saw this SUPER cute kids project featured on another blog, I knew I just had to make one {or three} for Henry and Grant's classes at school. 

I'll skip the step by step on how to make this, only because Sara Westbrook's tutorial at One Charming Party is amazing! But I will share with you some pictures of the 3 turkeys that my friend Kaila and I made yesterday!

My turkeys aren't dressed quite as nicely as the inspiration, but they got plenty of oohs and ahhs when I dropped them off at the boys' school yesterday! A few brown bags, some hot glue, a few {fourteen} bags of popcorn, and less than an hour was all it took to make 3 SUPER cute Paper Bag Turkeys. You should definitely give this one a try this Thanksgiving! The little ones at the kid's table will love it!
Pin It!

Monday, November 15, 2010

Shirt of Plenty

I have seen a ton of cute turkey shirts for Thanksgiving floating around the internet lately. I had intentions of making my boys a cute turkey shirt, but was really wishing I could make something a little different and a little more fun instead.

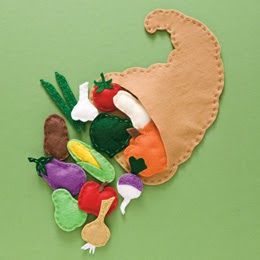
The Shirt of Plenty is what I ended up with after a TON of inspiration {and a template} from Family Fun magazine.
This is the original craft shared in the November issue of Family Fun...SUPER cute Thanksgiving themed felt food. I simply decided to turn my felt food into a shirt instead of making a toy:)
The first step in making this SUPER cute shirt is to print the templates and cut them out. Sometimes the template calls for two of each shape, but you usually only need one.
Use spray adhesive and stick the cut out shapes to different colors of felt. You can mix and match however you want, or follow the suggestions on the templates.
Then add iron-on adhesive to the backside of the felt following the directions on the package.
Cut out the shapes following the template, then remove the paper and the iron-on adhesive backing.
Lay out your design on the shirt and decide where you want each piece to be. Iron the pieces onto the shirt following the directions on your package of iron on adhesive.
The finally step to making The Shirt of Plenty is the most tedious and time consuming....but it also makes a big difference in the appearance of the shirt. Using coordinating colors of embroidery thread, go around the edges of each piece of felt with a running stitch. Make sure to tie off each end of the embroidery thread well, so that the felt pieces stay securely attached.
And that is how you make a SUPER cute Thanksgiving shirt!
Now if I can only find the time {and energy} to make two more:)

Pin It!

Thursday, November 11, 2010

A Bag for a Baby Boy Named Bryson

I love giving homemade gifts for birthday, showers, and almost any other kind of special occasion you can think of. Not only do homemade gifts usually end up being cheaper, but they also show the person that you really cared about the gift you gave them.

I went to a baby shower this past weekend and this is the gift I took:
Hobby Lobby is an awesome place to find supplies for homemade gifts. I picked up this plain white tote for $2.47! I made a simple ruffle {my first ever} with my sewing machine, added some Fray Check to the edges of the fabric, and then sewed the ruffle onto the top of bag. The letter is cut from felt. I love felt....no fraying or pulling or peeling...plus it can be hot glued on {which is exactly what I did}!

Inside the bag are some fun baby goodies {aka a personalized bib, a monogrammed burp cloth, a teddy bear, and a paci keeper}.

It only takes a little money and a little time to make a really great homemade gift!
Do you ever give {or receive} homemade gifts?
Pin It!

Thursday, October 28, 2010

Fun New Twist on an Old Classic

I'm sure you all remember the fun ghost lollipops that we used to make as kids. They are a SUPER simply project that only require tissue paper, ribbon, and a lollipop. I loved them as a kid, but lately I've been trying to do less scary stuff and more fall type stuff for Halloween.  So when I saw this idea a few weeks ago, I knew the pumpkin version was just too cute not to make for my boys' classmates.
I started with orange tissue paper, green gingham ribbon, some small squares of contact paper,
and of course LOLLIPOPS!
I found these SUPER sized lollipops at the dollar store for $1!
The first step is to cut the tissue paper to size. Then punch a hole in the center of the contact paper square. This is to reinforce the tissue paper so that it doesn't tear. Place the contact paper square in the center of the piece of orange tissue paper.
Insert the lollipop stick through the hole in the contact paper and then through the tissue paper.
Tie them up with a piece of green ribbon, and you have a SUPER adorable and really easy party favor.

Join  us Saturdays at tatertotsandjello.com for the weekend  wrap    up           party!
Pin It!

Monday, October 25, 2010

Candy Corn Tshirts

A few weeks ago, I made the boys some really cute and really simple Candy Corn Tshirts.
I started with some plain white broadcloth, plain yellow broadcloth, and some cute black and orange polka dot material. I decided how big each color should be and then cut strips of each material. I lined them up like a candy corn: white on top, orange in the middle, and yellow on the bottom.
I printed out a clip art candy corn to use as a template. I traced the shape onto some iron on adhesive. {You could just freehand the shape if you wanted to.}
Then I attached the candy corn shaped iron on adhesive to the back side of my strips of material following the directions on the package. After it cooled off, I trimmed the extra material away and then ironed the candy corn to the shirt.
I used my sewing machine and went around the edges of the candy corn with a straight stitch. I also did a zig-zag stitch between the different colors of material.
And that is how you make a SUPER cute and SUPER easy Candy Corn Tshirt for fall!
Join  us Saturdays at tatertotsandjello.com for the weekend  wrap    up           party!
Pin It!

Thursday, October 21, 2010

Simple Outdoor Pillow Slipcovers

My attempt to add a little fall flair to my front porch continues with some new pillow slipcovers to go onto THESE pillows that I made this summer.
I really didn't want to re-sew and re-stuff new pillows for fall, so instead of new pillows I made some simple pillow slipcovers.
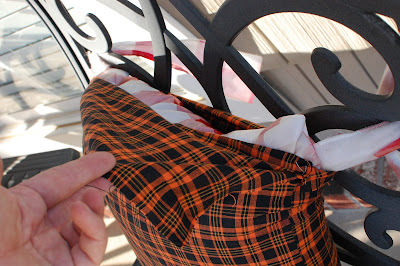
To make the slipcovers, I cut one piece of material just a little bigger than my pillow to account for the seams. Then I cut another piece of material with about 4 inches of extra length on one end to make a flap. I sewed the two pieces of material {right sides together} on three sides leaving the end with the flap open. It ended up looking kind of like a pillow case with a longer flap on one side. 
I turned the slipcover right side out and stuffed the old pillows into it. The picture above shows the flap that is at the top of the slipcover.
After the pillow was completely stuffed into the slipcover, I simply tucked the flap into the back.
Now I have new fall plaid pillows that took very little time or effort to make! My favorite part about these slipcovers is that now I can have new pillows for every different holiday and season without having to spend hours sewing and stuffing!
Pin It!
Related Posts Plugin for WordPress, Blogger...