Home AboutMe Crafts Food
Showing posts with label Crafts. Show all posts

Friday, February 3, 2012

Valentine Mailbox Magnets

I'm still working on getting our house ready for Valentine's Day. We really don't have a ton of decorations out other than the cute Chalkboard Candy Boxes that I made a few weeks ago, and this really cute printable that I pinned and then downloaded from Oopsey Daisy. For the last few years, my boys have had some cute little metal mailboxes that I picked up at Target {don't you LOVE the Dollar Spot} and decorated with a paint pen...obviously before my days of owning a Cricut or Silhouette:) I pulled them out of storage and Eli promptly sat on two of them and bent them all out of shape! Needless to say, the last time I as at Target there were three new little metal mailboxes in my shopping cart. I decided to try something a little different this time. Instead of just decorating the boys' Valentine mailboxes with their names or initials, I thought it would be really cute to include a picture of them too...but I wasn't quite sure how to achieve that. Then I walked past our fridge and noticed two old magnets that I had saved just in case I wanted to craft something, and a light bulb went off! Those little mailboxes are metal which means a magnet will cling to it with no problems! So I set out to make some cute Valentine Mailbox Magnets!

Here are the cute {but oh so plain mailboxes} that I started with.
They look really cute {but oh so plain} sitting the edge of our stairs with the Chalkboard Candy Boxes...but they needed something to jazz them up a little and make them pop!
I started with two 4 inch by 4 inch magnets that I cut in half. I ended up with 4 inch by 2 inch magnets, so I opened up a few pictures of the boys in PSE and cropped their pictures to fit the 4 X 2 magnet. I printed the pictures out in black and white and made sure that they were the right size.
I used my paper cutter to trim the picture to the right size, and then I used spray adhesive to attach the pictures to the magnets.
After the spray adhesive dried, I grabbed a red Sharpie and added a little bit of fun Valentine graffiti to the boys pictures. The black and white pictures were kind of plain and this was a quick easy way to add a little color. You could also add some cute stickers or even attach some pretty Valentine scrapbook paper. 
Then to seal the pictures, I added a few thin coats of Mod Podge.
I also cut out some red vinyl initials with my Silhouette, but stickers or scrap book paper would work great here too!
After the Mod Podge was dry I simply stuck the magnet to the side of the mailbox and they were ready to go! Eli was so excited to see his face on the side of  his Valentine mailbox:) Now I just have to come up with some fun stuff to put inside their mailboxes!

Linking up here..
Tatertots and Jello
Serenity Now
Someday Crafts
Skip to my Lou

Pin It!

Thursday, February 2, 2012

Groundhog Day Craft and Recipe Roundup

Happy Groundhog Day!
{Apparently Phil did not see his shadow this morning which means 6 more weeks of winter.}

My boys were SUPER excited to get up and eat their yummy Groundhog Day Donuts this morning:)

I' m pretty sure Henry and Grant will be doing at least a few different Groundhog Day activites at school today, so I decided to look around and find a few things that Eli and I could work on too. Here are a few of the SUPER cute craft and recipe ideas I found. These are all linked to pins on my holiday pinterest board, so click over to them to get to the original posts for instructions and printables.


Pin It!

Thursday, January 26, 2012

Play-Doh Valentines with Printable Labels

I love Valentine's Day.
Not the cheesy cards or the really expensive roses...but the fact that we have a whole day just to celebrate love! I remember Valentine's Day as a kid being so much fun, especially all the great goodies that we got during our class Valentine's Day party. The first few years that my boys were little, I would pick up a box of generic Valentines and let them give them to a few of their friends. But I soon realized that you could do so much more for Valentine's Day if you think outside the box! Last year I turned some clearance Tootsie Roll banks into a Sweet and Simple Valentine Favor. They turned out really cute, so this year the bar was set kind of high! I started thinking of  Valentine's ideas as soon as the Christmas decorations came down. I toyed with a few different ideas and ended up going with this cute Play-Doh Valentine after I found the 24 pack on sale last week:)
 I picked up two boxes {one for Henry's class and one for Grant's class} of regular sized Play-Doh at Target on sale for $12.99 each. When you do the math the cans of Play-Doh end up only costing a little over 50 cents each. You could also try this with the smaller party sized cans of Play-Doh, but they weren't really much cheaper than the regular sized ones. I created a fun circle label {just the right size for the regular sized Play-Doh lid} that said "Doh" you want to be my Valentine? using a tutorial I found on pinterest. 

{Disclaimer: This is my first attempt at sharing a printable and I'm not really sure what I am doing.}
Just right click on the image below and save it to your computer. Open it up in any editing software and add your kiddos name beside each of the hearts. You could also let them write their name in if you didn't want to edit it. Test print one on a sheet of regular paper first to make sure the circle are the right size for your paper cutter and the Play-Doh lids, then you simple print out as many copies as you need onto sticker paper. The page is formatted to print out on a regular 8.5 X 11 piece of paper. On my computer I have to select fit to printable area to make sure the circles are just the right size.
{A couple of readers have emailed me saying they can't get the printable to work just right when they right click and save. If you are having trouble with it send me an email  & I can send you a copy, contact me at kellibwilson (at) gmail (dot) com.}


Once you get your labels printed, use a 2 inch circle cutter to cut them out.
 Peel off the back of the stickers and place them on the lids of your Play-Doh.
 Then stack them up a take a ton of pictures because they turned out so cute! 
You could also dress them up a little more by adding some pretty ribbon or tulle...but I figured my boys would be happier without the added decoration! 
This really is a fun Valentine to give, and it worked out  perfect that there are 24 cans of Play-Doh in a box and both of my boys have 24 kids in their class. The fun part of the big box of Play-Doh is that their are ton of different colors so the boys can go home with a can of blue or green and the girls can have all the pink ones:)


Linking up here..
Tatertots and Jello
Serenity Now
Decor Chic
Someday Crafts
Skip to my Lou

Pin It!

Tuesday, January 24, 2012

Valentine Chalkboard Candy Boxes

I love a good holiday tradition, and if it involves candy then it's even better:) For Christmas one of my greatest candy memories is getting those cute Lifesaver Books in my stocking, and for Valentine's day nothing says tradition like a little heart shaped box full of chocolates. I remember every year my dad would come home from work with three of those little heart shaped boxes in tow...and even though my sisters and I had been eating candy all day at school, those candy boxes just seemed special. 

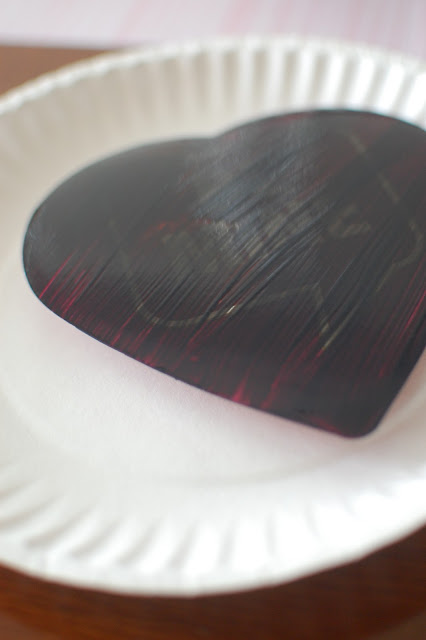
But let's be honest here....those store bought heart shaped candy boxes really aren't the cutest thing ever. I mean I took my time and picked out a few of the better looking ones at Target, and they still just really aren't my style. The great thing is, it's easy to make these candy boxes SUPER cute and all it took was a little chalkboard paint to get these:
from these:
 I started with three candy boxes that I picked up at Target for $1 each, chalkboard paint, and a foam brush...easy, peasy!
 Take the plastic off your candy box then start painting. I painted a few thin layers of the chalkboard paint with my foam brush. The paint won't adhere great the first couple of coats because more than likely your box will be made of shiny cardboard. Be patient and let each coat dry and then add another. I ended up doing four coats. Here's a picture after the first coat:
 You may have a little bit of warping because of the moisture of the paint, but it's not a big deal just lay the heart flat upside down after it dries to straighten it out. After your paint is completely dry, prime the surface by rubbing chalk all over it and then wiping it off.
 Then grab some chalk and have fun. You can decorate your Valentine Chalkboard Candy Box anyway you like. Add that special someone's name, put a fun Valentine's Day saying, or just draw a bunch of hearts. If you don't like your first design, just erase it and start over:)
I am planning on adding the boys names to a few candy boxes to give them for Valentine's Day. This would also be an adorable teacher's gift with a special message or picture added by your kiddo!


Linking up here..
Tatertots and Jello
Serenity Now
Decor Chic
Someday Crafts
Skip to my Lou

Pin It!

Tuesday, January 10, 2012

January Un-decorating & Redecorating

We took down all of our Christmas decorations last week. The tree had been down for a few days, but all the garland, wreaths, and pretty sparkly stuff was still hanging...and since it was almost two weeks after Christmas, it was time for it to come down. But for some reason the house seems so bare once all the pretty Christmas stuff comes down. Our front door is empty...no pretty wintery wreaths here {when the temps have been in the 70's it hard to put something that says "Let it Snow" up!}.

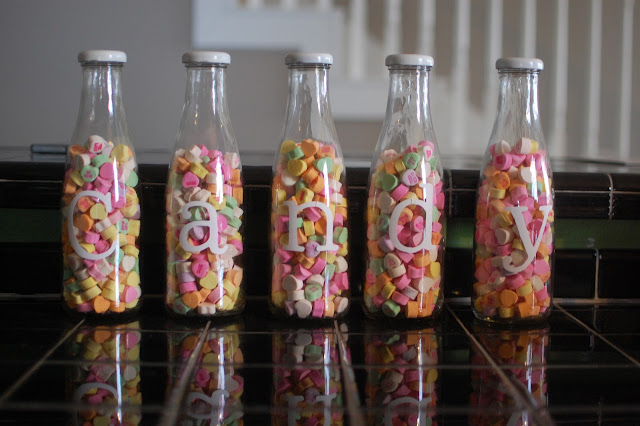
So since we aren't really into celebrating winter when we don't get to experience one...I decided to just jump right into Valentine's Day decorating! The first thing I did was dump out all the peppermints from my Candy Jars and add in the Conversation Hearts that I saved from last year:) No sense in buying new candy every year when all it is used for is decorations! After Valentine's Day last year I poured all five jars of Conversation Hearts into a Ziploc bag and stored them in the back of the pantry. And now they are SUPER cute back in my jars again this year for Valentine's Day!

Since I'm in the mood to get ready for Valentine's Day I figured I would share a few of my favorite past project just in case anyone out there is looking for some V-Day inspiration! 


Now I'm off to find my Hula Hoop Wreaths from last year so my front doors don't look so bare. Then I may start working on a yummy Valentine's Day snack to share with you {after I work on getting the three mountains of laundry put away first}!
Pin It!

Saturday, December 31, 2011

Top 10 Posts of 2011

Apparently food was a big deal on my blog in 2011:)
Nine out of the top 10 posts from this year are some form of food including 4 posts about waffles! So here they are, starting with #1 and going all the way to #10...the Top 10 Posts on Random Thoughts of a SUPERMOM! in 2011:
#1 Rainbow Waffles


#10 Brownie Waffles


Thank you all so much for being such awesome blog friends, followers, and commentors! I am looking forward to another fun year...and apparently I need to start working on some more fun waffle ideas!
Have a wonderful New Year's! See ya in 2012!
Pin It!

Friday, December 30, 2011

Oh My Crafts Vinyl

I got an early Christmas present in the mail a few weeks ago...a big box of vinyl from Oh My Crafts! Even though we got a ton of packages in the mail in December, I was extra excited about getting this big box of goodies, and I was SUPER excited to open it up and start creating.

The first thing I noticed when I opened up my box of goodies was that the vinyl wasn't in rolls but big sheets.  I was really used to the rolls I've bought before from craft stores and Silhouette, so I was a little uncertain about the sheets...but they ended up being way better than I could have imagined! The best part about these sheets is that they load into my Silhouette 100 times easier than the rolls! I normally have to try and load a piece of roll vinyl at least three times before it goes in straight...and the first time I put a piece of Oh My Crafts vinyl in my machine it went in with no problems! The vinyl sheets are 12 X 24, so I do have to trim down the sheets because my Silhouette will only load a 9 inch wide sheet, but if you have the newer Cameo or the bigger Cricut you won't have to trim at all! Oh My Crafts also sell rolls of vinyl but I think I may be sold on sheets instead:)
Before Christmas I used my Oh My Crafts vinyl to make a ton of great gifts. These cute paint bucket tins were in the dollar section at Target. I added an initial with red vinyl and some pretty red and green ribbon. Then I filled them up with goodies and I ended up with the perfect teacher gift for Christmas! I ended up making 13 of these little cuties and only used about half a sheet of vinyl!
My box of goodies also included a Vinyl Squeegee Tool. I have always just used my ruler or scissors to smooth down my vinyl...and I am so glad I have this Squeegee now! I'm actually kind of mad at myself for not spending the $3 on one a long time ago! It made applying my vinyl so much easier!
After I finished up teacher gifts, I moved on to the kiddos' class party stuff! I used a piece of my black Oh My Crafts Vinyl to make lots and lots of little circles {aka snowman eyes and smiles}...
...to make these:

The last vinyl project I have to share with you is a really fun one that my boys love:) And yeah, if you are thinking it's kind of hard to come up with a vinyl project for boys you are right!

Henry and Grant both got bow and arrow sets for Christmas this year and a couple of the arrows have suction cups on them. In true boy fashion, they got a huge kick out of shooting them at the glass on our doors....so Jason grabbed a dry erase marker and drew a bulls-eye for them. But after a couple of hours and more than a few kiddos taking trips in and out the door, the dry erase marker had been smeared and wiped off. So I decided a nice vinyl bulls-eye would work perfectly!  
{Apparently my boys feel the need to run around without shoes or shirts on in the middle of December! It was in the 70's that day so I didn't worry about him too much.}
I used my Silhouette to cut out a couple of circle on some fun red glittery vinyl to make the bulls-eye. It's kind of hard to see up on the door, so I included this picture so you can see how pretty and sparkly it is!
I was very impressed with all of my Oh My Crafts vinyl and I can't for things to slow down a little here so I can create even more fun crafty things with my new stash of vinyl! If you are interested in trying out Oh My Crafts vinyl, now is a great time! They have some great deals going on right now and if you use the code OMCBLOG10 you can save 10% on your entire order!

*Thanks so much to the people at Oh My Crafts for providing me with a free sample of their vinyl. No other compensation was given and all opinions are mine!*

Pin It!
Related Posts Plugin for WordPress, Blogger...