Home AboutMe Crafts Food
Showing posts with label Food. Show all posts

Thursday, June 30, 2011

Red, White, and Krispy Treats

Rice Krispy Treats are a favorite quick snack at our house, and nothing makes Rice Krispy Treats better than dressing them up for the holidays with a little bit of food coloring:)
To make Red, White, and Krispy Treats you will need to make three separate HALF batches of Rice Krispy Treats.
{1 1/2 tbsp of butter, 2 cups of marshmallows, & 3 cups of Rice Krispies}
You also need a 9x13 pan, a 9x9 pan, a star shaped cookie cutter , and red & blue food coloring.
Start each batch by melting down your butter and marshmallows. Leave one batch plain...
...add a little bit of blue food coloring to one batch....
...and a little bit of red food coloring to the other.
Make the blue batch of Rice Krispy Treats first and put them into the 9x9 pan that has been sprayed well with cooking spray.
Next make the red batch and add it into your 9X13 pan filling up only half of the pan.
Last make your batch of plain Rice Krispy Treats and add them into the 9X13 pan with the red treats.
Once the Rice Krispy Treats have cooled, turn them out of the pans onto a cutting surface.
Using a bread knife, cut the white and red into long strips about an inch wide. I ended up with 4 strips of each color.
Place your blue treats into the top left corner of the larger pan and estimate the size that you want it to be. Trim off the excess blue treats with your knife and then place your blue square of treats into the pan.
Starting at the bottom with a red strip of treats, add in the strips alternating red and white, ending with red. I used 4 strips of red and 3 strips of white. You will have to cut the top three or four pieces to fit into the pan next to the blue treats.
Use the star shaped cookie cutter to cut a few stars out of the leftover strip of plain Rice Krispy Treats, and then add them on top of the blue section of treats.

Even though there are a lot of steps, this is actually really easy to assemble...the hardest part was washing my pot between each batch:) I'm sure adults and kids alike will be really excited to see this fun patriotic treat on the dessert table for the 4th of July!

Pin It!

Thursday, June 9, 2011

The Best Lemonade Ever!

**Eli decided to share his germs from last week with me, so I am feeling a little nauseous and vomity under the weather. That means y'all are getting a repost from last summer:) Enjoy!**
****************
When life gives you lemons....
...or when you buy a bag of lemons at the produce stand...
Make Lemonade
We made The Best Lemonade Ever!
Really, that is what the recipe is called, and it was SUPER good!
Ingredients
1 3/4 cups white sugar
8 cups water
1 1/2 cups lemon juice
Directions
1.In a small saucepan, combine sugar and 1 cup water. Bring to boil and stir to dissolve sugar. Allow to cool to room temperature, then cover and refrigerate until chilled.
2.Remove seeds from lemon juice, but leave pulp. In pitcher, stir together chilled syrup, lemon juice and remaining 7 cups water.
I made the water/sugar mixture and chilled it in the fridge.
Then the boys helped me squeeze the lemons. We used a collander over a bowl to catch all the seeds and pulp.
We added our fresh squeezed lemon juice to the water/sugar mixure and then everyone got a turn to stir the lemonade....
...even Eli!
Pour your yummy lemonade over ice and enjoy!
Pin It!

Friday, June 3, 2011

Homemade Donuts

Did you know that today is National Donut Day? Really, it's a holiday...even the big chain donut stores {Krispy Kreme & Dunkin' Donuts} celebrate by giving away free donuts:) But instead of loading up the kiddos bright and early this morning for a free donut breakfast,  we made our own homemade donuts to celebrate!
 All you need to make your own homemade donuts is canned refrigerated biscuits, a rolling pin and a small circle cookie cutter....plus oil to fry your donuts and whatever glaze or toppings you want.
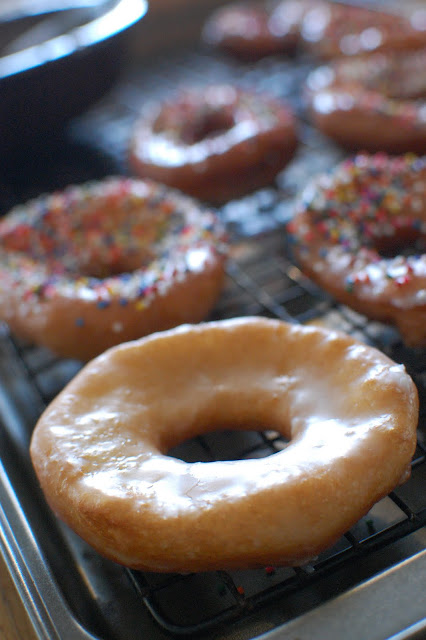
 I mixed up a traditional glaze with powdered sugar and water. It is also helpful to have a cooling rack on top of a cookie sheet to catch all the gooey drips of glaze while your donut is cooling.
 Use your rolling pin and roll out the biscuit dough trying to keep it in as round as possible. Then use the small circle cookie cutter to cut out the middle of the donut. Save the centers and you can make your own donut holes too:)
 The next step is to fry the donuts. This literally only takes a few seconds on each side. Watch carefully and when you see the bottom half of the donut start to brown, flip them over to brown the other side. Take them out of the oil and drain on a paper towel for a few seconds.
 Now it's time to glaze. Simply toss the warm donut into your glaze and give it a few flips to make sure the whole thing is coated.
 Place the glazed donuts on your cooling rack to let them dry.
 Add sprinkles before the glaze sets. You can also leave them plain or add any other kind of topping you would like.....mini chocolate chips or crumbled cookies would be really yummy!
Since I have a house full of sprinkle-loving boys, we topped all of our donuts with sprinkles, then we had a yummy time celebrating:)
Happy National Donut Day!
Visit thecsiproject.com
Pin It!

Tuesday, May 31, 2011

Brownie Waffles

A few weeks ago, I was watching Rachael Ray and she mentioned something about making brownies on a waffle iron. My first thought was that they wouldn't cook all the way through...but I figured I would give it a try anyway. My helper was just a little excited about the idea of Brownie Waffles...can you tell?!?
I got a little more help cracking the eggs.
Then we gave the batter a stir. I added a little bit more water than the recipe called for so that it would spread on the waffle iron better.
Fill up the waffle iron and spread the batter around.....
....just don't forget to spray your waffle iron with cooking spray or you will end up with a crumbly mess of brownies!
These would be so fun served up with some whipped cream or a big scoop of vanilla ice cream:)
Can you tell I'm on a waffle kick lately?!? I actually have a few more ideas in my head {and pantry} so be on the look out for some fun waffle ideas in the next few weeks!
Pin It!

Thursday, May 26, 2011

Watermelon Waffles

With summer here, I am already scrambling around for fun ideas to keep my boys busy and to avoid hearing the dreaded "We're bored!" from them! So for lunch yesterday, I got out my trusty waffle iron and made a fun summer treat: Watermelon Waffles:) These are SUPER easy to make {even easier then Rainbow Waffles} plus they are extra sweet because of the added watermelon seeds {chocolate chips}!
Start by mixing up some waffle batter using your favorite recipe or box mix. Let your little helpers get in on the action by stirring:)
Pour about 1/3 of the batter into another bowl and add some green food coloring. Add red or pink food coloring to the remaining 2/3 of the batter. You could also make these even more fun by adding in some watermelon flavoring {by adding some dried jello powder or some kool-aid mix}.
Star by pour the red colored batter in the middle, then go around the outside edge with the green batter. Spread the red around if you need to get the colors to meet, then sprinkle some chocolate chips {aka watermelon seeds} onto the red batter.
Once the waffles are done, cut them in half and you have a fun slice of watermelon waffle...just don't sprinkle salt on it:)
These would be adorable served up as dessert at a picnic and because they can be loaded up with chocolate chips, there really isn't any need for syrup!

What kind of fun treats are you making for your kiddos this summer?
Visit thecsiproject.com
Pin It!

Tuesday, May 17, 2011

Cookie Palm Trees

Summer is right around the corner and the cookies I am sharing with you today are perfect for all of those end of school/luau/beach/pool parties that everyone is sure to be having soon!
The beauty of these cookies is that you only need two ingredients. Pirouette cookies and green fruit slices...plus a few tooth picks to hold them together.
Using a very sharp knife, cut each fruit slice into three pieces as shown below.
Arrange three slices in a palm tree pattern making sure to overlap the top edge of each fruit slice. Push a toothpick into the fruit slices and be careful that you catch all three of the pieces with the toothpick.
Place the palm leaves {with toothpick attached} on top of the pirouette cookie and push the toothpick into the the fudgy inside of the cookie.
I added these Cookie Palm Trees to a Jello Island for Grant's Luau Party at school, but these Cookie Palm Trees would be really adorable on top of a cake or even cupcakes too!
I'm still trying to think of a way to display these without sticking them in another snack {because they are just that cute on their own}, so if anyone has suggestions I would love to hear them:)
Pin It!
Related Posts Plugin for WordPress, Blogger...