Home AboutMe Crafts Food
Showing posts with label Food. Show all posts

Tuesday, February 28, 2012

What's in Your Lunchbox?


*graham crackers*
*granny smith apple*
*sugar free chocolate pudding*
*marshmallows*
*capri sun*
*whole wheat goldfish*
*ham roll-up*
*grapes*

This is what the boys' lunchboxes look like most days.
{except the marshmallows were a treat today}
Sometimes the grapes are switched out for carrots, the apple is switched out for a banana, the pudding is switched out for applesauce or yogurt, and the goldfish are switched out for Sun Chips....and sometimes they get leftover pizza instead of a roll-up or PB&J sandwich!

What does your "lunchbox" usually look like?

Pin It!

Monday, February 27, 2012

Brownie Stuff

I like brownies.
And I really like this yummy dessert that we call Brownie Stuff!
BUT we only have 89 days until we leave on our big road trip. That will be here soon...and my behind has got to get into shape so that I can enjoy all of the great outdoors on our trip. There will be lots of hiking and biking and walking and mountain climbing for me to do in three months and I want to be ready for it. SO Jason and I started the P90X program today. Let me tell you...it is hard! Getting up at 4:45 this morning was not pretty, but I knew I had to work off this yummy dessert that we devoured this weekend:)
It is kind of painful to share this yummy dessert with you knowing that it will be quite a while before I will enjoy it again...but that doesn't mean you can't whip it up for your family:) 
 We call this Brownie Stuff. It is sort of like a trifle, but it's a lazy version of a trifle because there is only one layer of each thing...so I just call it Brownie Stuff:) All you need to make this {way too yummy chocolate heaven dessert} is a box of brownie mix, a box of instant chocolate pudding, and a tub of Cool Whip {plus the eggs, oil, and milk needed to make the brownies and pudding}.
 Start by mixing up your instant pudding according to the directions on the box. Then stick it in the fridge to chill.
 Mix your brownies according to the directions on the box, bake them in a 13X9 pan, cool them completely, then crumble them up in the pan. I usually take out the corners and any of the edges that get crispy and eat them as a snack...you want your Brownie Stuff to get soft and gooey:)
 Layer your chilled pudding on top of the crumbled brownies...
...and top it off with a layer of Cool Whip. Stick your Brownie Stuff in the fridge to chill for a couple of hours. This is even better the next day when all the pudding has soaked into the brownies and turned into soft chocolate yumminess! I wanted to get a picture of it all scooped up pretty on a plate, but we ate it so quick that there was no time to grab my camera:) 


So to recap:
Make this yummy dessert for your family!
I'll not be making or eating it for at least 3 months.
And I'll be working hard at P90X!
But I'll be craving Brownie Stuff the whole time:)

Linking up here..
Tatertots and Jello
Serenity Now
Someday Crafts
Skip to my Lou
Pin It!

Monday, February 20, 2012

Homemade Mini Moon Pies

Mardi Gras is a fun holiday for us. I know that it's not as big of a deal in other parts of the U.S., but we are right in the middle of  Mardi Gras country! To our east is Mobile, the official birthplace of Mardi Gras, and  to our west is New Orleans, the place best known for it {sometimes} wild Mardi Gras ways! It is such a big holiday were we live, that the kids get three days out of school for it!

We usually celebrate by going to a local {very family friendly} parade. The boys love all the decorated floats, catching beads, listening to the marching bands, and eating yummy Mardi Gras snacks. Besides the traditional King Cake {which must be from the fabulous Paul's Pastry Shop} that we eat every year around Mardi Gras, we also LOVE a Moon Pie. These sweet treats are so yummy, and they are even better if you catch them at a parade! Unfortunately we missed our usual parade because of storms that came through on Saturday...so no parade caught Moon Pies for us! I decided making some homemade ones would be a fun replacement, and I'm sharing the step by step for those of you who can't get your hands on a store bought Moon Pie!
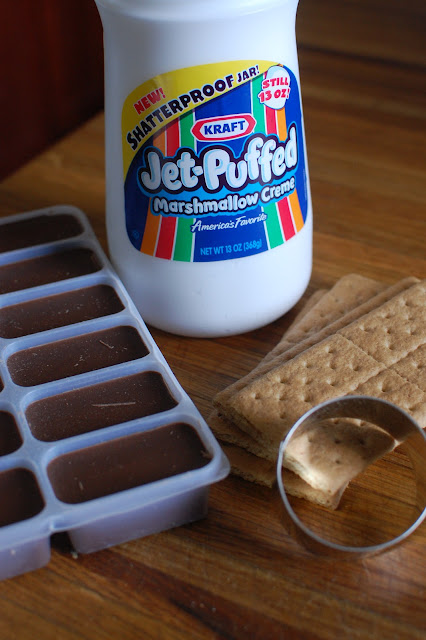
 Start with some really easy ingredients: graham crackers, marshmallow creme, and chocolate. 
 There technically isn't any cooking in this recipe...just melting and assembling:)
Start by using a small round cookie cutter {mine was 2 inches in diameter} to cut your graham crackers into circle. Each cracker should make two rounds.
 Put a good dollop of marshmallow creme on one graham cracker round and then sandwich it together with another cracker. This is easiest to do if you put the marshmallow creme into a ziploc bag and then squeeze it out onto the crackers! Place them in the freezer to chill while you melt the chocolate.
 Toss the graham cracker sandwiches into the melted chocolate and use a fork to turn and coat them. Lift them out of the chocolate and tap off any excess chocolate then place them on foil to harden.
 These aren't exactly the same as a traditional Moon Pie. The crackers are a little bit crunchier, and the chocolate isn't quite the same but they are a pretty close match without a whole lot of effort...and they taste really yummy!
How do you celebrate Mardi Gras?!?
Linking up here..
Tatertots and Jello
Serenity Now
Someday Crafts
Skip to my Lou
Pin It!

Thursday, February 9, 2012

I Love You More Than Chocolate Marshmallow Hearts

Eli and I are heading to library story time today. I'm kind of embarrassed to admit that my poor neglected third child has never been to story time. I took the boys all the time when Henry and Grant were little, but for a million and one reasons I've never taken Eli. A friend has invited us a few times over the past few months, and I had planned to start going in January....but I got sick, and it rained, and I had laundry to do...a million and one reasons! So we are going today! And today just happens to be the special Valentine party, which means if I'm going to show up for the first time I have to bring something cute with me:) Actually I probably don't have to take anything, but I bought these cute heart shaped marshmallows at Walmart a few weeks ago and I was kind of excited to have somewhere to take them!
So here are my SUPER simple, less than ten minutes to make, and really really really yummy
I Love You More Than Chocolate Marshmallow Hearts!
 I started with a bag of pink and white heart shaped marshmallows, melted chocolate candy coating, and a handful of toothpicks.
 Stick the toothpick into the side of heart shaped marshmallow and then give it a good dunk in the melted chocolate. Carefully shake off any excess chocolate.
 After dipping, place them on foil...
 ...and add a few shakes of some pretty Valentine sprinkles.
 After the chocolate hardens, carefully pull out the toothpick. You can dip another toothpick into the melted chocolate and covered up the hole where you pulled out the dipping toothpick, or you can just leave them as they are. 
Place your chocolate marshmallow hearts directly on a serving tray, or put them into cute papers cups like I did. They fit perfectly into mini baking cups that I picked up on clearance last year at Target. These were a big hit at our house yesterday {my boys begged to eat the extra chocolate marshmallow hearts last night after dinner}, so I'm hoping they will do just as good at story time today. What preschooler doesn't love sprinkles?!?
Linking up here..
Tatertots and Jello
Serenity Now
Someday Crafts
Skip to my Lou

Pin It!

Monday, February 6, 2012

Football, That Stupid Pig, Ice Cream Sundaes, and Airstream Progress

So did you watch the big game {and the commercials} last night? I have to admit that we really aren't fans of either of the teams that played last night, but we were cheering for the Giants...mostly because the Mannings have a little bit of Mississippi history and that history trumped the fact that Tom Brady's girlfriend is a supermodel {you know, because supermodels affect the teams that people cheer for}.

Anyway, we dvr'd the game because we had church last night, so when we got home Jason got busy with the fast forward button while I fixed dinner {aka put a couple of delicious slices of Papa John's pizza on paper plates}. We normally fast forward like maniacs through dvr'd games, but this one was different because half the fun of the Super Bowl is the commercials so we couldn't skip all of them! We did skip over most of the beer commercials and ALL of the Geico commercials {Please tell me I'm not the only one who thinks that squealing pig is the most obnoxious thing on tv?!?}. We LOVED the M&M commercial, but honestly there aren't really many great ones that I remember:) Lots of celebrity cameos {Seinfeld and Leno} and two products in one commercial together {Chevy and Twinkie} which just seems kind of weird to me! 

Now everybody knows that yummy food is SUPER important for proper Super Bowl viewing. We had dinner covered with pizza, so that just left dessert...and I had something really fun planned for us this year! Last week I pinned these adorable ice cream sundaes that I knew my boys would love! They're called Super Bowl Sundaes and they were created by Katrina. I recreated {aka copied} her dessert without changing much, because really they were pretty close to perfect! The one thing I did change is that I used chocolate to attach my sprinkles and I didn't pipe on my chocolate, I just kind of smeared it on with a spoon. I figured my boys would devour these before they noticed that the audience wasn't perfectly placed:) Anyway here are a few pics that I took of the process, but head over to In Katrina's Kitchen to get a great step by step and see her {not quite as sloppy as mine} version!


Other than watching football this weekend, most of our time was spent working on the Airstream and planning for our big trip. Jason has been making pretty good progress lately. The bathroom is completely put together and fully functioning. We still need to get light fixtures and figure out what we are doing for a mirror, but all the plumbing is working and there are no leaks! We ordered our flooring a few weeks ago and it should be in one day this week. I am SUPER excited to get the flooring in because I know it is going to totally change the look of everything because right now the floor is white painted plywood! I helped out yesterday by painting a shelf that Jason built in the front of the Airstream. 
We had originally planned to paint the shelf white, but I remember that we bought some {almost avocado} green paint back when we bought the paint for the walls. So I made the executive decision to go with green and add some color, because up until now everything has either been gray or white {with the exception of the boys room in the back that is a pretty turquoise/blue color}.

We also sat down and mapped out our trip and decided where {and when} we are going. Using google maps, I added in all our stops from start to finish. The trip should take around 17 days and during that time we are going to drive more than 5,000 miles! That just seems a little crazy to me...but I know we are going to have such a great time and see so many amazing things! I'm planning to take a few more pictures of the progress we've made on the Airstream and share it later this week, and {if I can figure out how to do it} I am going to share the map showing all our stops along the way.

Now, I must go do laundry because this morning I was digging through a pile of clothes trying to find uniform pants for Henry...and because all of Eli's clothes are piled up in a basket in the living room and they have been there for almost two weeks...and because there is a load of mine and Jason's clothes in the dryer that has been there since last Monday. Sometimes I get lazy and leave that last load of laundry in the dryer:) 

Miscellany Monday @
lowercase letters
Pin It!

Thursday, February 2, 2012

Groundhog Day Craft and Recipe Roundup

Happy Groundhog Day!
{Apparently Phil did not see his shadow this morning which means 6 more weeks of winter.}

My boys were SUPER excited to get up and eat their yummy Groundhog Day Donuts this morning:)

I' m pretty sure Henry and Grant will be doing at least a few different Groundhog Day activites at school today, so I decided to look around and find a few things that Eli and I could work on too. Here are a few of the SUPER cute craft and recipe ideas I found. These are all linked to pins on my holiday pinterest board, so click over to them to get to the original posts for instructions and printables.


Pin It!

Wednesday, February 1, 2012

Groundhog Day Donuts

Groundhog Day has always seemed like such a strange holiday to me. Maybe it's because I live in the deep south and the groundhog seeing his shadow or not really has no effect on our winter {because we really don't have winter down here...it's been in the 70's almost every day since Christmas}! But I do remember the movie Groundhog Day with Bill Murray being hilariously funny though it has forever since I've seen it:) Anyway, we haven't ever really celebrated Groundhog Day at our house. I think the kids may do a little craft or something at school, but nothing big. Last year I saw the cutest cupcakes on the Family Fun website...but I saw them too late to make them. Luckily this year I remembered that Groundhog Day was February 2nd before February 2nd actually got here:) So here this is the SUPER fun Groundhog Day treat that my boys will be starting their day off with tomorrow:
Groundhog Day Donuts
{I'll make them eat some fruit too since this thing is loaded with chocolate!}
 Start with any kind of donut you like. You could even make these SUPER easy homemade donuts. I was being lazy so I just bought a dozen glazed donuts at the grocery store. You will also need some chocolate cookies, chocolate candy coating, and Nutter Butter cookies cut in half {or another oblong shaped cookie if you have peanut allergies to deal with}. I also used some sprinkles and a couple of chocolate chips to decorate the groundhogs face but they didn't make it into the picture.
 Start by crushing your chocolate cookies in a ziploc bag.
 Then set up an assembly line.
Donuts
Chocolate Candy Coating
Crushed Cookies
Foil to place the donuts on
 Dip your donut in the melted chocolate. Shake off the excess chocolate. Then dip them into your crushed chocolate cookies.


While the chocolate is hardening on the donuts, decorate your Nutter Butter groundhog face. Simply cut the Nutter Butter in half, then use a small dab of the melted chocolate to stick sprinkles and chocolate chips on to look as much like a groundhog as you can. I used some heart shaped sprinkles because that is what I had, but mini M&M's would work good here too.
 Stick the groundhog head down into the hole of the donut and you will have a SUPER cute groundhog sticking his head up to try and see his shadow!
These would be a perfect breakfast to start off Groundhog Day, or a really fun snack to sneak into your kiddo's lunchbox for school! Happy Groundhog Day...a day early:)
How do you celebrate Groundhog Day?
Pin It!

Friday, January 27, 2012

Chocolate-Covered Strawberry Waffles

A few weeks ago, I starting thinking about making some yummy Valentine-ish waffles...fun waffles have kind of become an obsession of mine and I knew I couldn't leave Valentine's out of the mix! The only problem was that I just couldn't figure out a clever way to use my round waffle maker to make anything heart shaped. So I figured instead of making something fun shaped, I would do a combo of ingredients that are classic Valentine flavors. 
Nothing says romantic Valentine's like a yummy chocolate covered strawberry! But lets be honest here, strawberries really aren't in season right now so you will probably either end up with small not so sweet strawberries or you will have to pay a ton of money to order fancy chocolate covered ones that end up not being nearly worth the $40 you spent to have them shipped all the way from California {I don't know this from experience or anything}!
Enter the Chocolate-Covered Strawberry Waffle:
This yummy waffle concoction is made with a strawberry cake mix, so you are guaranteed that yummy strawberry flavor without having to get it shipped from California. You could also make a homemade strawberry cake mix, but then you still run into the problem of strawberries not being in season...so I would just stick to the boxed cake! The only other thing you need is a bag of milk chocolate chips.
Start by mixing up your cake mix according to the directions on the box. Then add in half of your chocolate chips and give them a good stir.
Put the other half of your chocolate chips in a microwave safe bowl and heat them until melted.
Warm up your waffle iron, spray it down with non stick cooking spray, then add your batter to the waffle iron. I use a large cookie scoop {the same one I use to portion out cupcakes}, and it takes a little more than three scoops to fill my waffle iron. Just play around with it until you get the right amount.
Once the waffles are finished cooking, carefully remove them from the waffle iron. They will be a lot softer than a regular waffle because they don't really crisp up...which you don't want anyway because you want a soft fluffy cupcake feel. Let them cool slightly, then drizzle them generously with the chocolate that you melted earlier. You can do that simple with a spoon, or you can put the melted chocolate in a little baggie, cut off the corner and drizzle away. 
I don't really recommend having these waffles for breakfast...they're a little too sweet for breakfast. But they are the perfect dessert to end your romantic Valentine's meal, or maybe a sweet treat to surprise you kids with when they get home from school on February 14th!

Linking up here..
Tatertots and Jello
Serenity Now
Decor Chic
Someday Crafts
Skip to my Lou


Pin It!

Wednesday, January 18, 2012

100 Days

Today is Henry and Grant's 100th day of school. Their school always has a fun 100th Day Party with all kinds of fun 100 activities. Earlier this week both boys took baggies with 100 items in them {Henry took toothpicks and Grant took Conversation Hearts} to share with their class. And yesterday the boys and I helped Grant's teachers hang 100 balloons from the ceiling of their classroom.
Yesterday I was also up to my eyeballs in cake and homemade buttercream icing:) Grant's teacher asked last week if I would make a 100 cake for their class, and I was more than happy to help out!

 Honestly making a 100 cake really isn't that hard. It doesn't take a rocket scientist to figure out that all you need is a rectangular piece of cake and two round cakes. I mixed up two store bought box mixes. One I place in a 13X9 pan and the other I divided into two round 9" pans. After the cakes baked and cooled, I stuck them in the freezer to harder up. I've learned the hard way that boxed cakes don't keep their shape well when you cut them unless they are pretty close to frozen. After about an hour in the freezer I pulled out the two round cakes and used a 3" round cookie cutter to cut a hole in the center. To make the one, I lined the almost frozen 13X9 cake up next to the zero and cut it as proportionally as I could {sorry I forgot to measure how big the one was}.
 After I had the cakes cut and ready, I did a crumb coat of buttercream icing. I used the Vanilla Buttercream recipe from Cookies & Cups and it work really well. After I did the crumb coat I stuck them back in the freezer to chill for about 10 minutes. Then I added the final coat of icing. It's not perfect by any means...one of the reasons I don't make cakes often is because I can never get the icing as perfect as I want it. But the pretty M&M's distract you from the imperfections:)

Weekend Bloggy Reading
Pin It!
Related Posts Plugin for WordPress, Blogger...