Home AboutMe Crafts Food
Showing posts with label Food. Show all posts

Thursday, December 15, 2011

Snowman Juice Boxes

Last week when I opened up Grant's backpack there was nice little note from his teacher. It had information about their class Christmas party, and at the bottom it had a little line that said "Can you please send..." You all know that I am kind of an over-achiever when it comes to school treats, so when I saw juice boxes on that little line I was kind of disappointed....until I remembered these cute Mummy and Turkey juice boxes that I had seen earlier in the year! I decided that I wasn't going to just send boring old juice boxes, I was going to rock the juice boxes for Grant's class! I did a little search on Pinterest and surprisingly there were very few {actually I don't think I found any} Christmas themed juice boxes...I'm guessing because most people do the milk and cookies thing! So I brainstormed a few ideas and decided on Snowman Juice Boxes!
 I started by wrapping the front and two sides of the juice box with white cardstock. I decided to leave the back of the juice box uncovered so it would be easy to remove the straw. I measured my juice box, cut the paper to size, applied a few lines of glue dot runner, and then folded the paper onto the juice box. 
 I used my Silhouette to cut out a ton of black circle onto some {Oh My Crafts} vinyl. If you don't have a craft cutter, you could use a circle punch or even a hole punch. I also cut out some cute snowman noses onto some orange paper...I would have used vinyl for that too but I didn't have any orange:) 
 I put the black vinyl circles on the front of the juice box for eyes and a smile and I added the orange noses with a little bit of glue. To finish them off I added a cute scarf to each juice box made out of ribbon and ric rac.
I'm hoping these Snowman Juice Boxes are a hit at Grant's class party tomorrow:)
Pin It!

Monday, December 12, 2011

Nutter Butter Snowman Snacks

If you have kiddos in school, you more than likely have more than one Christmas party to attend this week. That also means you more than likely need to take some sort of yummy treat too. I know some parents would much rather be the plate/cup/napkin bringers, but I LOVE to bring something fun and yummy for the kiddos to enjoy...even if it is way harder than just picking up some cups:) So if you're like me and crazily think that bringing cute treats for your kiddo's class is fun, then try out these {oh so adorable and really not that hard to make} Nutter Butter Snowman Snacks.
 My inspiration for these cuties came from Pinterest {surprise, surprise}. Here's a link to my pin and a link to the blog post {My Pretty Purse} where the pin is from:)
 Start by dipping your Nutter Butter in white candy coating aka almond bark. I used a toothpick stuck in between the two cookie pieces to dip them {though it didn't work every time because the toothpick slipped out or the cookie broke}. While the candy coating is still wet add two M&M's for buttons, mini chocolate chips for eyes and a smile, and an orange tic tac for the nose. They are SUPER cute this way, but to make them even cuter add some earmuffs too! I did the earmuffs the same way I did with my Simple Snowman Snacks last year....curl up the Pull n Peel and place them in the freezer to harden {this helps them keep their shape while the coating dries} then place the Pull n Peel on the snowman's head with two M&Ms on either side.
SUPER cute and really not that hard to make...though a little time consuming with all the small candy pieces. If you are concerned about nut allergies, you can use any other oval shaped cookie in place of the Nutter Butter.
What kind of fun treats are you making for your kiddos this year?
Pin It!

Thursday, December 1, 2011

Sweet and Spicy Almonds

December is here. I don't know about you, but for me that means time to put out the Christmas decor, wrap presents, and make lots and lots of party snacks! I am mostly a baker during the month of December, but a party can't just have cookies and cakes:) This recipe for Sweet and Spicy Almonds is perfect for the buffet table at a party, but they would also be really great packaged up and given to one of your favorite people this holiday season...plus they are actually pretty healthy for you too!
 You start this recipe by beating one egg white until it is nice and foamy. Whisk, whisk, whisk until it looks kind of like the the picture below:
 Dump about 2 cups of raw almonds into your bowl with the foamy egg white and toss them around to coat.
 In a gallon sized Ziploc bag, mix together your sweet and spicy coating. I started with 1/4 cup of sugar, and I added a sprinkle of salt, and a pretty good amount of cinnamon. 
 Then to give my almonds a little kick, I added in some crushed red pepper flakes. You could also add cayenne pepper and chili powder like this recipe {Sugar Spiced Almonds} calls for. Honestly you can add any combination and amount of seasonings and spices that you want....play around with it to see what you like best.
 Once you get all your spices added to your bag, pour in the egg white coated almonds. Zip up the bag and give the almonds a good toss to coat them with the sugar/spice mix....this is where the kiddos might want to give you a hand too:)
 Pour the almonds onto a baking sheet and bake in a 250 degree oven for about an hour. You can adjust the time to get the almonds as crunchy as you would like...and make sure to stir them about every 15 minutes so they don't stick or burn.
Let the almonds cool {or sneak a few while they are still warm and toasty} then store them in an airtight container until you are ready to party or you need to give someone a sweet and spicy gift!

What kind of snack foods do you like to make during the holidays?
Pin It!

Tuesday, November 29, 2011

Mini Muffins Make Me Smile

And hopefully they will make you and the person you share these with smile too...because this SUPER cute decorated egg carton is filled with Pumpkin Chocolate Chip Muffins!
 I pinned this cute egg carton idea from fiskar.com a few months ago. I was waiting for just the right time to make them, and staff appreciation at church turned out to be perfect time for me to whip up some mini muffins and try them out!
To make these, simply cut scrapbook paper to cover the top and front of your egg carton. The inspiration one only covered the top and left the egg carton writing visible on the front...but I wanted to cover most of the writing up for a cleaner look. The inspiration one also added some cute scrapbook paper and little note inside, but I figured the muffins were a good enough surprise inside without the little note:) I used spray adhesive to attach the paper, but a glue stick would work fine too.
Honestly, I was a little skeptical about the mini muffins fitting into the egg carton when I first got started, but as soon as they were cool I started sitting them in the egg carton and they fit perfectly!
Fill up your egg carton with yummy mini muffins, tie them up with some pretty ribbon or raffia, add a little note, and you have a perfectly cute and edible gift to show your thanks to someone!

Here's the recipe for the Pumpkin Chocolate Chip Muffins {from allrecipes.com} just in case any is interested:


Ingredients
  • 3/4 cup white sugar
  • 1/4 cup vegetable oil
  • 2 eggs
  • 3/4 cup canned pumpkin
  • 1/4 cup water
  • 1 1/2 cups all-purpose flour
  • 3/4 teaspoon baking powder
  • 1/2 teaspoon baking soda
  • 1/4 teaspoon ground cloves
  • 1/2 teaspoon ground cinnamon
  • 1/4 teaspoon salt
  • 1/4 teaspoon ground nutmeg
  • 1/2 cup semisweet chocolate chips

Directions

  1. Preheat the oven to 400 degrees F (200 degrees C). Grease and flour muffin pan or use paper liners.
  2. Mix sugar, oil, eggs. Add pumpkin and water. In separate bowl mix together the baking flour, baking soda, baking powder, spices and salt.. Add wet mixture and stir in chocolate chips.
  3. Fill muffin cups 2/3 full with batter. Bake in preheated oven for 20 to 25 minutes.
Pin It!

Friday, November 18, 2011

Gobble, Gobble: Turkey Waffles

Yesterday I admitted my obsession with crafty kids shirts, so now it's time for me to admit that I am just a little bit obsessed with fun waffles too! The first waffle I made was a rainbow waffle to celebrate St. Patty's Day. It's fun to have a colorful breakfast to help celebrate a holiday...but once I started I couldn't stop. I've shared some just because waffles {cupcake waffles} and a whole lot of holiday ones too {candy corn and jack o lantern}.

I have been brainstorming Thanksgiving ideas for a while now. It's amazing how hard it is to come up with a good waffle idea for a holiday based around food:) I tried to make Cornucopia Waffles with an abundance of M&M's, but all that did was make a huge mess of the waffle iron. So I decided to give Turkey Waffles a try instead. Now I know the name makes them sound kind of gross because seriously who wants savory turkey hiding in their waffles! Don't let the name scare you off...there is not a trace of real turkey in these fun and colorful Thanksgiving waffles:)
I started with the usual suspects...and my usual helper:) 
**waffle mix, food coloring, and Eli**
 Mix up your waffles according to the directions. You will need four waffles total to make two turkeys. By the way, these are sharing waffles...two people per turkey:)
*Start by making one plain waffle.*
*While that waffle is cooking divide your remaining batter into three bowls.*
*Add green, yellow, and orange food coloring each into one of the bowls and stir to combine.* 
*Cook the three colored waffles and then get ready to assemble.*

Start by cutting the plain waffle in half and the colored waffles into quarters.
Lay out the colored waffles in a turkey tail pattern starting with the outside ones{green here} and working your way in. Lay the half plain waffle on top of the turkey tail and adjust as needed. Use one of the leftover yellow quarter waffles to make a beak for your waffle. I simply cut off the pointed edge and added it on top of the plain waffle. 
What kind of fun foods are you making to celebrate Thanksgiving this year?
Pin It!

Monday, October 31, 2011

Monster Brownies & Halloween Costumes

I saw these SUPER cute Monster Brownies over at Amanda's Cookin' last year...and I have been waiting for a reason to make them ever since! I can't remember why I didn't make them for Halloween last year, but I knew they would be the perfect treat to take to our annual Halloween gathering this year! 
 I started with a box brownie mix. I know a lot of people who say they LOVE homemade brownies, but I've never made homemade brownies {and I've tried lots of times} that taste as good as Duncan Hinds Chewy Fudge brownies! I mixed my brownies according to the chewy {NEVER cake-like} instructions, let them cool, and then cut them into squares and rectangles. Then I made a quick icing from powdered sugar, water, and green food coloring. I piped a border around the the edge of each brownie, let it harden, and filled in the inside with the same icing. Then I got busy making some monsters with M&M's, mini marshmallows, licorice, and colored icing. Pretty cute, SUPER easy, and the perfect treat for the kiddos to help with! Make sure to head over and check out Amanda's Monster Brownies...they are WAY cuter than mine:)
 Here's a BIG little sneak peek of the boys' Halloween costumes for this year: A shark and a surfer dude!
You may notice that we are a man surfer dude down...that's because Grant has been sick since Friday. I finally took him to the doctor Sunday afternoon {thank goodness for after-hour and weekend sick appointments}, and he has pneumonia! Needless to say, he wasn't feeling up for costume night at Awana's last night! He started on antibiotics yesterday, and he is already feeling a ton better. I'm hoping to get a picture of all three boys in the costumes this afternoon...and I'm hoping Grant is feeling well enough to trick or treat at a couple of houses too!
Have a safe and HAPPY Halloween!
Miscellany Monday @
lowercase letters
Pin It!

Tuesday, October 25, 2011

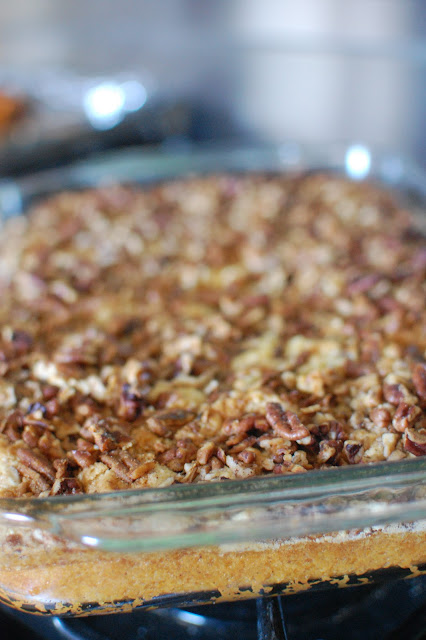
Sweet Potato Pecan Dessert

Last week, I shared a picture of my abundant supply of sweet potatoes and I asked for your suggestions on what to make with them. I got a ton of great ideas {like sweet potato fries} that I am planning on trying...but first I had to make this yummy dessert that I found on Pinterest. The original recipe is called Pumpkin Pecan Dessert and it is from a scrumptious blog called Glorious Treats! I know that pumpkins and sweet potatoes aren't the same thing, but they are pretty much interchangeable in  recipes...at least they are for me. So I took the original recipe and simply switched out the pumpkin for my sweet potatoes, and I came up with Sweet Potato Pecan Dessert!


Ingredients:
4-5 medium sweet potatoes, baked
1 can (12 oz) evaporated milk
3 eggs
3/4 cup sugar
pumpkin pie spice or cinnamon to taste

1 boxed yellow cake mix
1 1/2 cups chopped pecans
3/4 cup butter, melted

Directions:

1. Bake your sweet potatoes at 350 until tender. Scoop out the insides. You will need about 15 oz of sweet potato for this recipe. 
2.  In a large bowl add the first 5 ingredients, and stir to combine.
3.  Pour sweet potato mixture into 9" x 13" dish that has been sprayed with cooking spray.
4.  Sprinkle dry cake mix evenly over the sweet potato layer.
5.  Add chopped pecans.
6.  Pour melted butter over top.
7.  Bake 50-60 minutes on 350. 
Top with whipped topping or ice cream before serving.
Adapted from Glorious Treats who got the recipe from the Betty Crocker Holiday Recipes booklet
Pin It!

Thursday, October 20, 2011

Sweet Potatoes

Lots and lots of sweet potatoes!
I bought this bag of sweet potatoes for $6 from a man selling them on the side of the road last week. I'm guessing there are probably close to 50 sweet potatoes in this brown bag that the man called "the small bag"....he was also selling a larger bag that had twice as many sweet potatoes in it! 

I came home with grand plans to make some yummy baked sweet potatoes and maybe some kind of pie, but my bag of sweet potatoes is still sitting untouched on the kitchen counter. We were out of town most of the weekend, and Jason has been working long hours...or at least those are the excuses that I tell myself when I start feeling bad for not cooking any of them yet:) Another reason I haven't cooked them is because it has been so hot here lately and sweet potatoes just seem like a cold weather kind of food to me. 

Luckily our temps dropped almost 40 degrees overnight on Tuesday and Jason is supposed to have normal work hours for the rest of  the week...so no more excuses! I will make something with {at least a few of} my sweet potatoes, I'm just not sure what!?!

Do you have any great sweet potato recipes that your family loves? Please share them with me! I'm hoping to try out a few different recipes and blog about them next week.

Pin It!

Tuesday, October 18, 2011

Jack O Lantern Waffles

What's more fun than colorful waffles? Colorful waffles that smile back at you of course! If you've been around my blog long you know that I have quite an obsession with FUN waffles, and today I'm sharing my newest fall waffle creation: 
To make these smiling waffles, all you need is a waffle mix of you choice, orange food coloring, and mini chocolate chips.
After you mix the batter according to the package directions, add a pretty good amount of orange food coloring {I always use Wilton gels because they make the color a lot more vibrant than liquid food coloring}.
Stir in the food coloring and add more as needed.... You want to make sure your jack o' lantern is a vibrant orange, not a pastel color.
After your batter is mixed up and you've got the perfect shade of orange, get your mini chocolate chips ready. I found it was easiest to pour them in a small bowl. That way I could scoop them up with a spoon and add them to my waffle batter quickly.
Pour the orange waffle batter onto your greased and heated waffle iron. Using a spoon {it gives you a little more control of the those crazy mini chips}, add the mini chocolate chips onto your waffle in the pattern of a jack o' lantern....eyes, nose, and big smiling mouth.
When your jack o' lantern waffle comes out of the waffle iron, it will be smiling back at you!
I had three hungry boys waiting for waffles so I didn't have a ton of time to decorate these after they came off the waffle iron, but you could add some green gummies to the top of the waffle as a stem and leaves to make them even more fun!

Pin It!

Friday, October 7, 2011

Friday Flashback: Food Edition

PUMPKIN JIGGLERS
**It's another Flashback Post! This is a fun recipe that I shared last year. We are definitely going to be making these again this year because they were a huge hit with my boys! Enjoy**


Jello Jigglers
& pumpkin cookie cutters
 make SUPER easy
and SUPER fun
fall treats
for everyone to eat!

What kind of fun Halloween/fall snacks have you been making?!?
Pin It!
Related Posts Plugin for WordPress, Blogger...